In This Guide:
Related Guides:
Contracting
eContracting from a Credit Application
What does it mean to start an eContract from a Credit Application?
Starting an eContract from a credit application requires that a credit application has already been submitted and approved.
It involves finding an approved credit application in the system, and then generating a Contract Worksheet.
Information from the credit application will automatically be populated in the Contract Worksheet, saving time and reducing re-keying errors.
How do I start an eContract from a Credit Application?
From the ‘Deals’ navigation tab, select ‘Deal Manager’ from the dropdown menu.
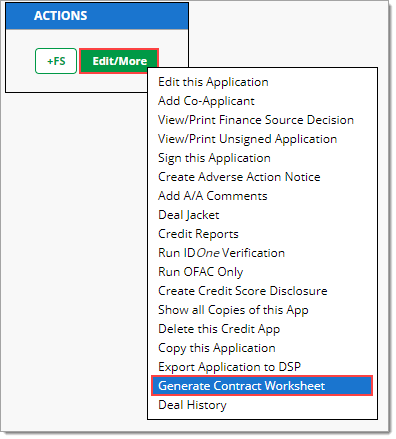
You will be directed to a list of credit applications. Once you find the approved credit application you would like to generate an eContract for, click the ‘Edit/More’ button, and select ‘Generate Contract Worksheet’ from the dropdown list.
- If you are working in the ‘Decision Summary’ page of a credit application, you can also click ‘Generate Contract Worksheet’ to begin the eContracting process. The ‘Decision Summary’ page is accessed by clicking on the credit application from the ‘Deal Manager’ page.
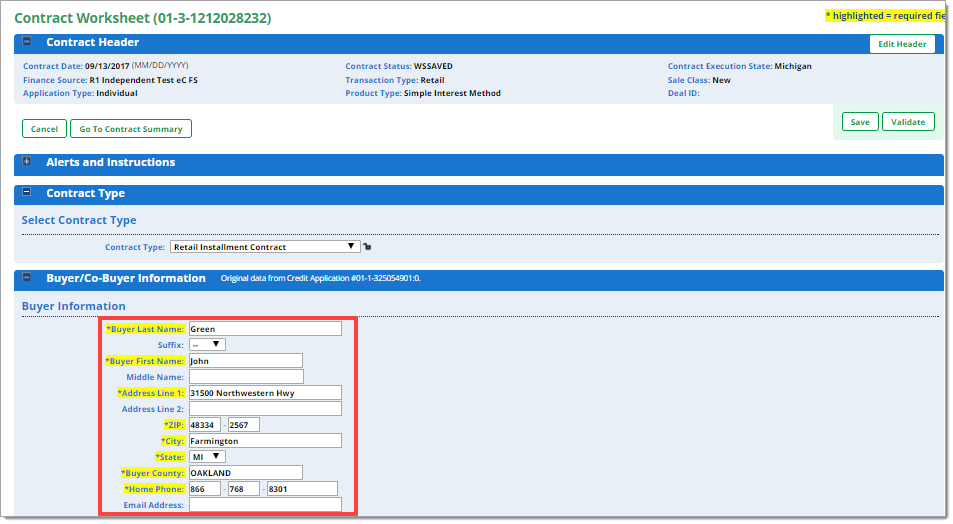
After selecting ‘Generate Contract Worksheet,’ you will be directed to the ‘Contract Worksheet’ page to begin the eContracting process.

Scroll through and complete the required fields in the Contract Worksheet. Note that the required fields will vary depending on the finance source you use.
Available information (Contract Header, Buyer, Vehicle, etc.) is automatically populated from the credit application.
Once you have completed all the necessary fields of the Contract Worksheet, you will have several options for proceeding. The following buttons appear in the bottom right and top right corners of the page:
Save
You can ‘Save’ the worksheet to complete it later.
Validate
This button will only be displayed if the finance source you are using supports validation. Validation checks the information in the worksheet by sending the contract details to the finance source for review, before the contract is signed by the customer, reducing the risk of held offerings.
More information on validation can be found here.
Generate Contract
If validation is not required, this button displays immediately. If validation is required, this button appears after validation is successful. This button generates the ‘Contract Package’ page, which is the next step in the eContracting process.
Once you click the ‘Generate Contract’ button, you will be directed to the ‘Contract Package’ page. If the contract does not generate immediately, wait 10 seconds, and click the ‘Update Contract Package’ button on the right side of the page to refresh the page contents.
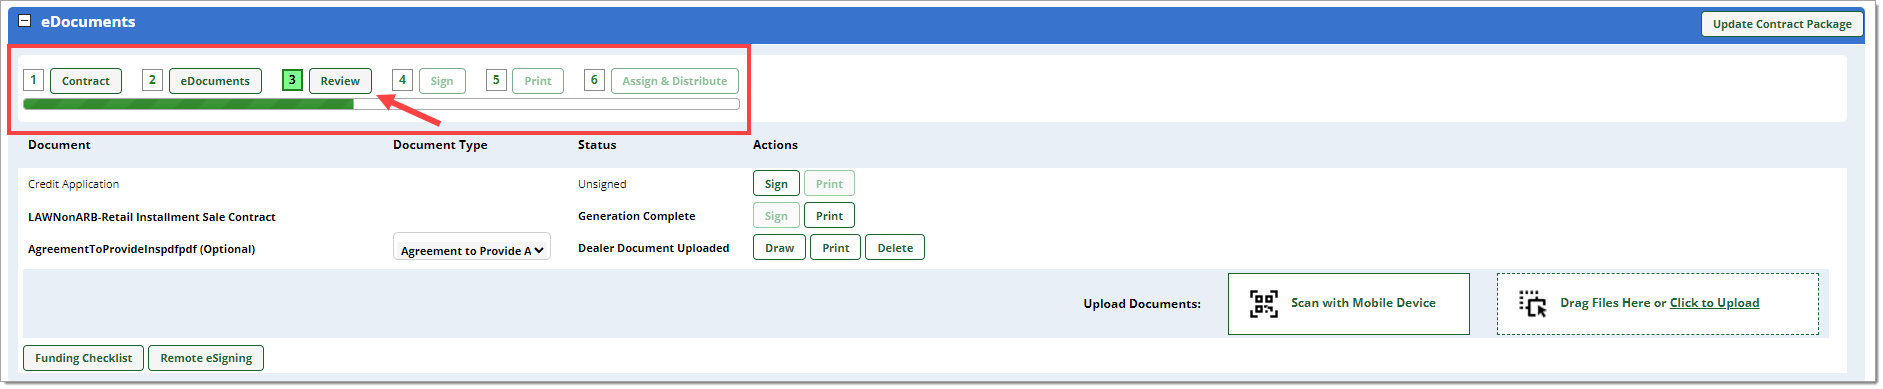
On the ‘Contract Package’ page, the green tracker status in the ‘eDocuments’ section shows where you are in the process of completing the deal. Clicking on each step will progress you through the eContracting process.
If the contract does not automatically advance to the next step of the eContracting process, click the ‘Update Contract Package’ button or refresh your browser to manually advance.
The Six eContracting steps
1. ‘Contract’
You already completed this step when you filled out the Contract Worksheet. Clicking this button returns you to the Contract Worksheet page. If you need to edit the contract, click the ‘edit contract’ button in the Contract Worksheet.
If you edit the contract after generating the eDocuments or applying the eSignatures, those items will be deleted and those steps will need to be redone.
2. ‘eDocuments’
Depending on the parameters of the deal, there may be optional ancillary documents available that can be included in the eContracting signing process. You can click the ‘eDocuments’ step to see what documents are available, and generate them if needed.
You also have the option of uploading documents to RouteOne and defining signature areas for your customers so their signatures can be collected electronically on those documents. More information on RouteOne’s eSign Anything® functionality can be found here.
3. ‘Review’
This step is for generating a review copy of the eContract and the ancillary documents for the deal, and printing a copy for the customer to review before signing.
Important: It is required by law that the dealer provide a review copy to the customer (as well as a signed copy, once that step is completed).
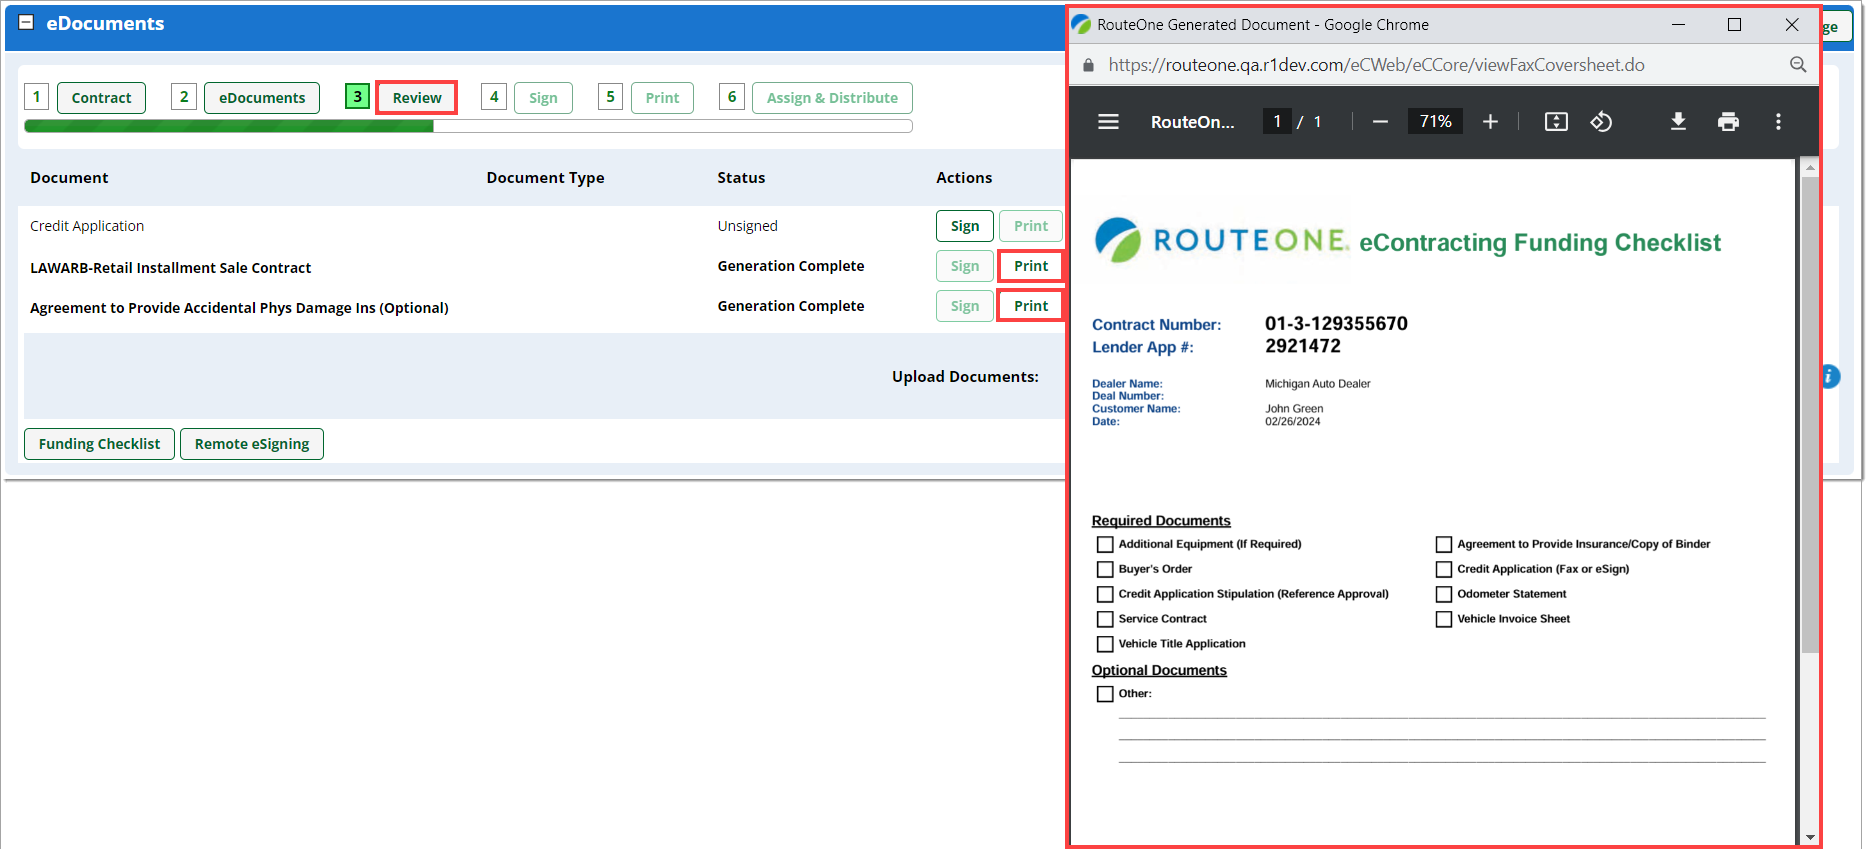
There are two ways to complete the ‘Review’ step:
Option 1:
Clicking the ‘Review’ button will generate review copies of all the documents, which can then be printed.
Option 2:
Alternatively, each individual document can be printed by clicking the ‘Print’ button next to each file in the ‘Documents’ list.
Clicking on the ‘I want to type my signature’ hyperlink will open a new browser tab and automatically log you in to the eSign app and take you to the contract you are working on. The signature method (Type, Draw, or Type and Draw) you selected in your Dealership Preferences will be overridden for that deal and that customer, and your customer will be able to choose whether they want to type or draw their signature.
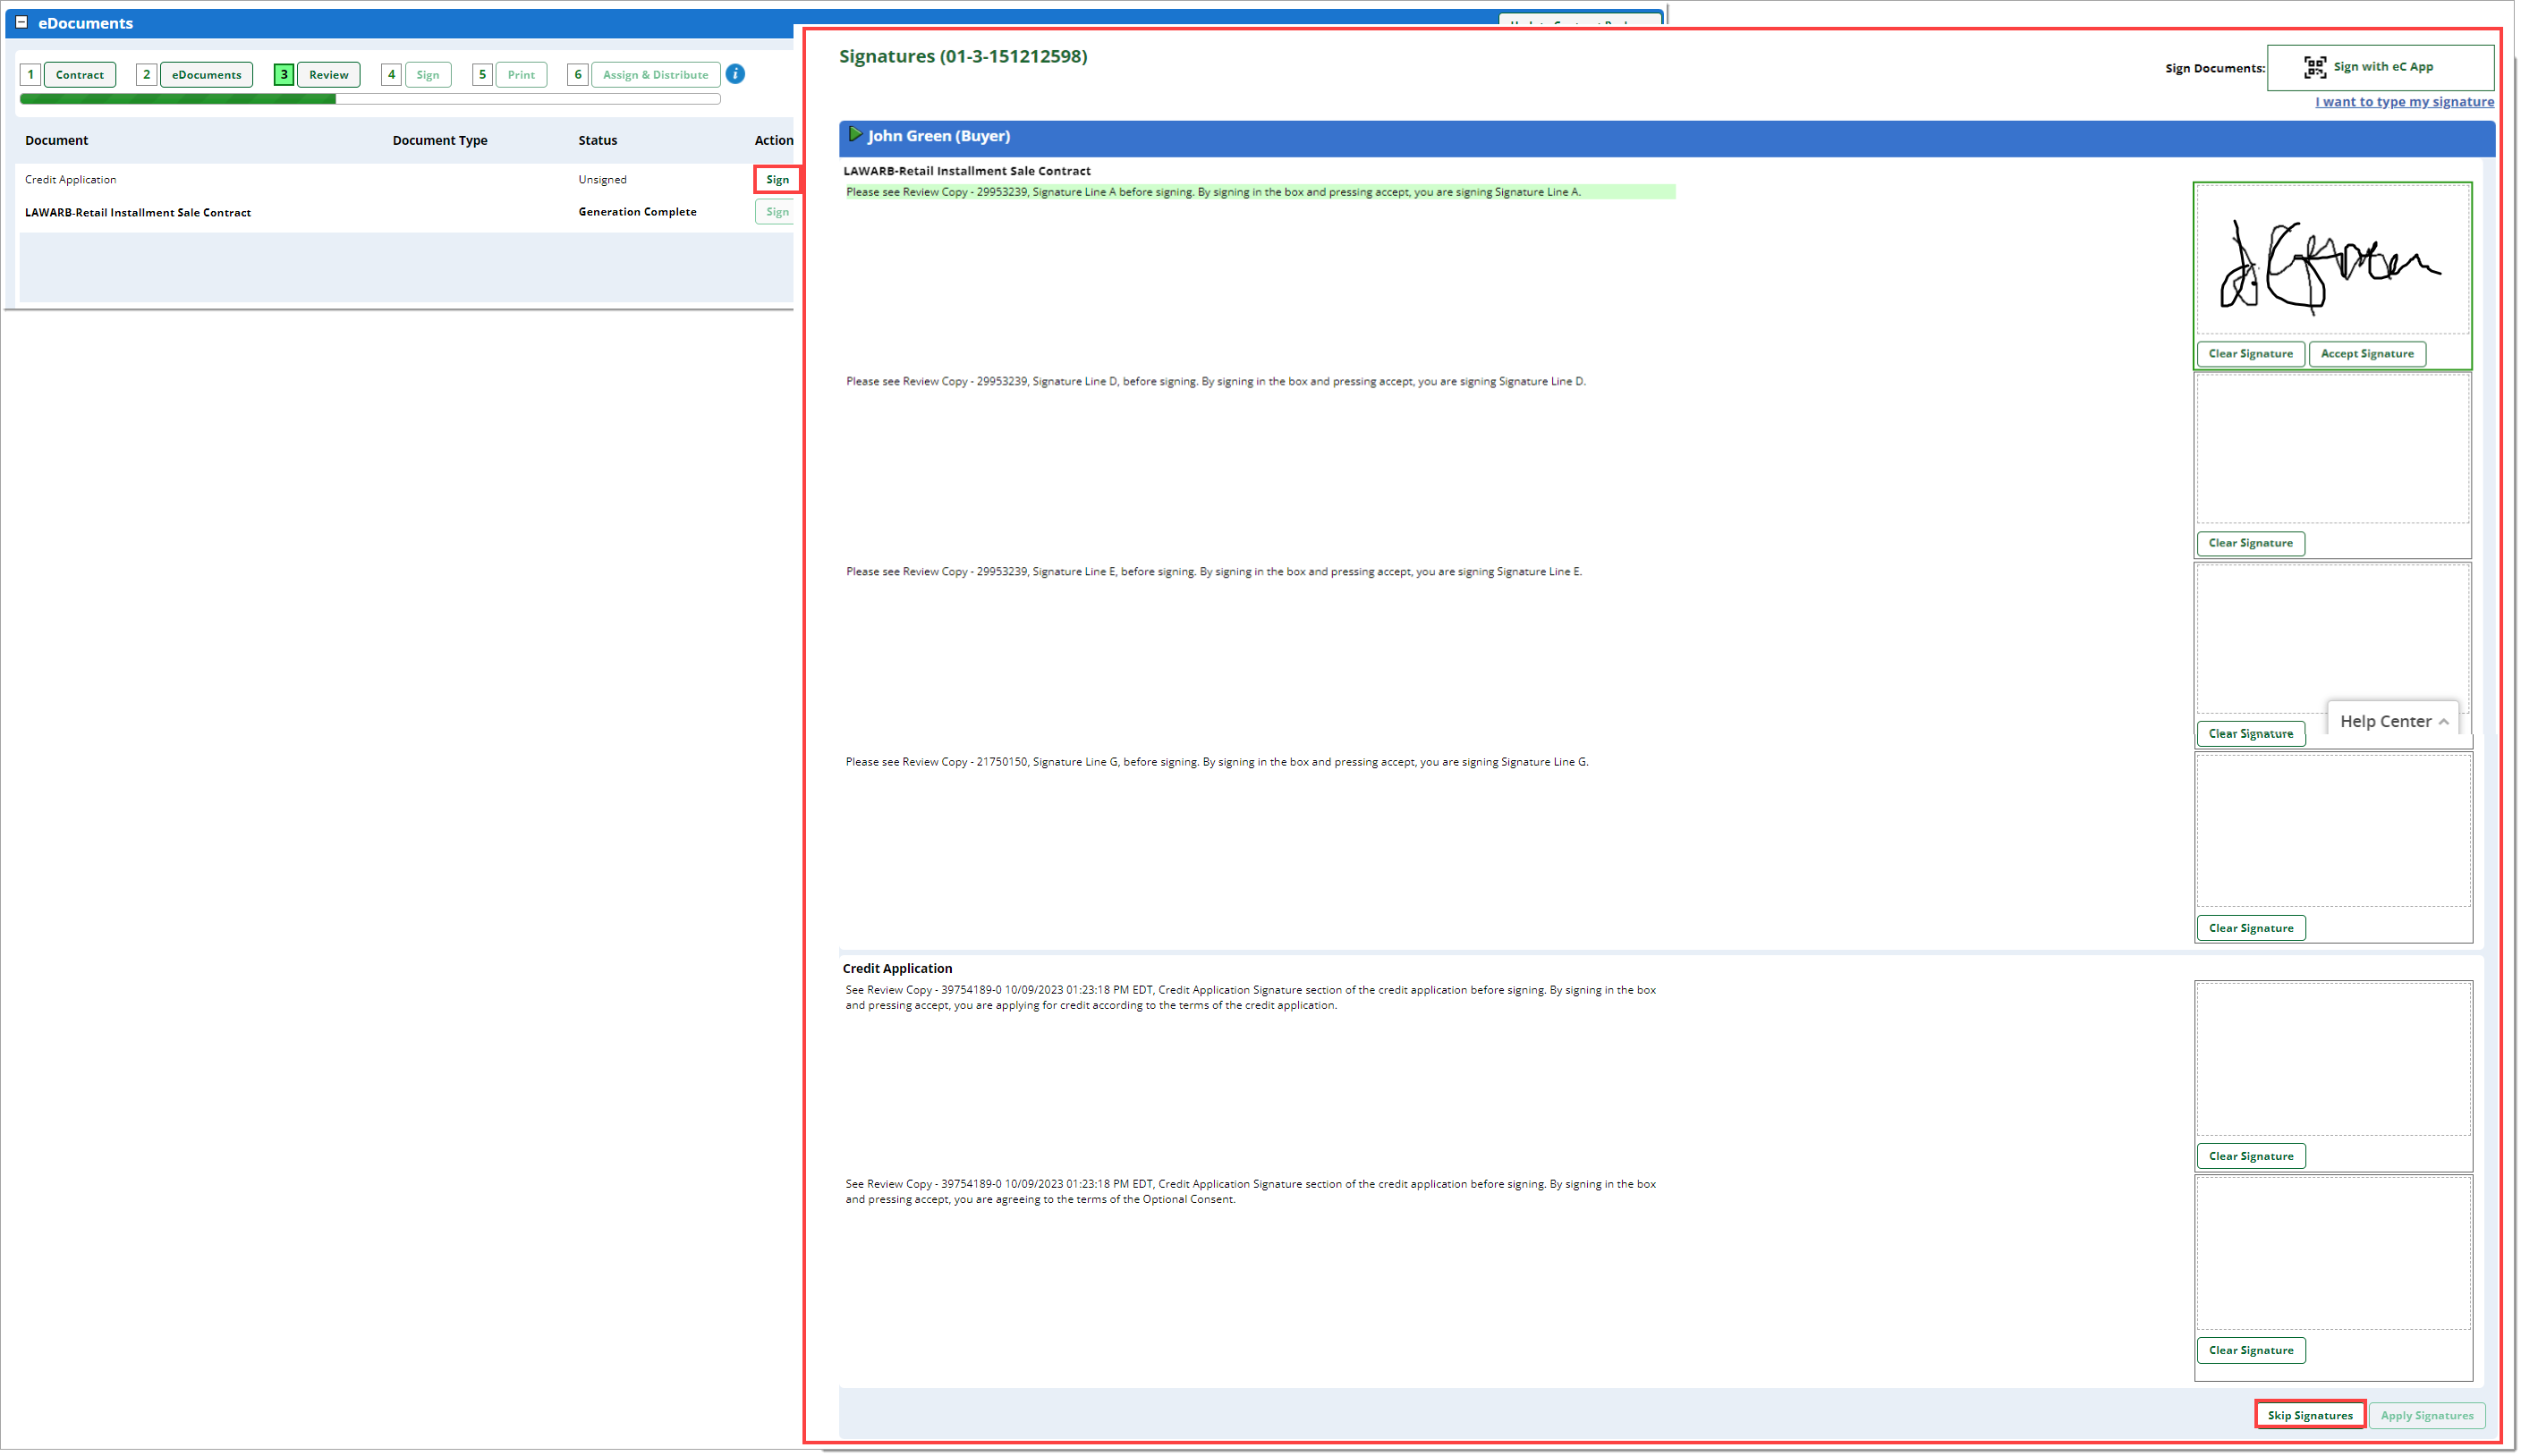
4. ‘Sign’
This step is for collecting signatures from the customer and dealer. More information about In-Store eSigning can be found here.
Click the ‘Sign’ button to launch the contract’s ‘Signature’ page.
Have the customer sign within each signature box and click ‘Apply Signatures.’ Ensure that all signatures are visible within the signature boxes.
- If the credit application is unsigned at this point, there will be a signature box to sign the credit application.
- If there is a Co-Signer, they must first sign the ‘Notice to Co-Signer’ document before signing the contract.
If needed, you can skip the customer’s signature by clicking the ‘Skip Signatures’ button. This will send you to the dealer’s signature section, where you will sign and apply the signatures as normal. When you are ready to collect the customer’s signatures, click the ‘Sign’ step on the Contract Package page. This will open up the customer signature section again.
Important:
At least one set of completed buyer signatures must be applied by the end of the day or you will have to regenerate the contract.
A co-buyer has a 7 day window to sign the contract before you will have to regenerate the contract.
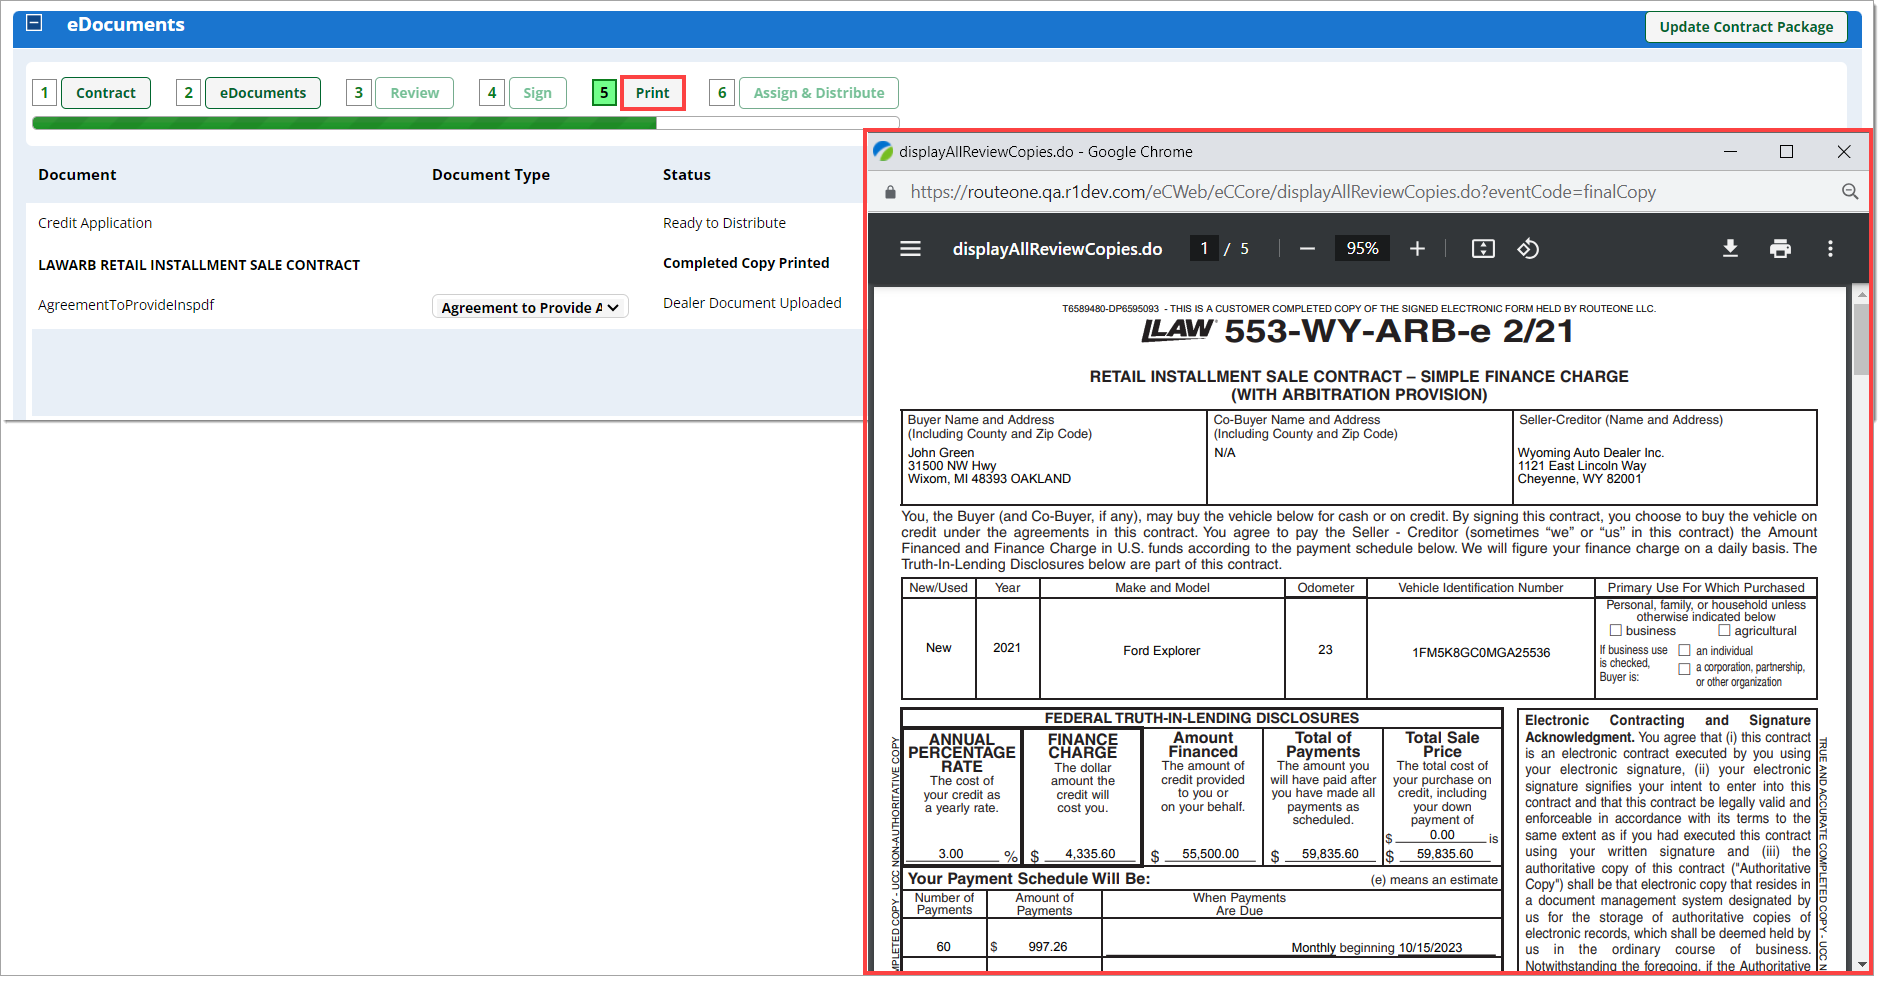
5. ‘Print’
Clicking this button launches the signed and completed copies of the contract and any ancillary documents for the deal.
Important: It is required by law that signed copies are printed for the customer, and also retained by the dealer.
6. ‘Assign and Distribute’
This step allows you to assign and distribute the contract.
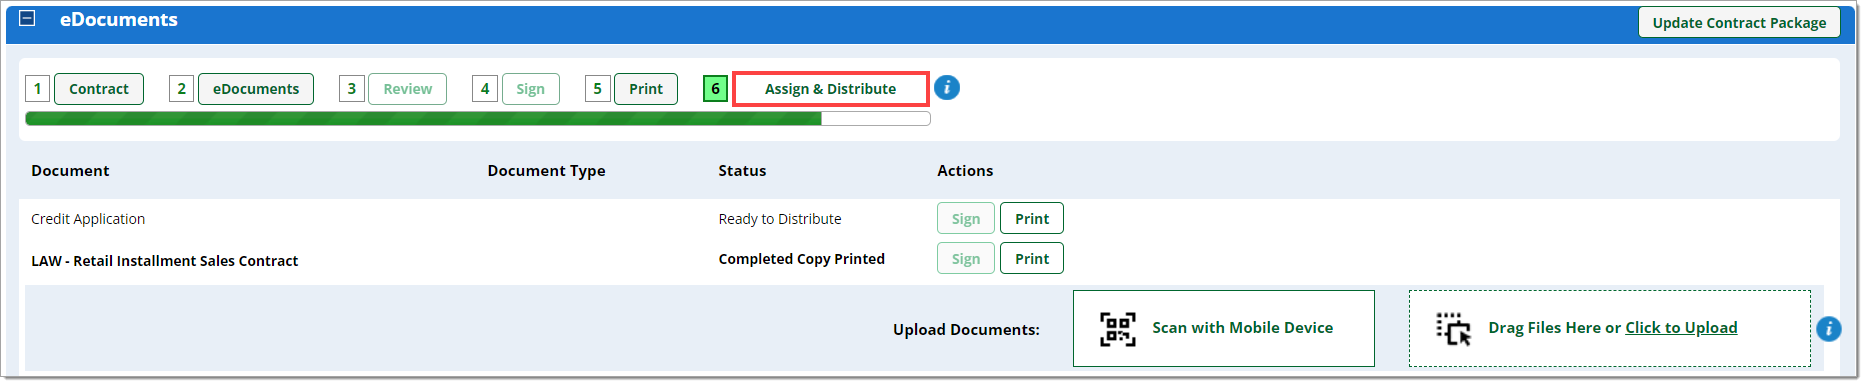
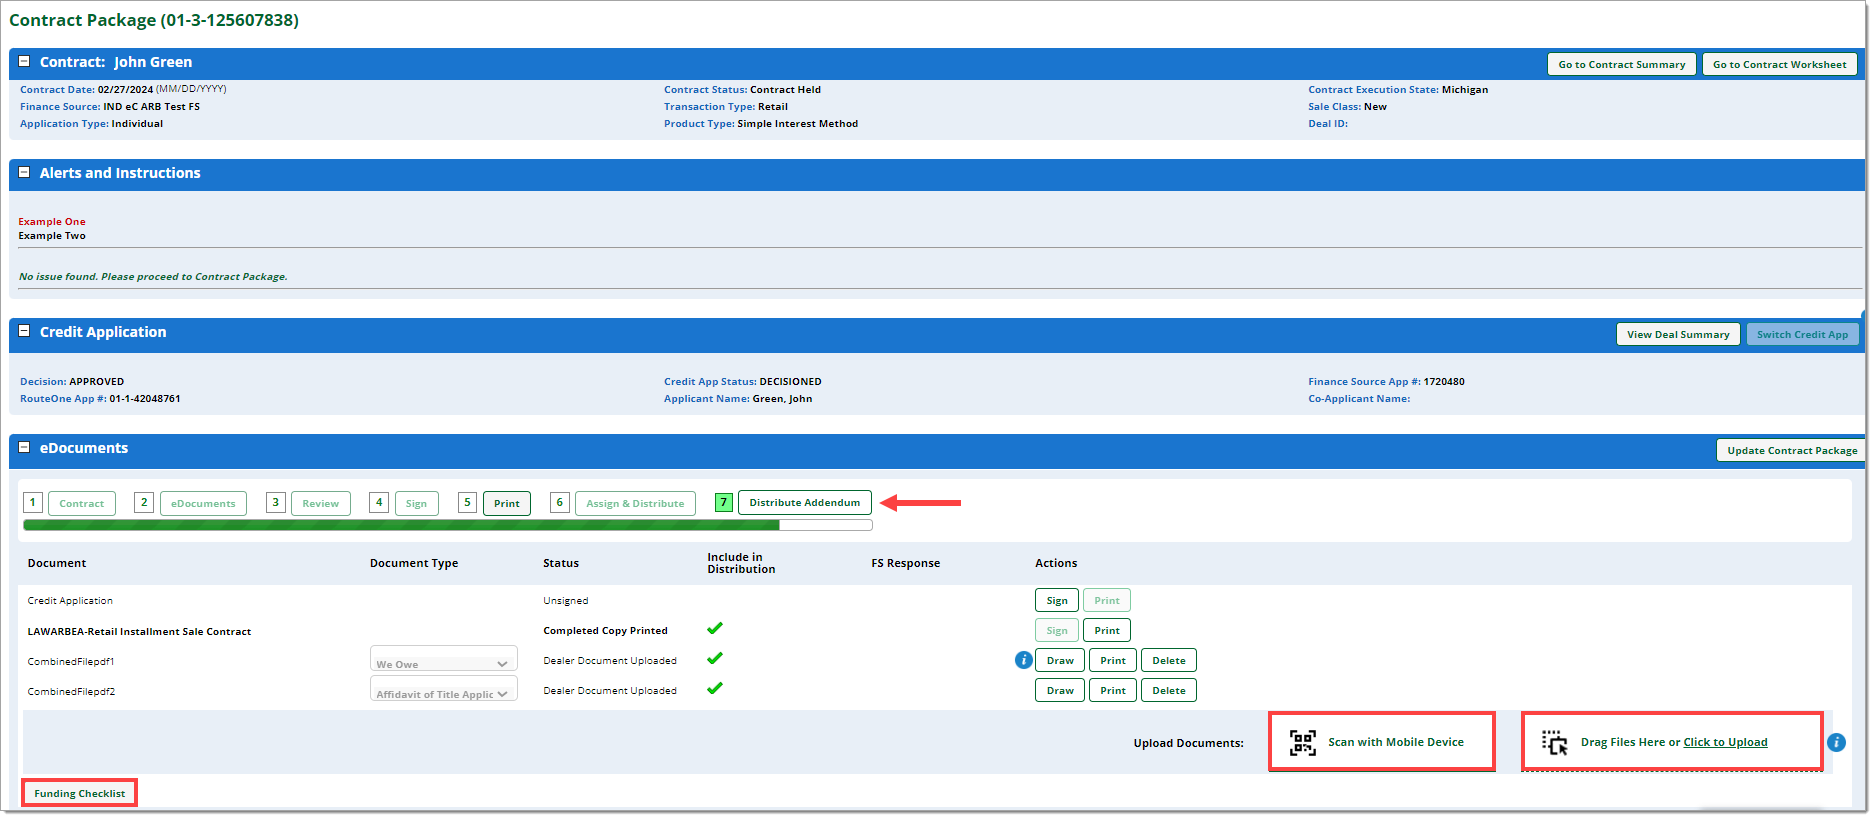
If additional documentation is required by the finance source, dealers have the option of uploading the documents into the RouteOne application using RouteOne’s Mobile Document Capture (MDC), dragging and dropping files from the desktop to the eDocuments section, or clicking to browse for files on the PC.
For more information on using RouteOne's Mobile Document Capture (MDC), view the guide here.
Uploading Documents
The ‘Drag Files Here or Click to Upload’ button, if available, is used to upload PDF files into RouteOne to include in the funding package. Dealers can only upload documents to the contract package if the contract package is not currently with the finance source.
Some finance sources have enabled automatic document typing/classification. Click here for more information about ‘Automatic Document Typing/Classification in eContracting.’
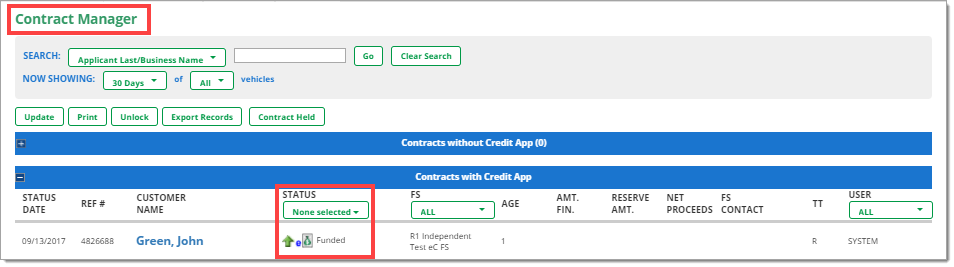
Once you have assigned and distributed the contract, you can check its status in the ‘Contract Manager’ page, which can be accessed from the ‘Deals’ dropdown menu in the navigation tab. More information about contract statuses can be found here.
Possible Actions for ‘Held’ and ‘Rejected’ eContracts
Once you have assigned and distributed the contract, you can check its status in the ‘Contract Manager’ page, which can be accessed from the ‘Deals’ dropdown menu in the top navigation tab.
‘Held’ eContracts: Only Upload Missing Ancillary Documents
Important:
For ‘Held’ eContracts, you can only upload the missing ancillary documents and then send the addendum.
You cannot edit or delete the eContract, apply signatures, or change the finance source.
When a contract is in ‘Held’ status, that means the finance source has paused the processing of the contract and is generally waiting for additional supporting information. This is why the only action you can take for a contract with a ‘Held’ status is to upload missing ancillary documents.
Click the customer name to navigate to their ‘Contract Package' page.
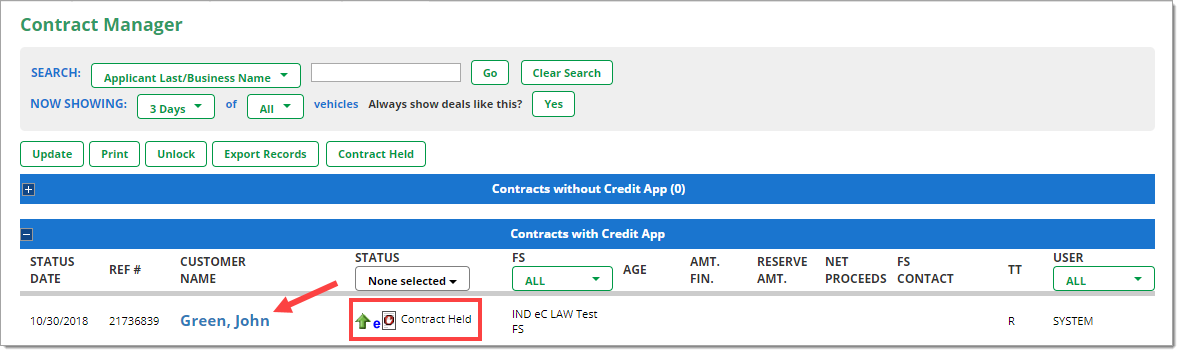
In the ‘Contract Package Page,’ complete the steps for uploading the ancillary documents. Then click ‘Distribute Addendum.’
‘Rejected’ eContracts: All eContracting Actions Possible
Delete the eContract
From the ‘Contract Manager’ page, click the customer name to navigate to their ‘Contract Package’ page.
From the ‘Contract Package’ page, click ‘Go to Contract Summary,’ then click the ‘Delete Contract Record’ button.
More information on deleting the contract
Edit the Contract Worksheet
From the ‘Contract Manager’ page, click the customer name to navigate to their ‘Contract Package’ page.
From the ‘Contract Package’ page, click ‘Go to Contract Worksheet,’ then click the ‘Edit Contract’ button.
The contract will need to be re-signed, and if applicable, re-validated.
Resubmit the eContract
From the ‘Contract Manager’ page, click the customer name to navigate to their ‘Contract Package’ page.
If the Credit Application has an ‘Approved’ status, you can resend the eContract (by clicking on the ‘Assign & Distribute’ step).
If the Credit Application has an ‘CPREJECT’ status, you can only resend the eContract if the lender allows resubmission of rejected contracts.
If you need to upload additional documents:
- From the ‘Contract Manager’ page, click the customer name to navigate to their ‘Contract Package’ page.
- On the ‘Contract Package’ page, complete the steps for uploading the ancillary documents.
The contract can be resubmitted as-is, or as revised if edits have been made to the Contract Worksheet.
Other eContracting Workflows
ROUTEONE SUPPORT
Hours (EST)
Monday - Friday: 6:00am – Midnight
Saturday: 9am – 9pm
Can’t find what you need?
Try our search
