In This Guide:
Related Guides:
Contracting
Mobile Document Capture
About Mobile Document Capture
The Mobile Document Capture application can be used to capture documents from your mobile device for your credit decision stipulations or for capturing and appending documents for your contract packages.
Important: Not all finance sources support Mobile Document Capture. This functionality will only be available if your selected finance source supports document uploads in eContracting.
Installing the Mobile Application
To install the RouteOne Mobile Document Capture application, please visit the app store for your device.
For Apple iOS users For Android users
Accessing Mobile Document Capture
Accessing Mobile Document Capture for Stipulations
In order to capture documents using the mobile application, begin by navigating to the ‘Decision Summary’ page from Deal Manager or Desktop, by clicking on a decision status for the applicable customer.

On the ‘Decision Summary’ page, scroll down to the ‘Stipulations’ section.
Click the ‘Display QR Code for Mobile App’ button to access the authentication barcode for the deal.


Accessing Mobile Document Capture for eContracting
In order to capture eContracting documents using the mobile application, begin by navigating to the ‘Contract
Package’ page of the eContract that you would like to upload documents to.
Click the ‘Scan with Mobile Device’ button.
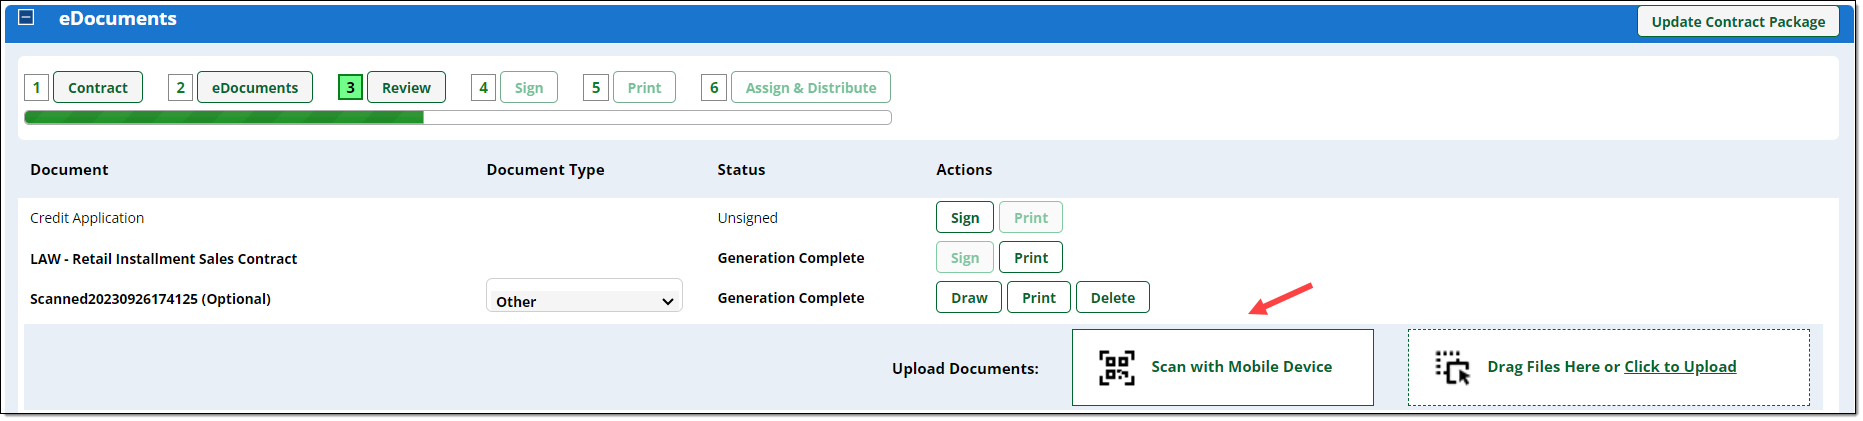
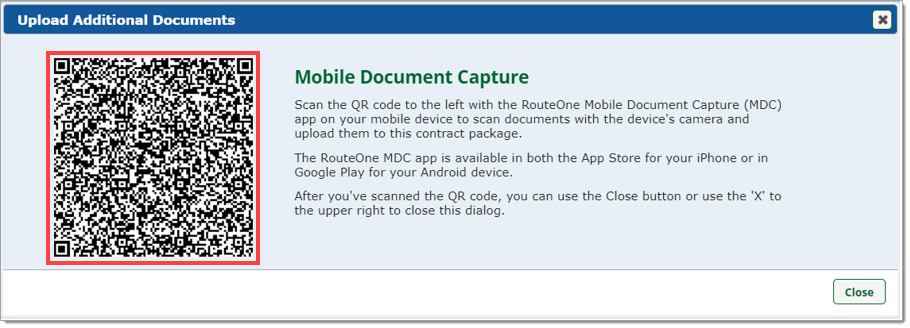
A pop-up window will appear with the authentication barcode for the deal.
Uploading Documents Using Mobile Document Capture
Open the RouteOne Mobile Document Capture application on your mobile device, tap the ‘Scan QR Code’ button and use the device’s camera to take a picture of the QR code.
The first time the RouteOne Mobile Document Capture application attempts to scan a QR code, it will request permission to access the camera on your device.
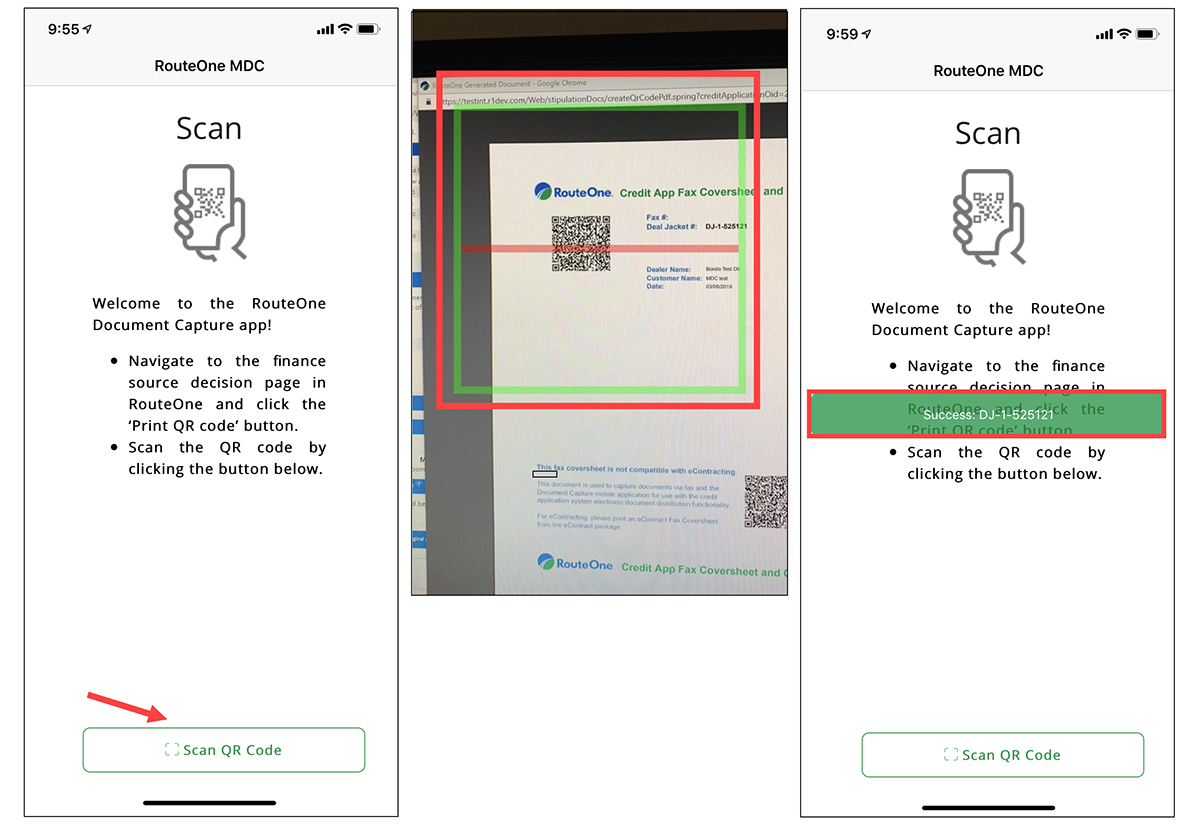
After the QR code is scanned, the mobile application shows the RouteOne Deal Jacket ID that you will be uploading documents to.
Once you are ready to scan a document, tap the ‘Scan Document’ button.

The camera will open, allowing you to capture a picture of the document.
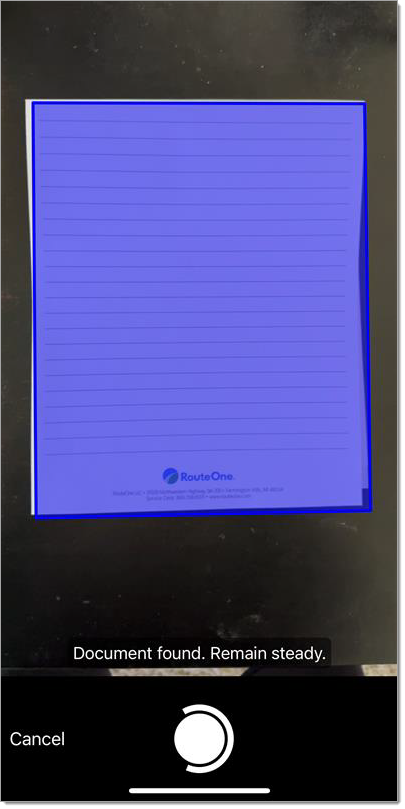
The application will automatically recognize the edges of the document and will highlight the image in blue.
Once the document is properly aligned, hold the camera steady and the camera will capture the document automatically.
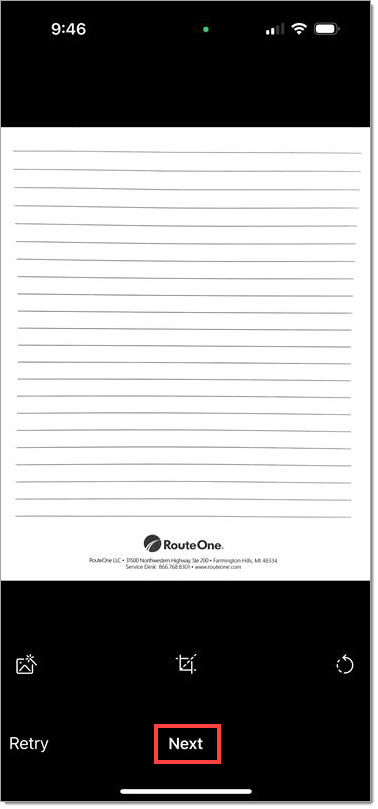
Once the image is captured, you will have the option to retake the image, modify the image, or select next to move onto the next step.
If you need to recapture the image for any reason, you can do so by tapping ‘Retry.’ This will reinitiate the device’s camera to recapture the image.
If you need to modify the image, you can apply a filter, crop, or rotate the image as needed by tapping on the icons at the bottom of the screen.
When you are satisfied with the image, tap ‘Next.’
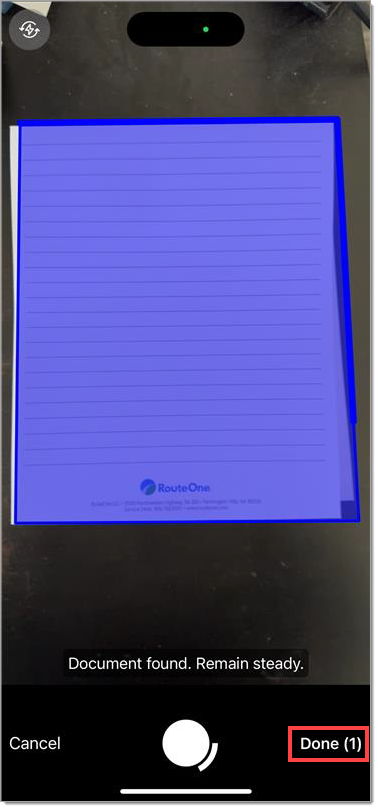
Selecting “Next” will reinitiate the camera to capture another image. If additional images are not needed, tap “Done”.
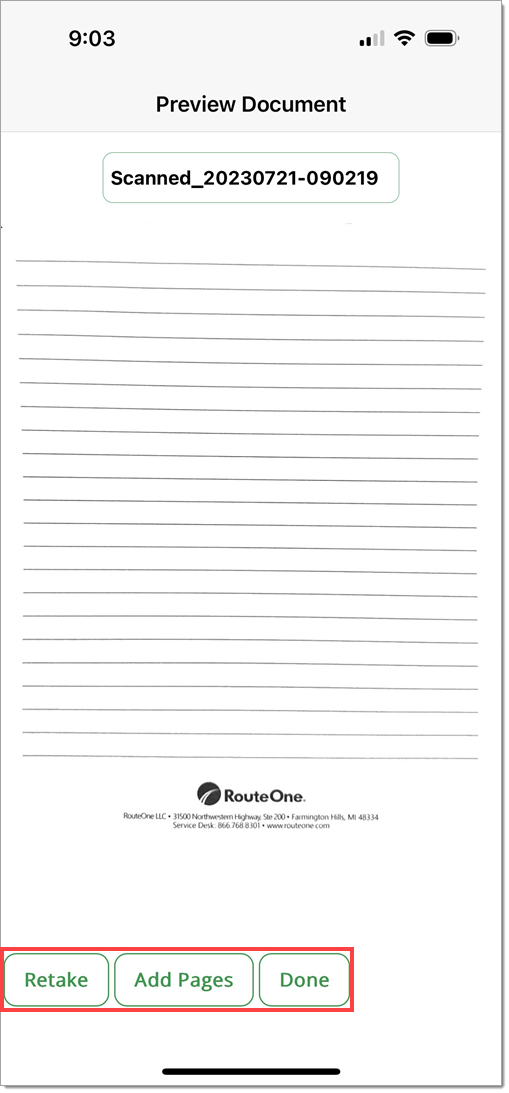
After selecting ‘Done,’ you will be shown a preview of the image, where you can modify the name of the document, retake the image, add additional pages, or select ‘Done.’
If you need to capture additional pages associated with your document, you will repeat the process of capturing and editing an image for each page, until all pages have been added to the document.
Once you are finished adding pages, tap the ‘Done’ button. The document will be finalized.
You will not be able to add more pages to the document, edit the name, or edit the image (e.g. adjust the color or rotate the image) after selecting ‘Done.’
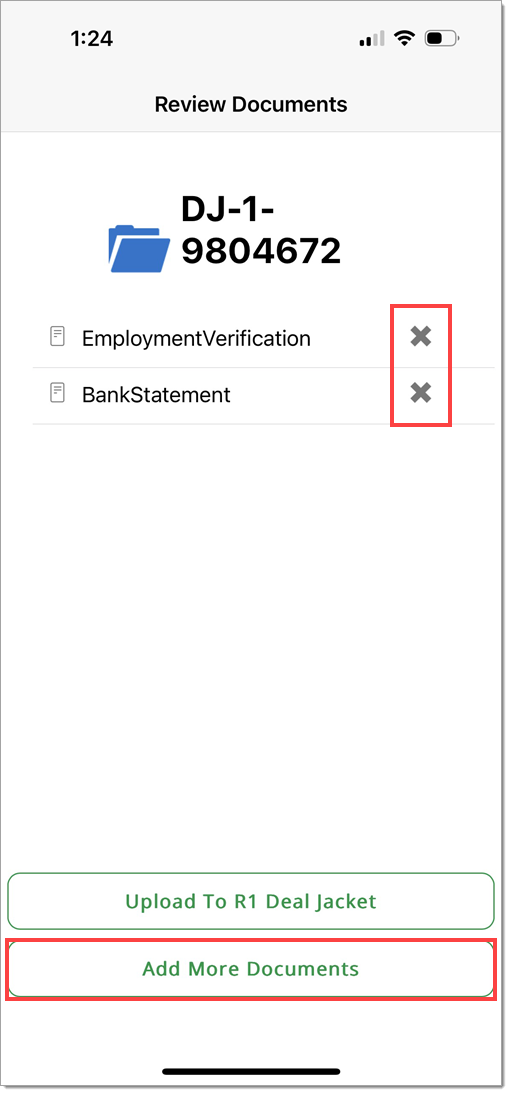
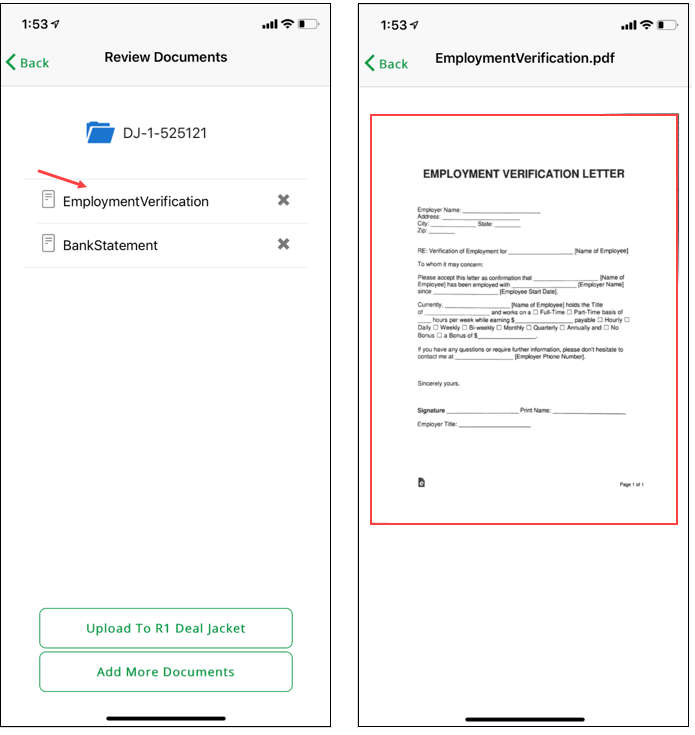
After previewing the document and selecting ‘Done,’ you will be shown a list of the documents you have captured.
If you need to delete a document, tap the corresponding ‘x’ icon next to the document.
If you would like to capture images for another document, tap the ‘Add More Documents’ button.
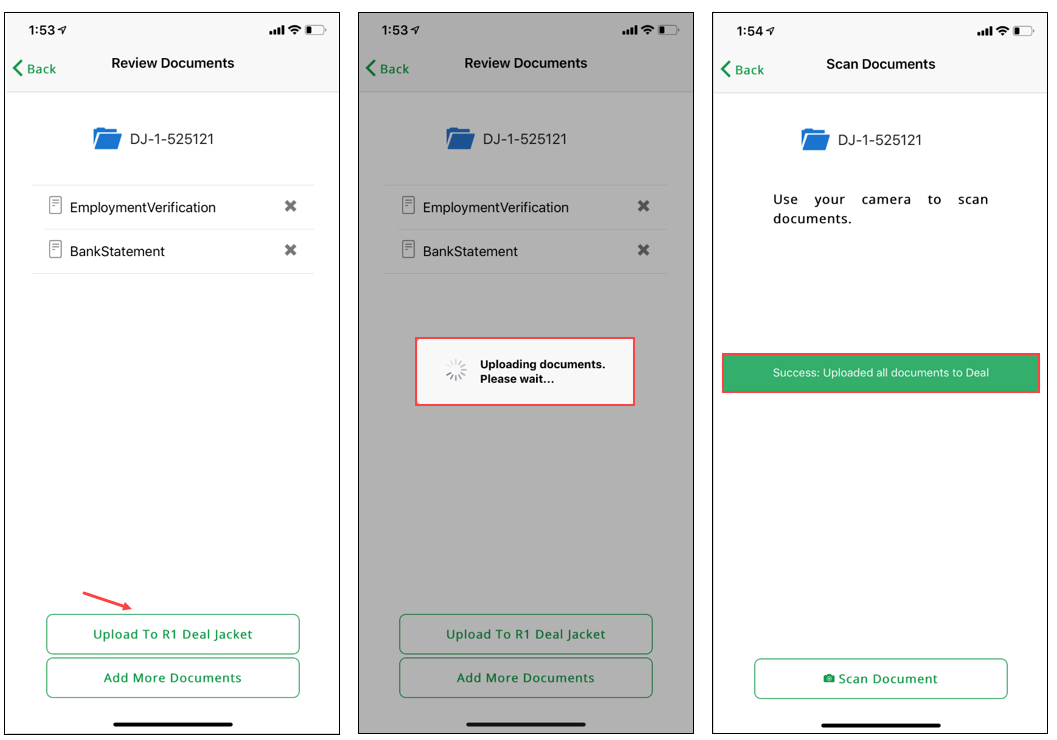
If your documents are ready to upload, tap the ‘Upload to R1 Deal Jacket’ option to upload your documents. Upon successful completion of the document upload, a confirmation message will be displayed inside the RouteOne Mobile Document Capture application.
You can also view a document you’ve captured by tapping on the file name.
Tapping on a document that has multiple pages, will display all of the pages for that document.
Once you are ready to upload the documents to RouteOne, tap the ‘Upload to R1 Deal Jacket’ button.
Adding Uploaded Documents to the Stipulations
After uploading the documents with the mobile application, return to the ‘Decision Summary’ page for that deal in the RouteOne system.
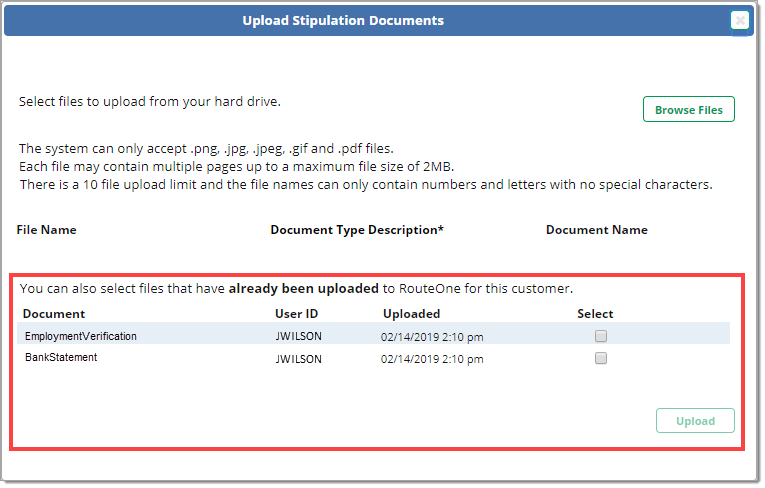
Scroll down to the ‘Stipulations’ section and click the ‘Upload Documents’ button.

The documents uploaded via the mobile application will be available for you to select at the bottom of the upload window.
You can now select the required documents and send them to the finance source using the Stipulation Document Capture functionality.
Learn more about completing the Stipulation Document Capture
Accessing Uploaded eContracting Documents
Accessing Uploaded Documents from the Contract Package
After uploading the documents with the mobile application, return to the ‘Contract Package’ page for that deal in the RouteOne system.
When you selected the credit application to associate the eContract to, the eContract was added to the Deal Jacket. This enabled the Mobile Document Capture functionality to upload the images to the RouteOne Deal Jacket. For more information on how to complete this process within the Deal Jacket, see the section below.
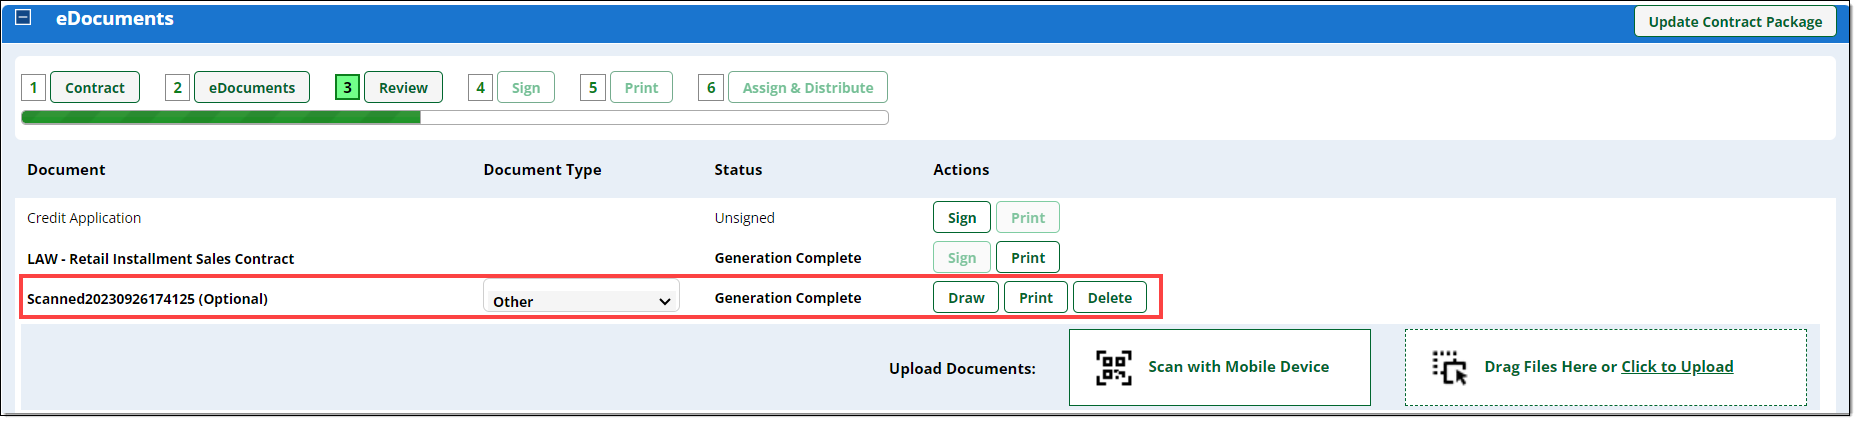
In the ‘eDocuments’ section, review the ‘Documents’ list. eContracting documents uploaded via the Mobile Document Capture application will be listed.
Accessing Uploaded Documents from the Deal Jacket
In order to support the upload of documents into the Contract Package using the Mobile Document Capture application, the eContract is also linked to the RouteOne Deal Jacket.
The Deal Jacket can be accessed from anywhere where the blue ‘Deal Jacket’ icon appears, such as the Deal Manager, Desktop, Decision Summary page, or App Manager.

In an effort to match your in-dealership process, the RouteOne Deal Jacket will only ever have one eContract in it.
If a Deal Jacket contains an eContract, you will not be able to start the generation process for an additional contract as part of the same Deal Jacket.
As a result, associating the eContract to the Deal Jacket will also associate the credit application and all related documents for that particular deal.
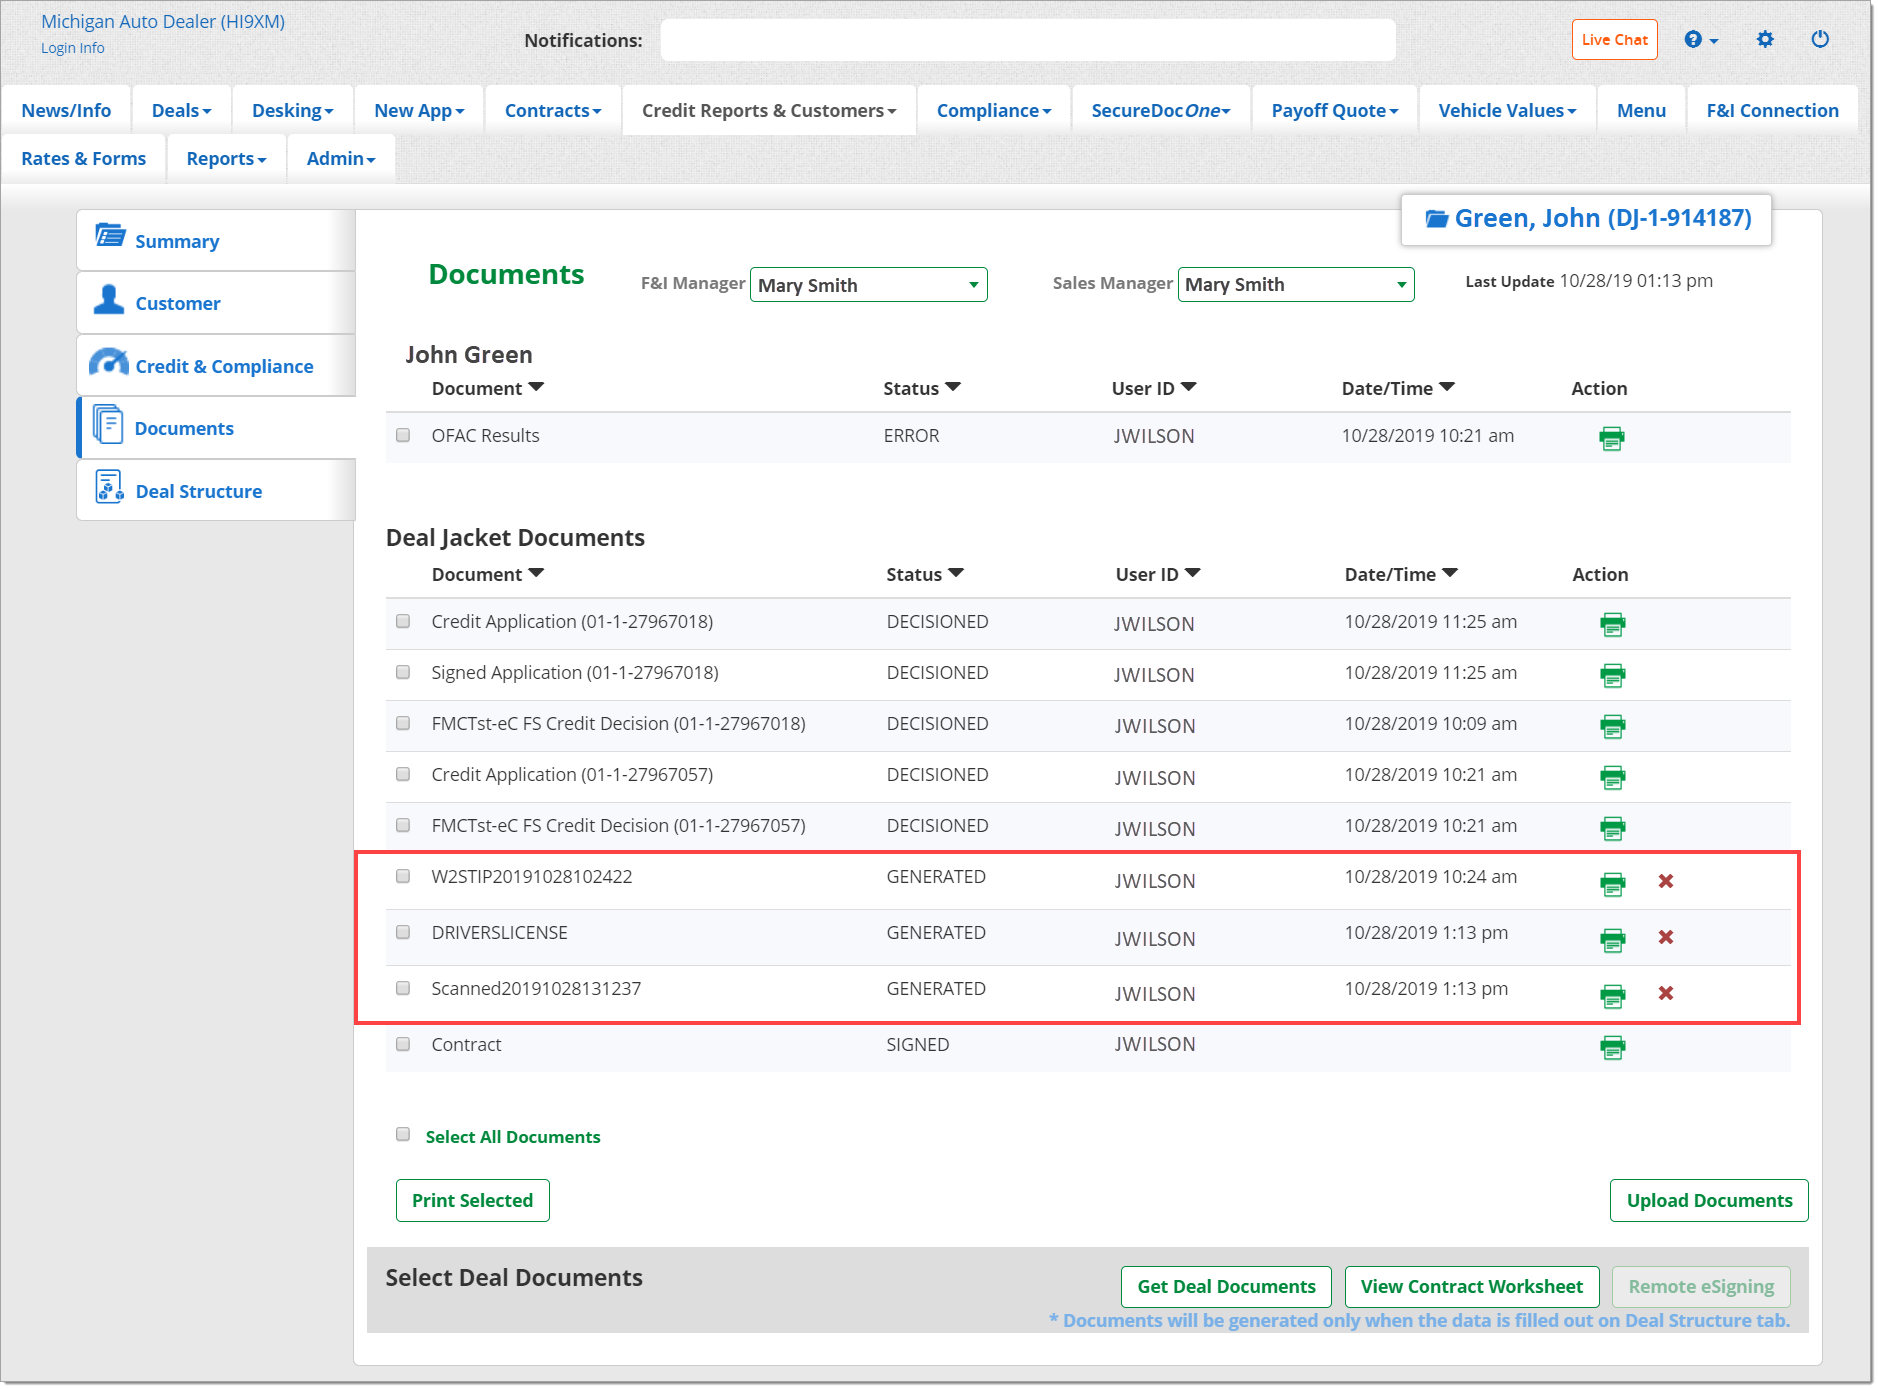
Once the documents have been uploaded to the RouteOne Deal Jacket from the Mobile Document Capture application, you can access them by clicking on the ‘Documents’ side tab within the Deal Jacket.
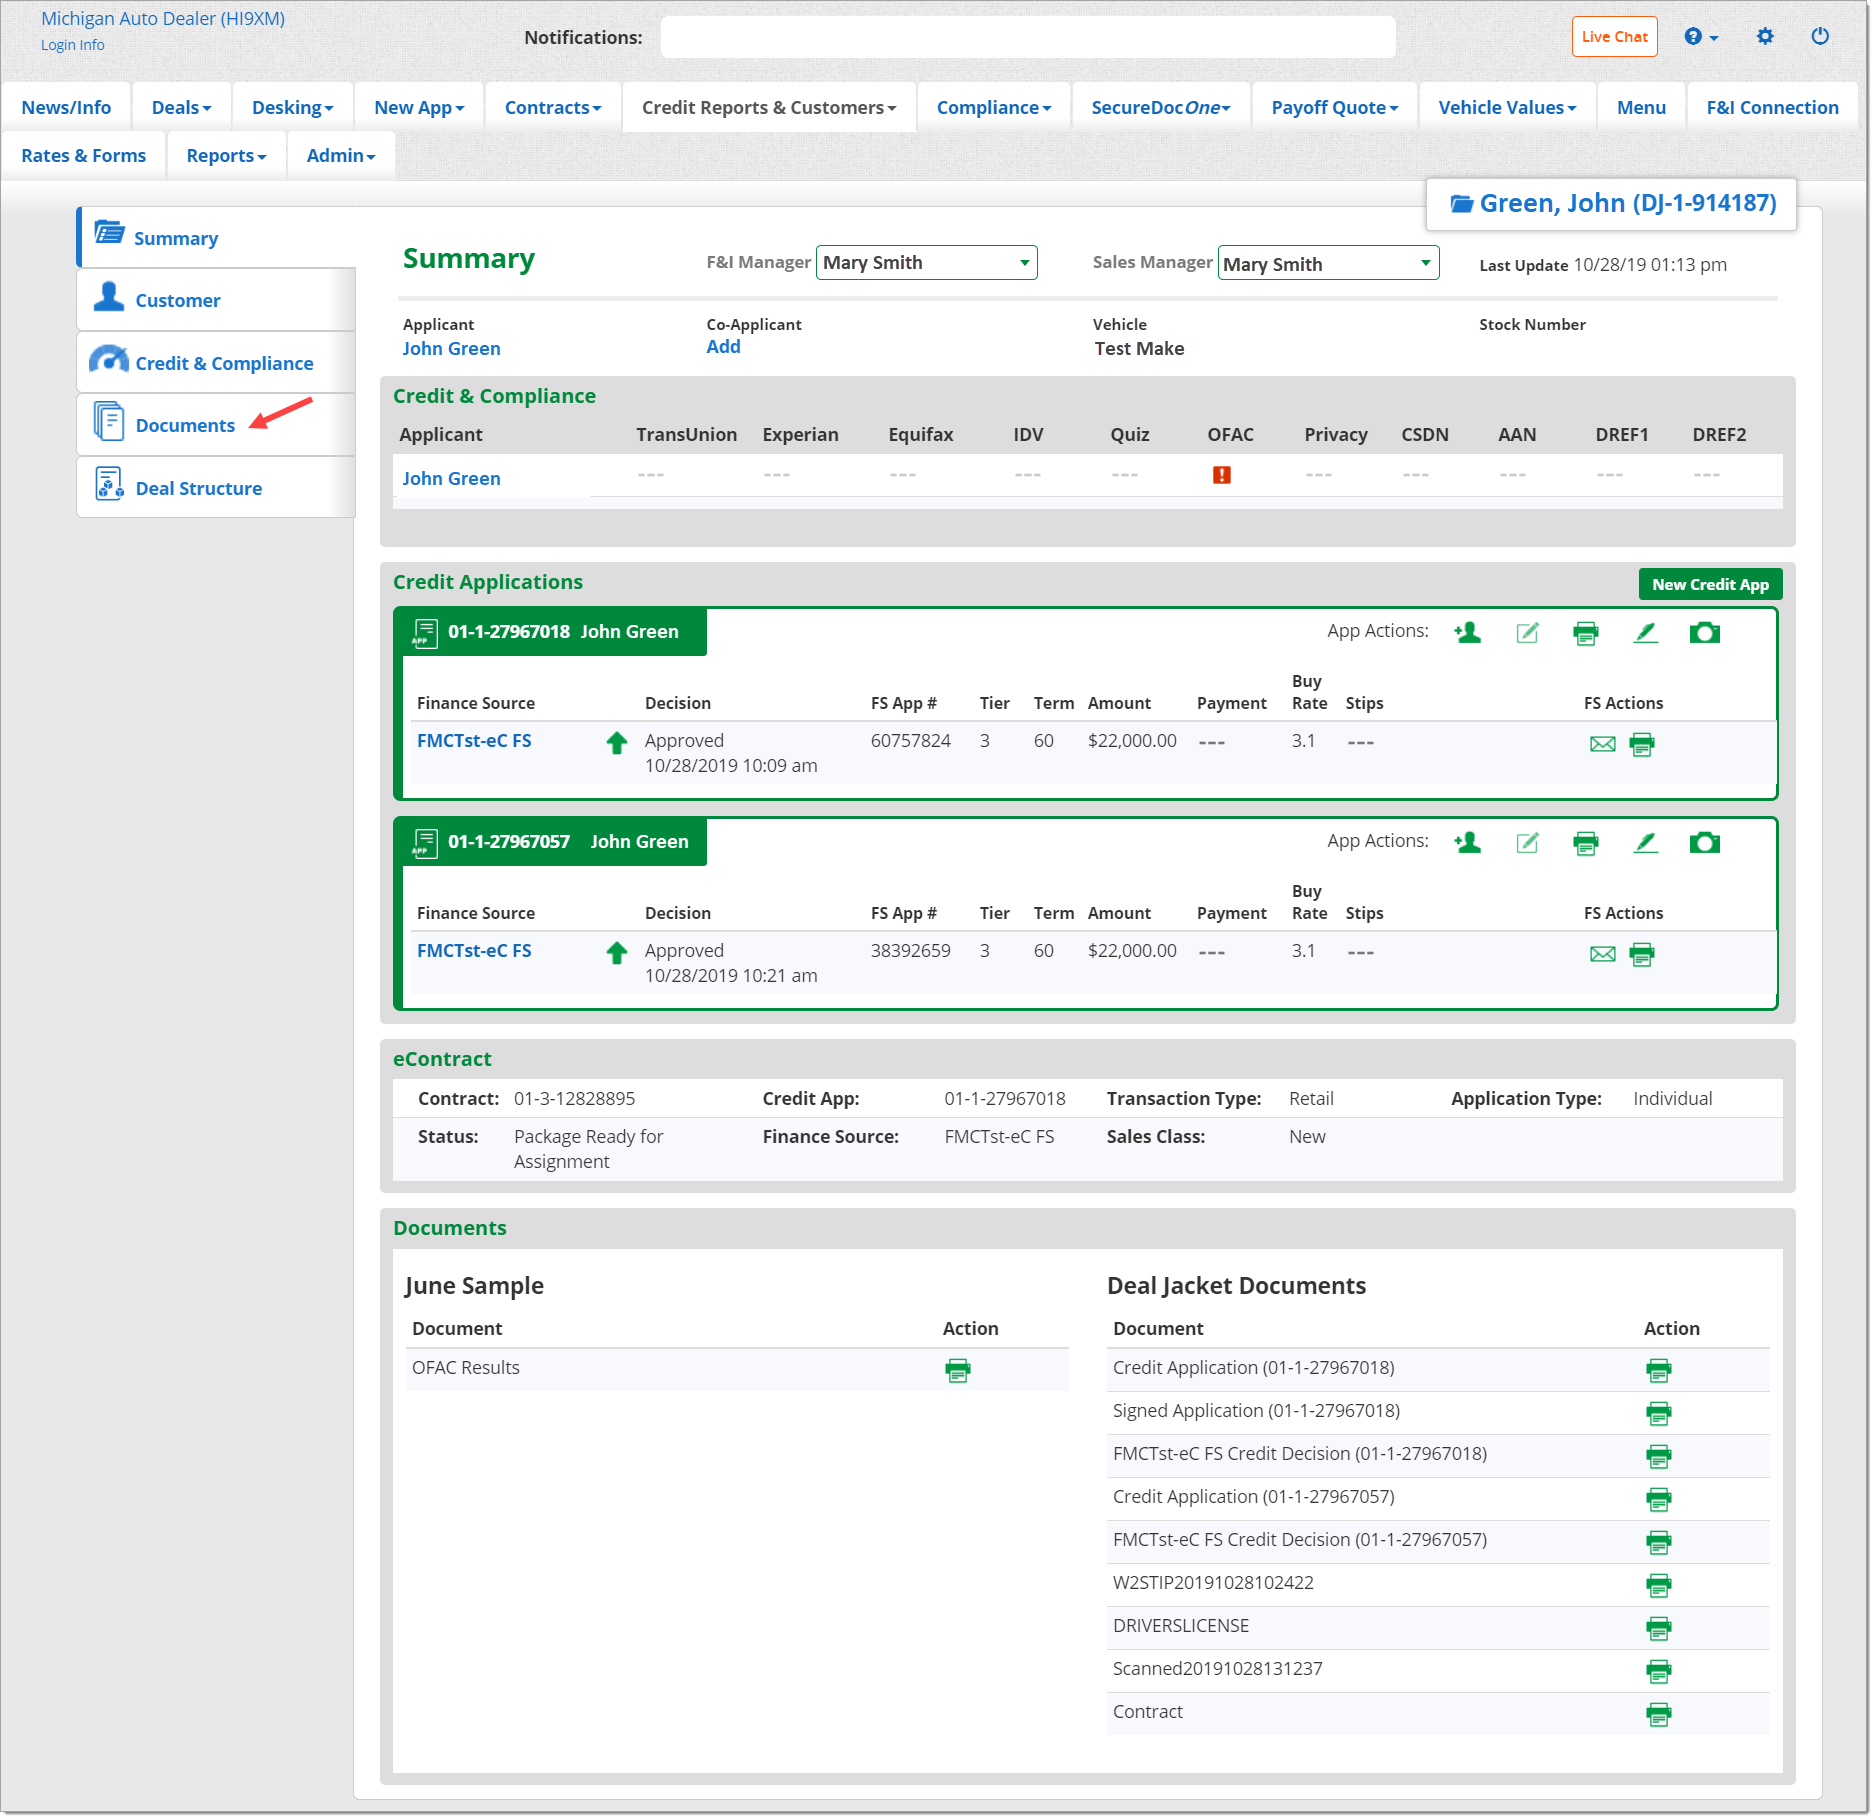
In the ‘Documents’ section, you can see the uploaded documents that have been generated and associated to the Deal Jacket.
If you need to edit a generated contract, these uploaded documents will not be deleted. Once you finish editing the contract and regenerating it, the uploaded documents will automatically be brought back into the Contract Package.
ROUTEONE SUPPORT
Hours (EST)
Monday - Friday: 6:00am – Midnight
Saturday: 9am – 9pm
Can’t find what you need?
Try our search
