In This Guide:
Related Guides:
Credit
The Decision Summary Page
Viewing Decision Details
To review and manage the contract status and decision details, begin by navigating to the ‘Decision Summary’ page from Deal Manager or Desktop, and clicking on a decision status for the customer.


The Decision Summary page shows the Credit Application’s entire history, and any actions or statuses associated with it. All records are retained for reference.
You can see the list of all finance sources the Credit Application was submitted to, and a quick summary of information about the deal.
You can also see the various actions that can be taken for the Credit Application. These buttons link you to many other areas of RouteOne, including adding another Finance Source, linking to eContracting, and printing the Decision Details.
Scroll down to see more information.

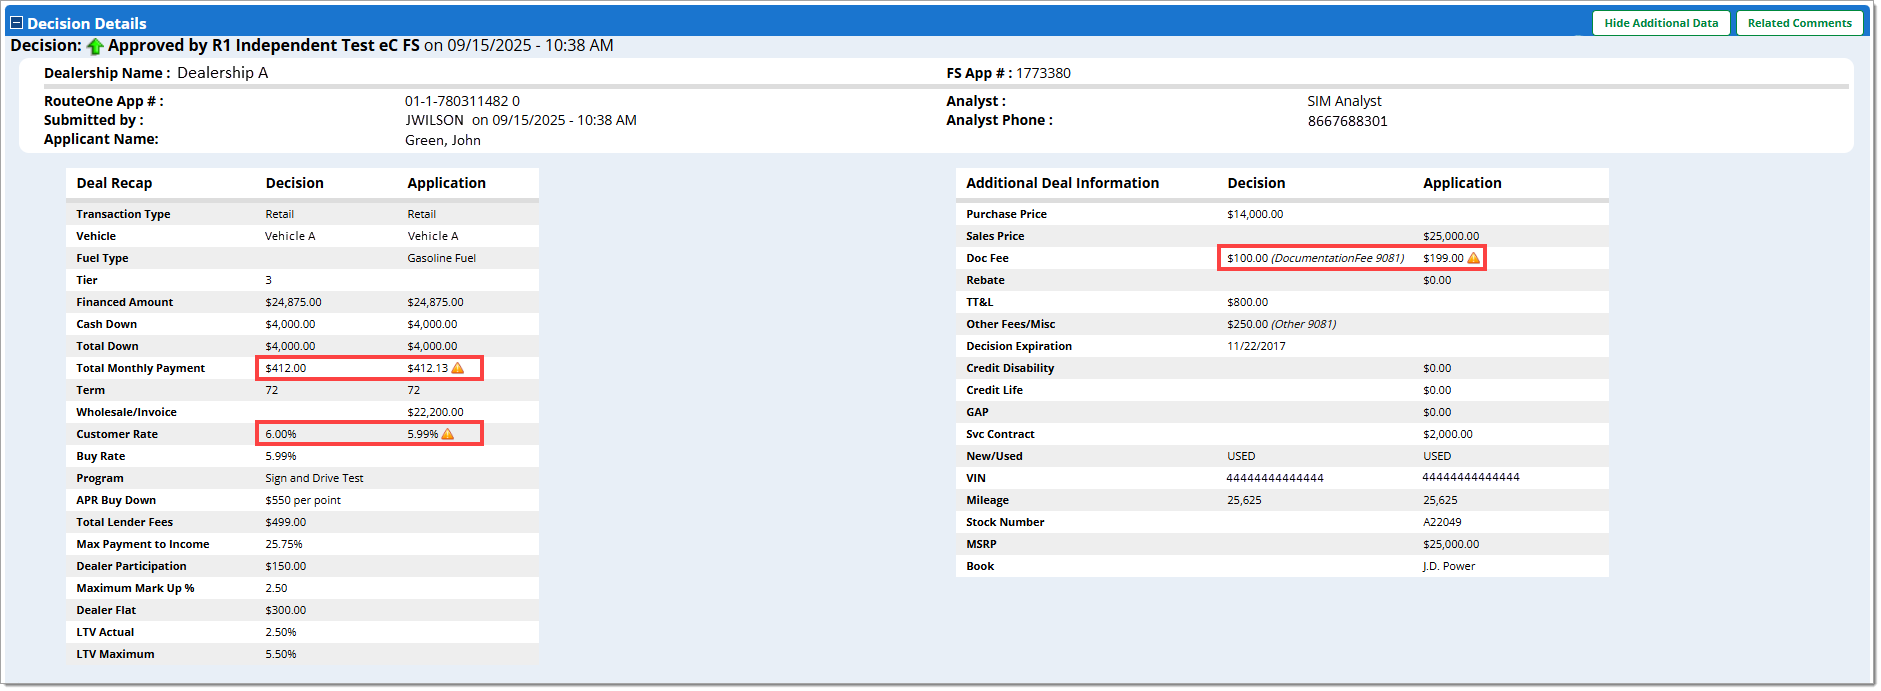
Within the ‘Decision Details’ section of the page, you can see highly detailed information about the decision from one finance source.
For deals submitted to multiple finance sources, you can return to the ‘Decision Summary’ page and click on a finance source name from the ‘Finance Source’ list to switch between viewing Decision Details for different finance sources.
The top section of Decision Details provides summary information about the decision.
The ‘Deal Recap’ table shows fields based on what information was included in the Credit Application and what information was returned from the finance source decision.
The ‘Additional Deal Information’ table contains other important decision data sent from the finance source.
Not all Finance Sources return information within these fields.
For both tables, the ‘Decision’ column will list details returned from the finance source, while the ‘Application’ column will contain the values entered in the credit application.
If there is a difference between the values in the Decision versus the Application columns, an exclamation point icon will appear next to the differing information. See below for reference.
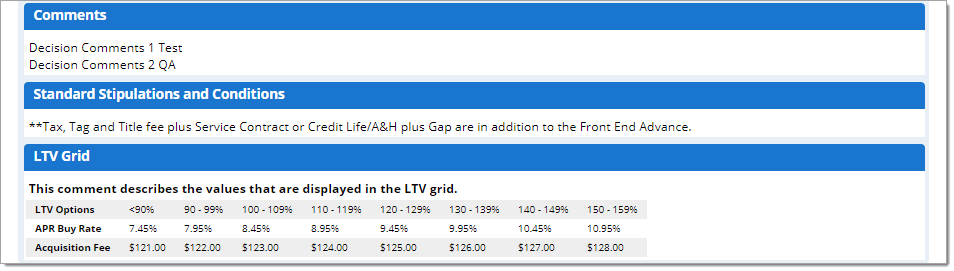
Comments, Stipulations/Conditions, and an LTV Grid could be returned from a finance source. That information would appear in these sections of the Decision Summary page.
Previous Decisions are available via the ‘Decision History’ section of the page.

In the ‘Credit Report & IDOne Verification’ section, you can run a Credit Report or IDOne Verification by clicking on the corresponding buttons.

Deal Refresh
What is Deal Refresh?
With ‘Deal Refresh,’ some finance sources allow dealers to update vehicle information, the transaction type, and/or contract information on the Credit Application, and allow that information to be resubmitted to them.
The refreshed Credit Application can only be resubmitted to the same finance source.
The finance source can enable or disable Deal Refresh as needed for individual deals.
Customer Information cannot be updated in Deal Refresh.
Not all finance sources support Deal Refresh.
View the available finance sources that support the Deal Refresh feature.
Using Deal Refresh
To update the vehicle information, the transaction type, and/or the contract information, click the ‘Deal Refresh’ button on the Decision Summary page.

You will be returned to the Credit Application, where the ‘Transaction Type’, ‘Vehicle’, and ‘Contract Information’ sections can be modified.
Applicant Information cannot be updated in Deal Refresh. Fields that cannot be updated will be greyed-out.
In the ‘Send App to’ section you can review which finance source(s) you are resubmitting the Credit Application to. Keep in mind that the Credit Application will only be resubmitted to the finance source(s) you previously submitted to. All other finance sources will be locked and greyed out.
Click the ‘Submit’ button in the bottom right-hand corner of the page.
Refreshed Credit Application will appear in a new row at the top of Deal Manager, along with any updated decision from the finance source.

Stipulation Document Capture
In order to send documents directly to your finance source in the RouteOne system, begin by navigating to the ‘Decision Summary’ page from Deal Manager or Desktop, and clicking on a decision status for the customer.
Uploading Documents
On the ‘Decision Summary’ page, scroll down to the ‘Stipulations’ section.
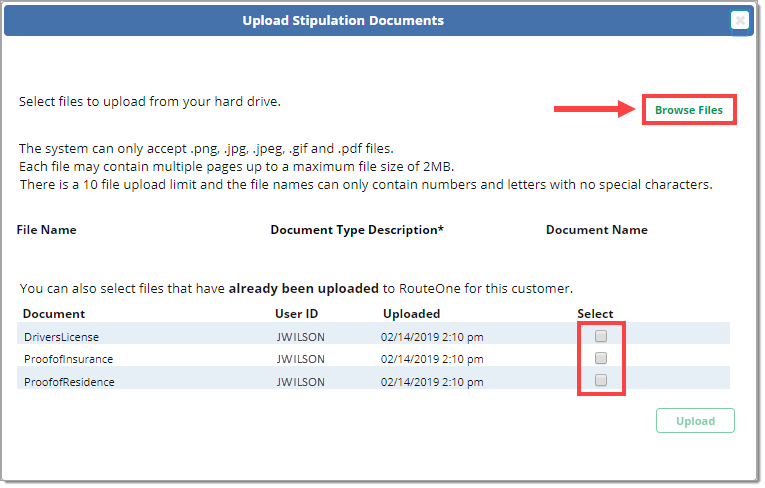
Click the ‘Upload Documents’ button to access your saved documents.

Click ‘Browse Files’ to browse your computer for files.
You can upload up to 10 files at a time.
- Only certain file types are allowable: .png, .jpg, .jpeg, .gif, and .pdf
- The maximum file size is 2MB, though your files may include multiple pages.
- Special characters are not allowed in the file name.
- The file name is optional. If you do not provide a file name, RouteOne will use the original name of the file from your computer.
You can also select documents that you have previously uploaded to RouteOne using the checkboxes under the ‘Select’ column.
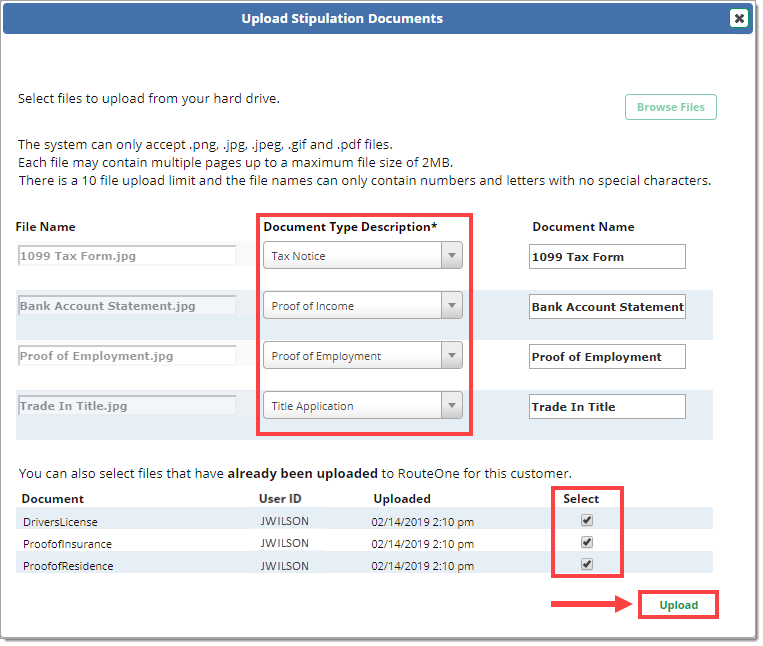
Select the applicable ‘Document Type Description’ from the dropdown menu for each file you would like to upload from your computer and send to the finance source.
Select any previously uploaded documents you would like to send to the finance source.
Click the ‘Upload’ button.
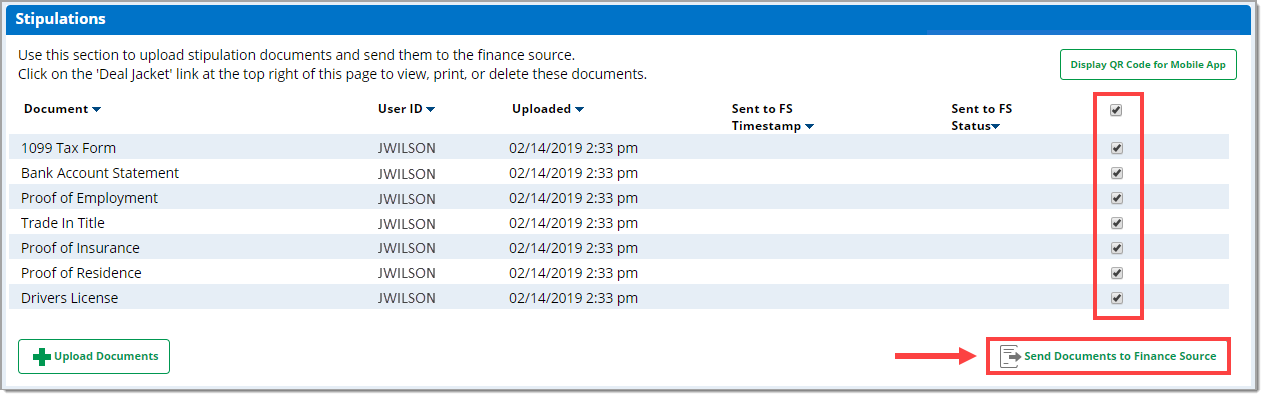
Once you have uploaded the documents, they will appear in the ‘Stipulations’ section of the ‘Decision Summary’ page.
Select which documents you want to send to the finance source by selecting the checkboxes on the right and clicking the ‘Send Documents to Finance Source’ button.
While the documents are in the process of being sent to the finance source, the ‘Status’ will update to ‘Pending.’
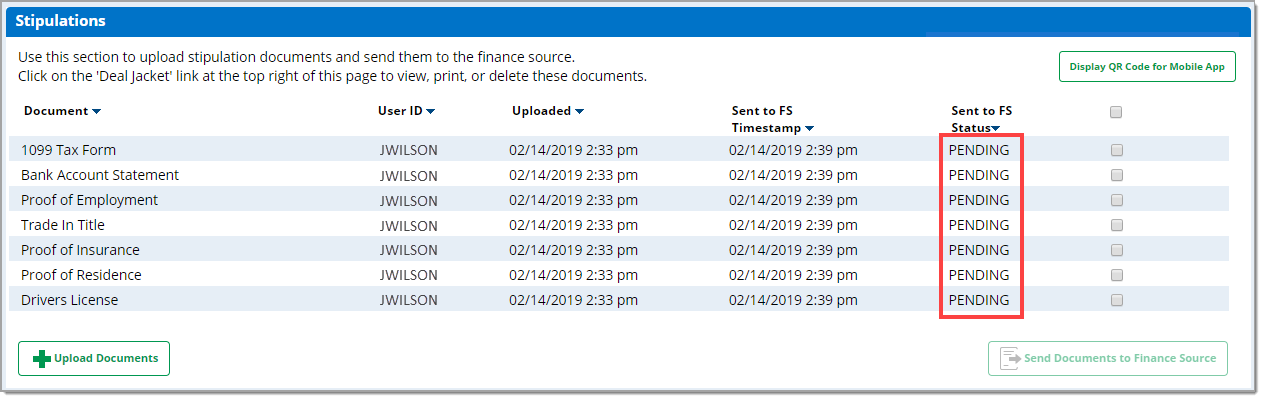
To see the final status, click the ‘Update’ button at the top of the ‘Decision Summary’ page to refresh the system.
The status will not update on its own.

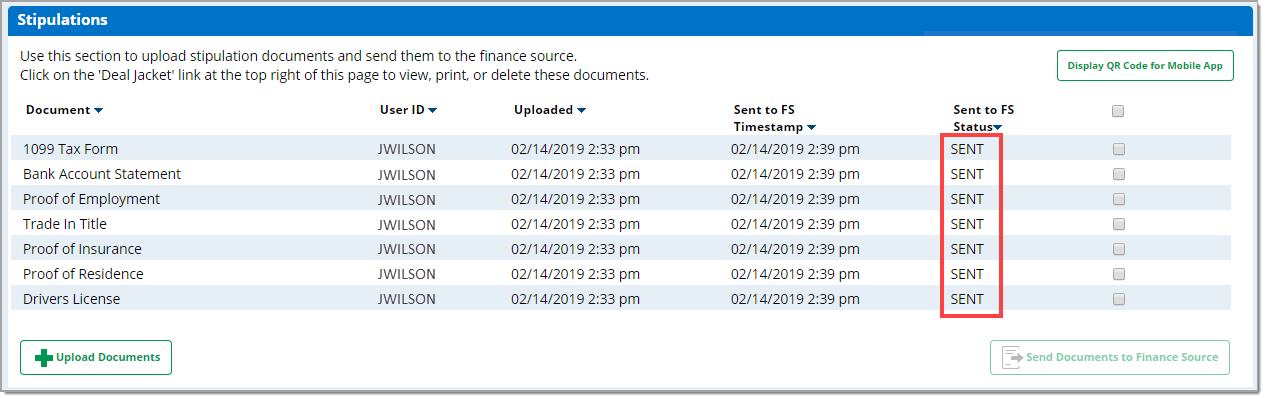
If the documents were successfully transmitted to the finance source, you will see a ‘Sent’ status, along with the timestamp.
If the documents were not successfully transmitted, you will see an ‘Error’ status. You will need to re-select the documents and click the ‘Send Documents to Finance Source’ button again.
Important Notes:
All documents that have been sent to a finance source will be saved in SecureDocOne for dealers who are subscribed.
You can send documents to the finance source as many times as necessary.
You can send all of your uploaded documents at once. There is no limit to the number of documents you can send at a time.
Communicating with Finance Sources
The Text Messaging feature gives finance sources the ability to communicate with dealers in real-time to work a deal in a more effective and efficient manner, leading to a reduction in decisioning delays and missed opportunities. Credit analysts will experience enhanced communication with dealer customers, reducing the need for phone calls and allowing the ability to multi-task, thus streamlining the auto loan process.
Finance sources offering this functionality will provide dealers with a quick way to rehash and confirm deal changes as well as an auditable text record of all associated communications.
- Dealers may access the Text Messaging feature directly through the Deal Summary page, or by clicking the ‘Edit/More’ button next to the appropriate application in ‘Deal Manager’ and selecting the ‘Text Messages’ option.
To send a text message to the finance source, type the message in the text field on the left and click ‘Send Message.’
Sent and received messages will appear in the box on the right.

To access the Text Messaging feature through the RouteOne mobile app, click on the ‘Envelope’ icon in the Deal Manager, or the ‘More’ button in the Deal Summary. Text Messages will be accessible from the envelope icon on the Deal Manager page, or the arrow icon on the Deal Summary page.
ROUTEONE SUPPORT
Hours (EST)
Monday - Friday: 6:00am – Midnight
Saturday: 9am – 9pm
Can’t find what you need?
Try our search
