In This Guide:
Related Guides:
Credit
Introduction to Navigating RouteOne
Deal Manager
Deal Manager is the primary navigation tab for RouteOne users. This is where you can perform the most comprehensive number of tasks and actions in the system. All credit application-related actions can be performed from Deal Manager, including compliance tasks.
Deal Manager shows your active deals, sorted by most recent.
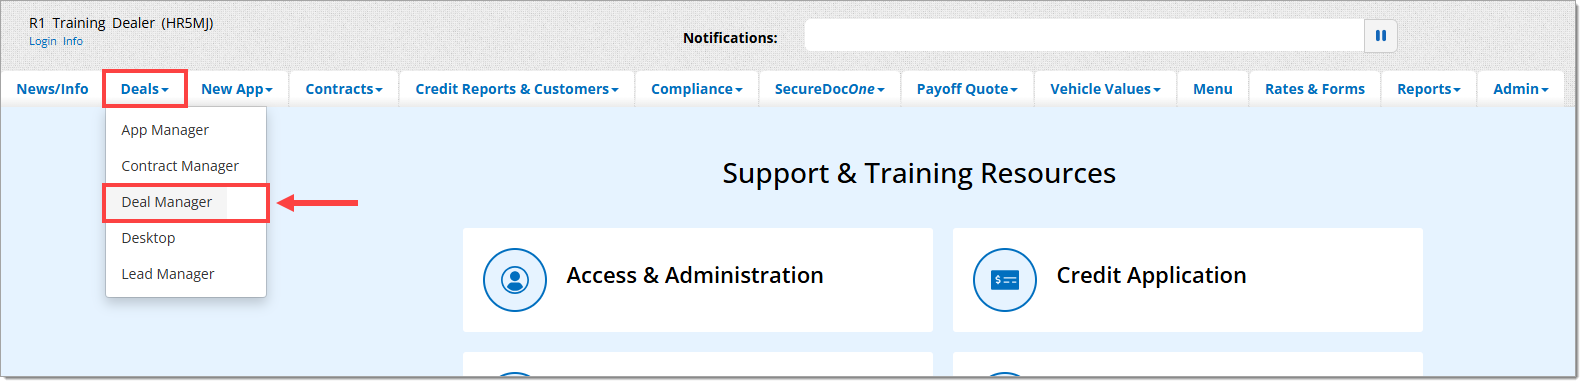
You can navigate to Deal Manager by clicking on the ‘Deals’ navigation tab and selecting ‘Deal Manager.’
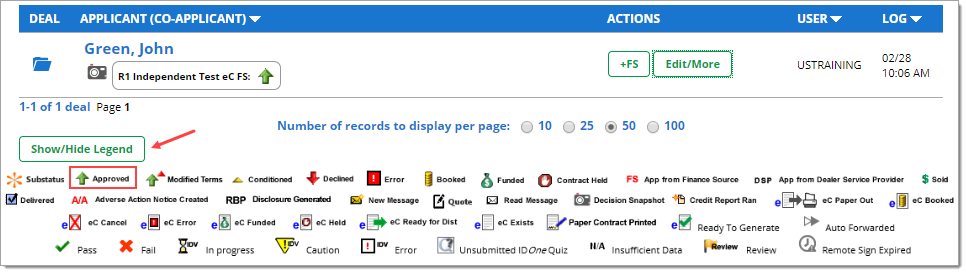
Clicking on the customer’s name will return you to their Credit Application.

You can identify which finance source the credit application was sent to and the decision returned from the finance source directly below the customer name.

In order to determine the meaning of the status icon for the credit application, you can click the ‘Show/Hide Legend’ button. That will show the status icons to help you identify which status applies to your credit application.
Clicking on the decision status icon when there is no contract attached to the credit application will direct you to the ‘Decision Summary’ page for the credit application. It will provide more details about the credit application and decision.
Clicking on the decision status icon when there is a contract attached to the credit application will direct you to the ‘Contract Package’ page.

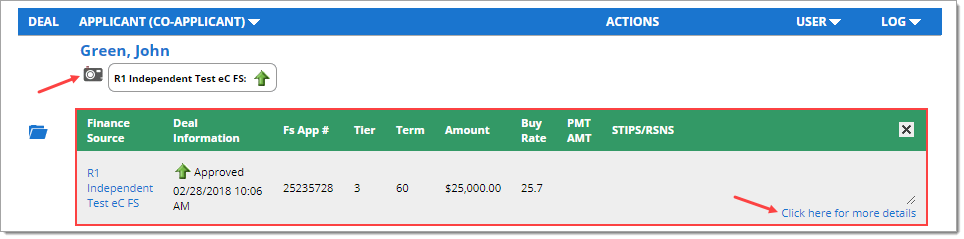
Clicking on the camera icon will expand the section and provide a decision snapshot of the credit application. Clicking the ‘Click here for more details’ link will direct you to the ‘Decision Summary’ page.
More detailed information about how to use Deal Manager to check and manage deals and their statuses can be found here.
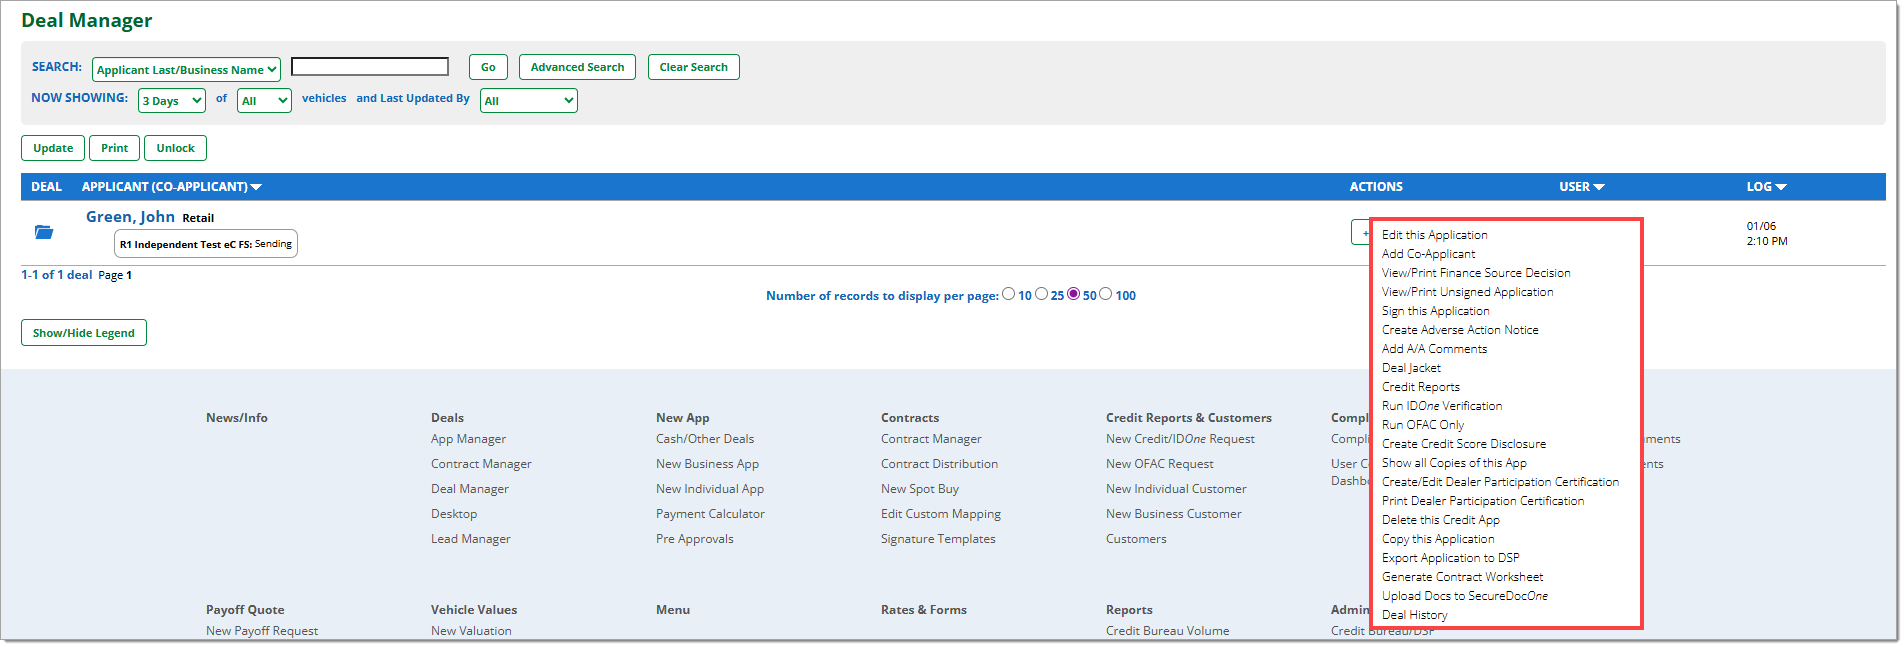
Clicking on the ‘Edit/More’ button will show a list of actions that can be taken for each credit application.

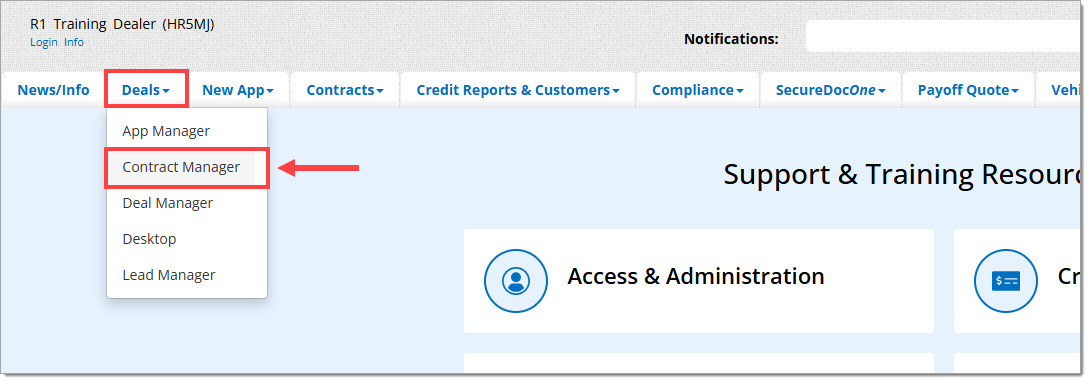
Contract Manager
Contract Manager is the navigation tab used for managing eContracting. For this tab to be visible, users must be subscribed to eContracting.
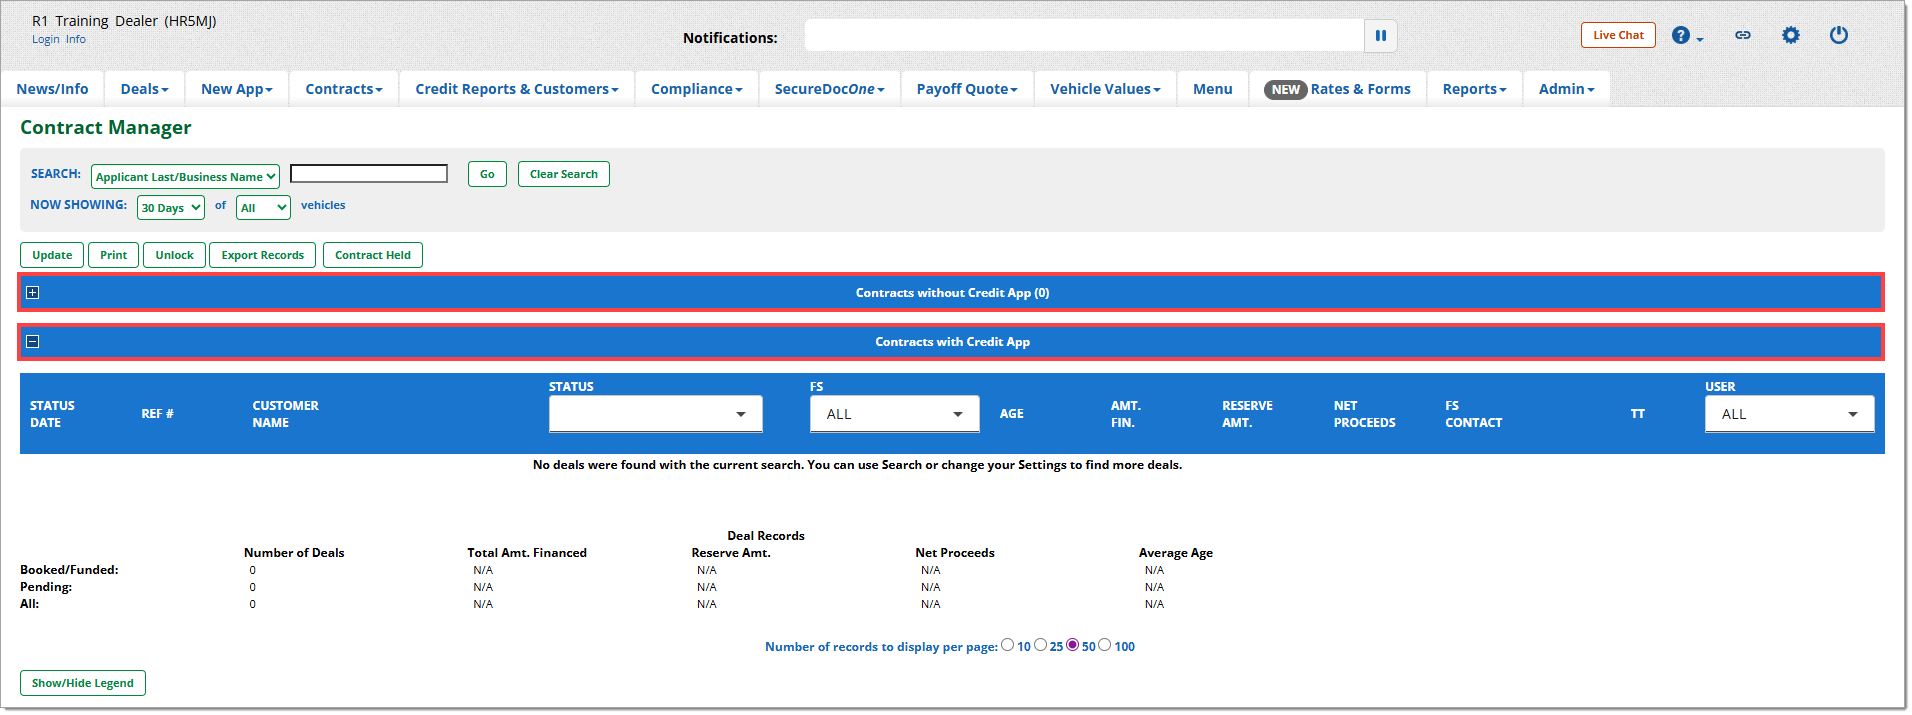
Contract Manager shows your eContracts, sorted by most recent.
You can check the status of an eContract on this page.
You can navigate to Contract Manager by clicking on the ‘Deals’ navigation tab and selecting ‘Contract Manager.’
Under the expandable and collapsible section, you can view both contracts without a credit application, and contracts with a credit application. Note, contracts without a credit application generally are from DSP/DMS imports.
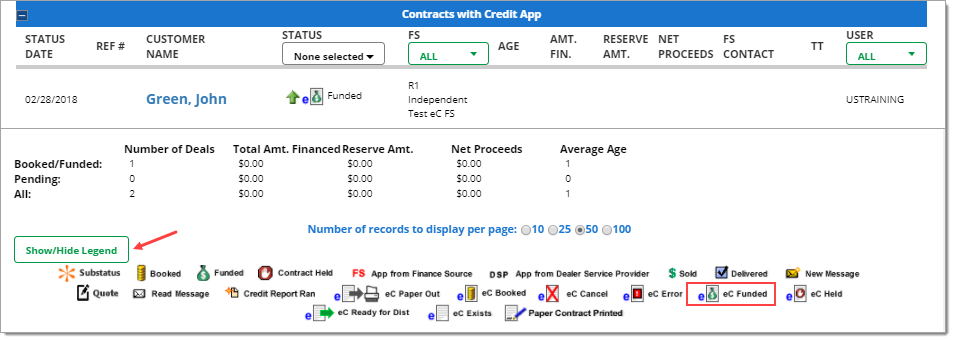
Clicking on the customer name returns you to the ‘Contract Package’ page, which shows information about the contract and the steps it has undergone.

You can identify the status of the contract, as well as the finance source the contract was assigned and distributed to.

In order to determine the meaning of the status icon for the contract, you can click the ‘Show/Hide Legend’ button. That will show the status icons to help you identify which status applies to the contract.
In Contract Manager you can filter the contracts you see on the page by their status. Click on the dropdown menu under ‘Status’ to apply the desired filter.

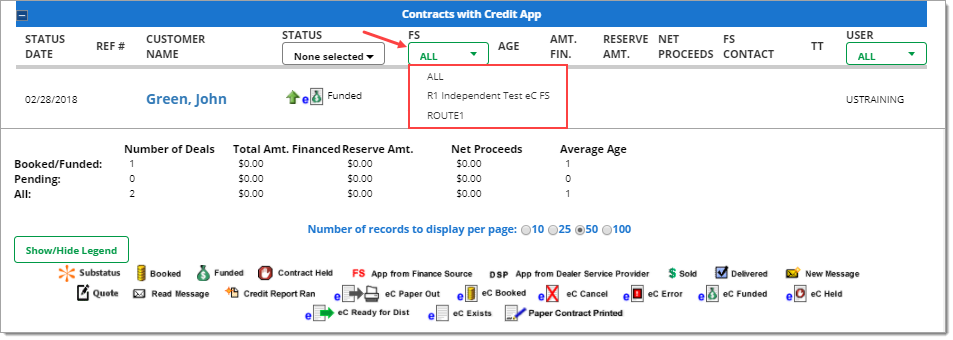
In Contract Manager, you can also filter the contracts you see on the page by the finance source they were assigned and distributed to. Click on the dropdown menu under ‘FS’ to apply the desired filter.
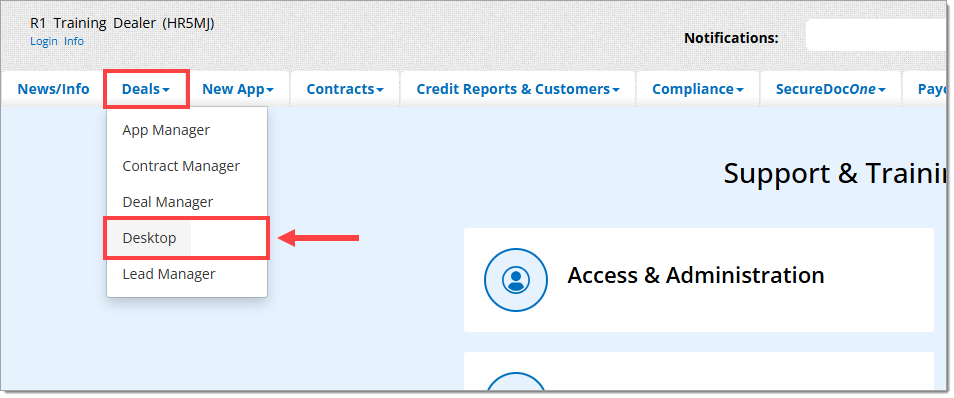
Desktop
Desktop is a customizable page that allows users to manage customer Deal Jackets. It provides users a single location to visually understand deal and compliance status, manage deals, and complete tasks, including editing credit applications, printing compliance documents, etc.
Upon the initial loading of the Desktop page, all deals from the past three days will load. You can change the date range to view different time spans. Desktop contains all your RouteOne deals from the past 90 days.
Because nearly all icons and text on Desktop are clickable, you can also use Desktop to quickly navigate to other areas of the RouteOne system.
You can navigate to Desktop by clicking on the ‘Deals’ navigation tab and selecting ‘Desktop.’
Because Desktop is customizable, you can select the columns you would like to see for your deals by clicking on the available checkboxes.
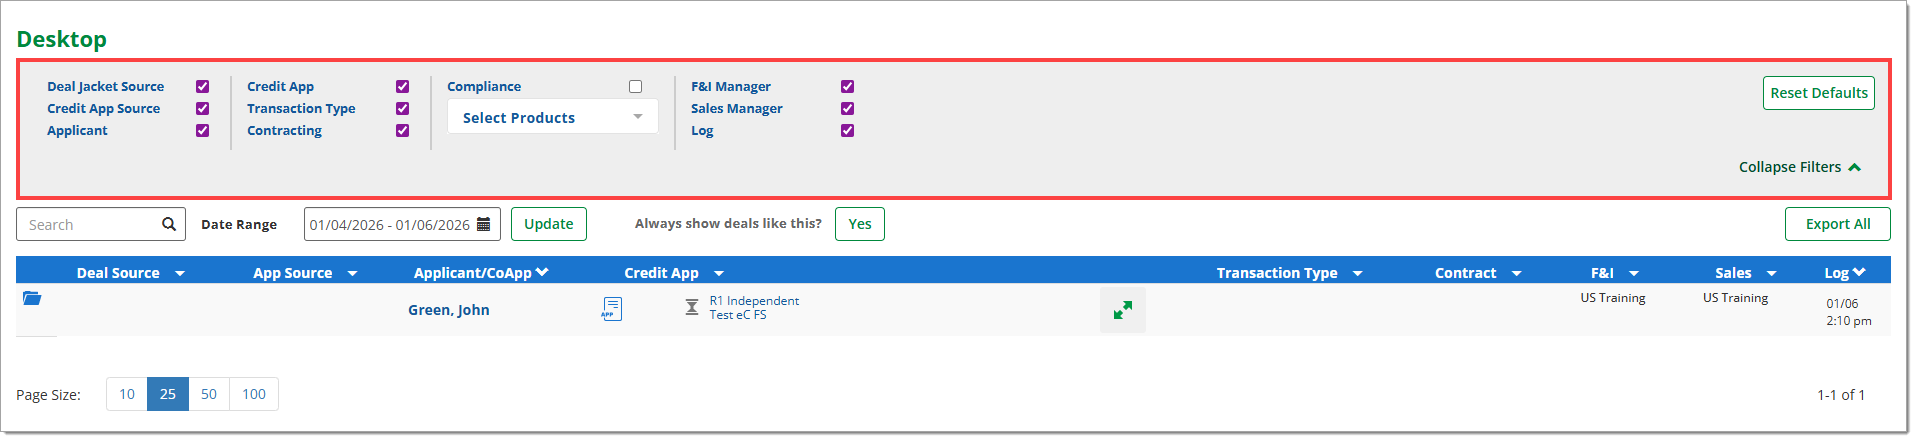
Once you’ve made your customization selections and you begin to scroll down the page, the customization section automatically collapses.
The default page view will reset when you navigate away from this page.
To expand the customization section, simply click on ‘Deals/All Deals’ or ‘Expand Filters.’

The table showing your deals will vary depending on which columns you selected to view. If you selected more columns than fit in the window, click the horizontal scroll bar to scroll to the right and see the rest of your columns for your deals.
How to Manage Deals from Desktop
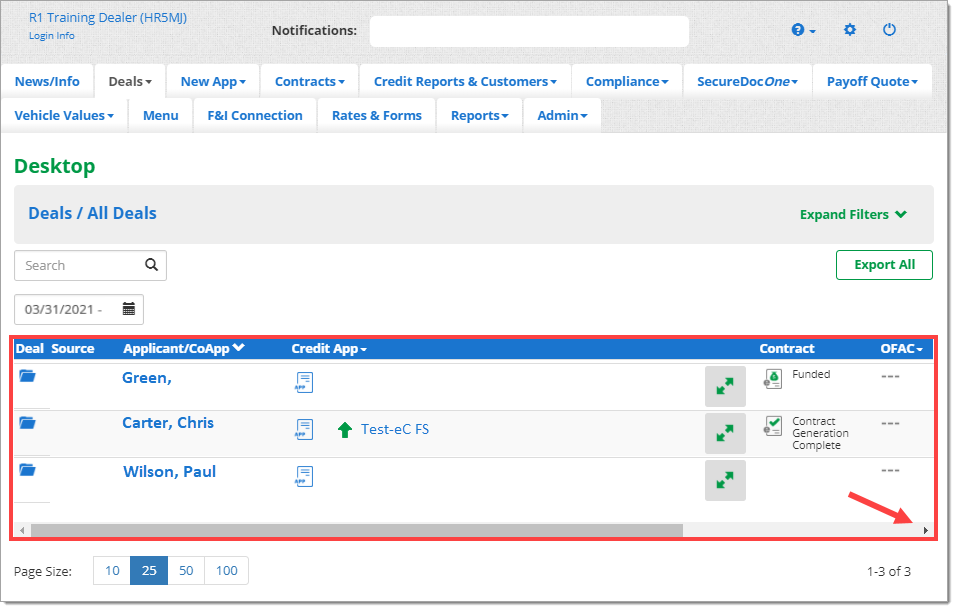
Desktop allows you to navigate through each step of your workflow in RouteOne from one location. Every icon on the page is clickable, including the null ‘- - -‘ icon, which indicates that no action has been taken for a particular step.
Recall that by default Desktop displays the last three days of deals, but contains all your deals from the past 90 days. You can customize your date range using the date range selector.
To review the Deal Jacket for a customer, you can click the Deal Jacket folder next to the customer’s name to navigate to that information.
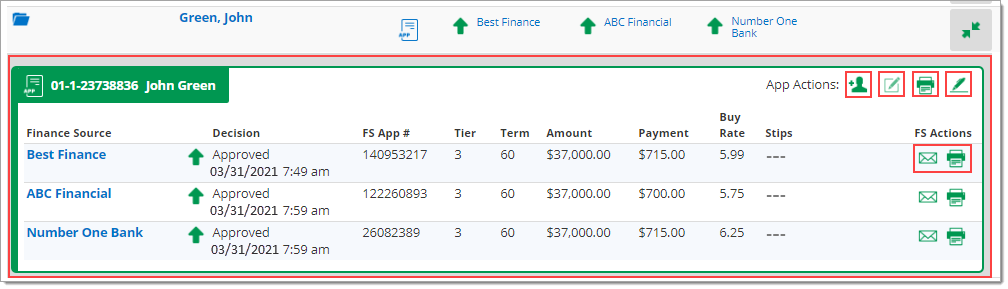
For this example, load the Decision Snapshot for the deal. Click the set of arrows in the grey box, which appears to the right of the Finance Source decisions.

The page will expand, and the Decision Snapshot will appear directly below the customer’s row.
From here you could add a co-applicant, or edit, print, or eSign the credit application. You can also send a text message to the finance source and print the finance source decision.
Hovering over many buttons will cause a tool tip to appear, describing the action or functionality.
Besides navigating to credit applications and finance source decisions, you can also take many different compliance-related actions from Desktop.
- Recall that an easy way to see deals with credit and compliance activity is to click ‘Expand Filters’ in the right-hand corner of the page, and select ‘Deals with Credit Reports & Compliance’ view from ‘Step 2.’
Also recall that all icons are clickable. For example, clicking a null ‘ - - - ‘ icon in the ‘Privacy’ column allows you to select whether you want to ‘Generate,’ ‘eSign,’ or ‘Exclude’ the Privacy Policy for that deal.
More details on running compliance actions and managing compliance

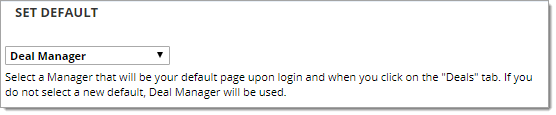
Did you know you can set Desktop to be your default manager page?
Simply click the ‘Gear’ icon in the top right-hand corner of the page to load ‘My RouteOne.’
In the ‘Set Default’ section, select ‘Desktop’ from the dropdown, and save your settings.
For more information about managing My RouteOne settings and preferences, click here.
ROUTEONE SUPPORT
Hours (EST)
Monday - Friday: 6:00am – Midnight
Saturday: 9am – 9pm
Can’t find what you need?
Try our search
