Related Guides:
Credit and Contracting - Canada
eSigning
What is eSign?
RouteOne’s eSign technology allows you to electronically capture signatures on deal documents through our secure signing portal. You can create a seamless signing ceremony using either a Wi-Fi-enabled tablet or a desktop.
Easily electronically capture signatures on any RouteOne-generated documents (e.g., finance contracts, extended service plans, etc.) directly from your Deal Worksheet. Additionally, our Dealer Uploads section allows you to upload additional non-RouteOne generated documents required for funding (e.g., bill of sale, void cheque, etc.). You can also use RouteOne’s eSign Anything® tool to define signable areas on uploaded PDF documents. Those documents will then be included with the eligible RouteOne-generated documents in the signing room.
This creates a completely electronically signed package, resulting in a more secure and fully compliant customer experience. Customers can sign the deal documents at the dealership or at a designated location where a sales representative would meet them in person.
Important: While standard eSign features are at no additional cost, Remote eSign functionality requires a subscription. Learn more in our Remote eSign user guide, or speak to your RouteOne Business Development Manager for more details.
eSigning may not be offered for all transactions (e.g., Commercial Lease) and/or provinces by your finance source. In these instances, RouteOne will automatically revert to the printing option only.
Subscribing and Setting Up eSign
How to activate eSign
There is no subscription required for the embedded eSign feature within the RouteOne platform. Once the finance source(s) that offer eSign enables access for dealerships, you will be automatically eligible to access this functionality via the Deal Worksheet.
The progress bar on the ‘Deal Worksheet’ page will indicate that your transaction is eligible for eSigning.
If your dealership is eligible to use eSign but the functionality does not appear in the Deal Worksheet, please reach out to your finance source representative or the RouteOne service desk at 1-877-556-0003.

What is required to eSign?
You will require a Wi-Fi or mobile service-enabled device, iPad or tablet to obtain the eSignature of the required parties.
The customer eSigning portion of the transaction can be captured via two methods:
- Option 1: Logging into your RouteOne account on the tablet’s browser. This is the primary workflow, as shown in the ‘eSigning a Retail Contract’ section below.
- Option 2: Logging into your account on your desktop or laptop, as per your normal process.
eSigning a Retail Contract
Completing the Credit Application and Deal Worksheet
The following steps occur on a laptop or desktop.
Begin by completing the ‘Credit Application’ page for a retail transaction, using the same steps you would normally take.
Click the ‘Next’ button to proceed to the Deal Worksheet.
No workflow changes have occurred for printing the credit application page. It can still be printed to obtain the buyer’s consent. This step does not require an eSignature. Please be mindful that a signed Credit Application is always required prior to submitting an application to your finance source. The only exception to this rule is with a digital application (consent is included with the online request). The completed and signed Credit Application will be required for funding.

On the ‘Deal Worksheet’ page, complete and submit the deal.
Each step of the contract’s progress will be tracked at the top of the page. With the addition of the eSign functionality, the progress bar will display several changes.
- ‘Validate and Review’ has replaced ‘Validate and Print Contract.’
- ‘eSign’ and ‘Send Contract’ have been added.

Once your deal is adjudicated, the progress bar on the Deal Worksheet will display the updated status, and the ‘Validate & Review’ button will appear on the right hand side of the page.

Adding Signature Boxes to Uploaded Documents
The ‘Dealer Uploads’ section at the bottom of the Deal Worksheet allows you to upload any supplementary documents required for funding that are not currently generated through RouteOne (e.g., bill of sale, proof of insurance, etc.). Dealer Service Provider (DSP)-generated documents required for funding (e.g., bill of sale) will need to be completed and uploaded to RouteOne via this section. For more information, refer to the ‘Dealer Uploads’ section of this guide.
To include non-RouteOne generated documents in the eSigning ceremony, upload the document to the Dealer Uploads section and add the necessary signature boxes using the eSign Anything® tool prior to starting the eSign process. Refer to the ‘eSign Anything’ user guide for more information.

At the bottom of the screen, you can customize how many copies of each document you would like printed. These selections will be saved as the default for future deals with this finance source.
Important: If the RouteOne-generated document package for the finance source you are using includes documentation that does not require a customer signature, those documents will not be displayed in the signing room for buyer(s) to view unless specified by the Finance Source.
Preparing to eSign
To check against all post submission validation rules and generate the contracts, click the ‘Validate & Review’ button.

Once the validation rules have been satisfied, clicking the ‘Validate & Review’ button will generate the review copy of the contract package in the PDF format in a new window.
When you are ready to proceed with the eSigning step, close the review copy window.
The progress bar on the Deal Worksheet will update, indicating you are on the ‘eSign’ step.
The buttons on the right-hand side of the page will update.
- The ‘eSign’ button will appear (replacing the ‘Validate & Review’ button).
- The ‘Print’ and ‘Ready to Fund’ buttons will display.
- You can click the ‘Print’ button to provide the buyer with a printed, unsigned preview copy of the contract(s).

eSigning Documents Within the Signing Room
Once you are ready to begin the eSigning process, launch the browser and log into your RouteOne account via: www.routeone.net.
Once logged in, find the desired transaction and click on the buyer name in the Customer Manager or Deal Manager page to navigate to the ‘Deal Worksheet’ page of the transaction.
On the ‘Deal Worksheet’ page, click the ‘eSign’ button on the Deal Worksheet to enter the ‘Signing Room.’

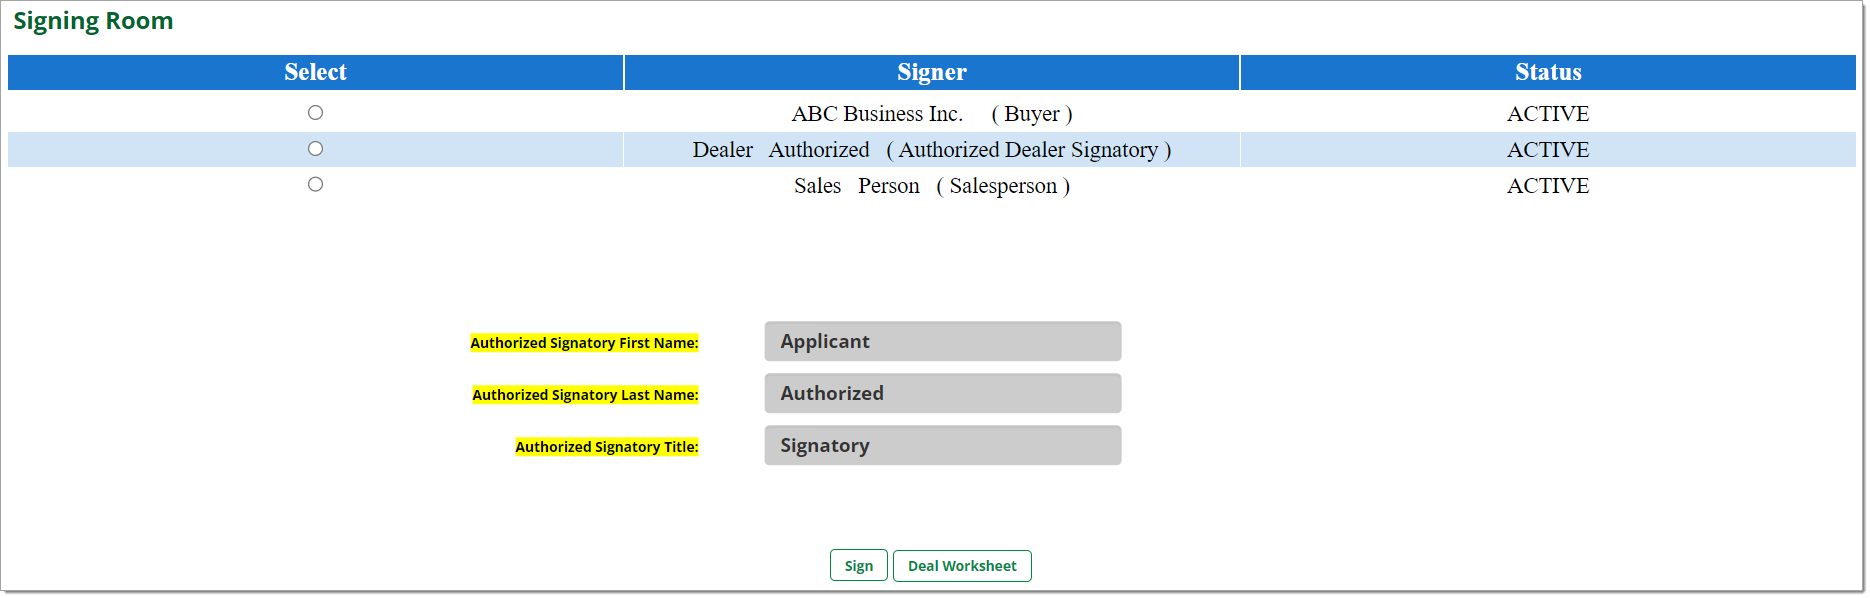
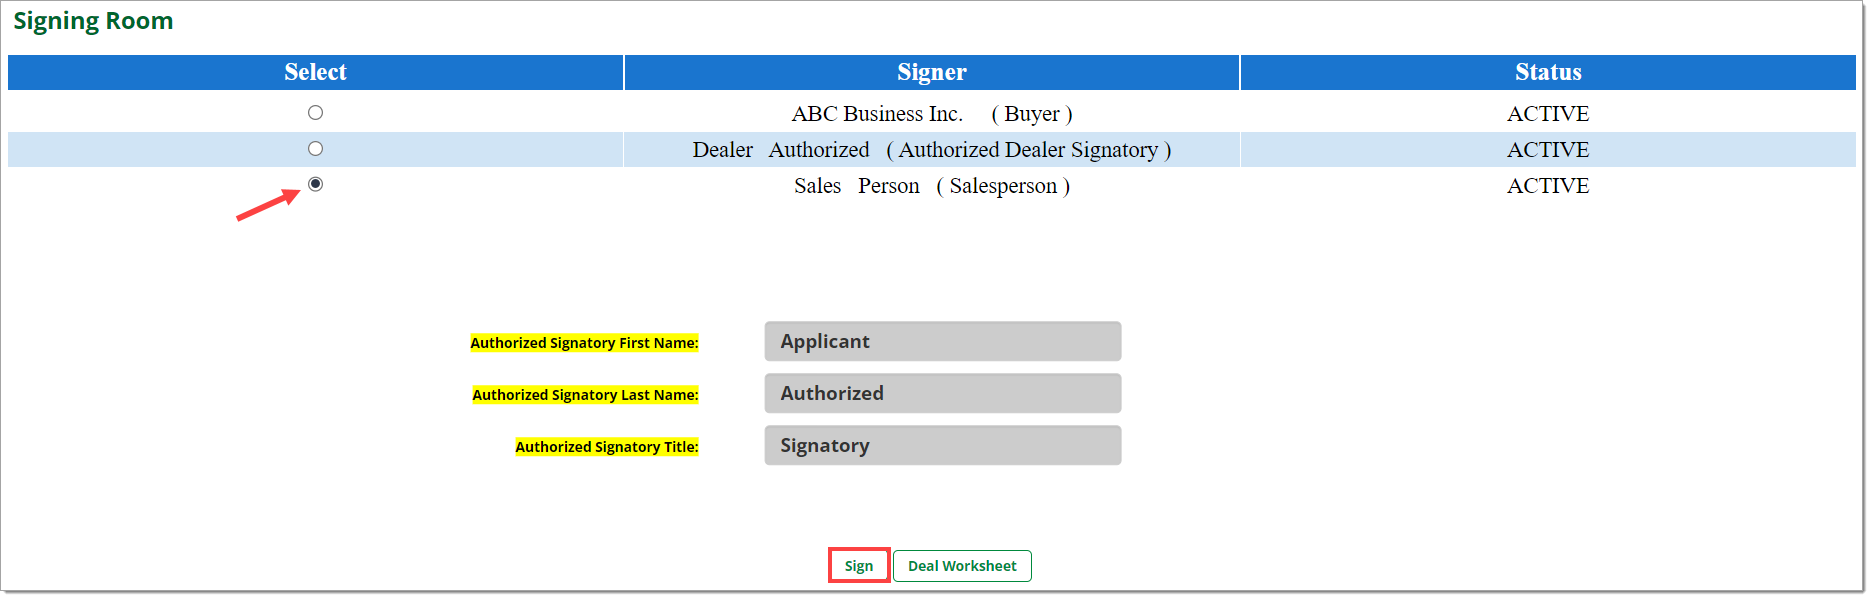
The Signing Room displays the name and title of the individuals who are required to electronically sign the contract(s).
- For retail transactions, electronic signatures will likely be required from the dealer, buyer, and co-buyer (if applicable) for the contract package.
Electronic signatures are captured one party at a time.
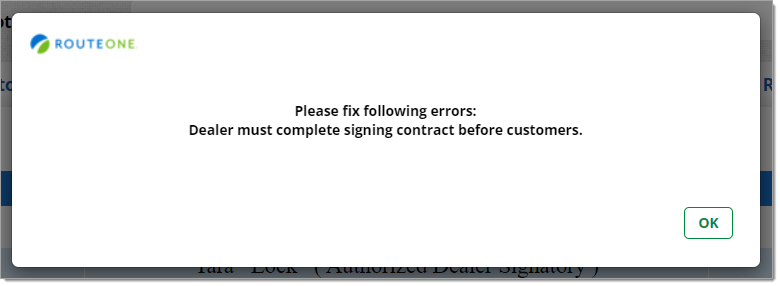
Certain finance sources require the dealer to sign first. If this is the case, you will receive the following error when attempting to open the buyer’s signing room without the dealer having eSigned first.
The ‘Status’ column indicates the progress of the electronic signature capture for each of the required signing parties on the contract(s).
- ‘Active’ - indicates the process to capture electronic signatures has not yet been completed for the individual.
- ‘Completed’ - indicates the electronic signature process is completed for the individual.
Select a signer and click the ‘Sign’ button to proceed with capturing the electronic signatures for the current signer on the contract package.
- If you are not ready to begin the eSigning process, the ‘Deal Worksheet’ button will navigate you back to the previous page.
- If needed, the dealer, buyer, or co-buyer can eSign the contract(s) at different times during the same day (e.g. if the buyer and co-buyer are not able to come in for signing at the same time).
Important: RouteOne will save the completed signatures in the contract until midnight, local time. If the Finance Source supports flexible eSign dating, this time frame may be extended. If all signatures have not been completed for all signing parties by the designated time, the system will clear the existing signatures, and they will have to be recaptured.

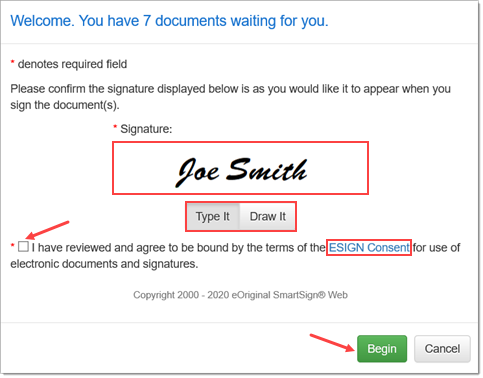
Selecting a signing party and clicking the ‘eSign’ button launches a screen that begins the self-guided process for capturing signatures.
- If needed, you can click ‘Cancel’ to exit the signing process and return to the ‘Signing Room’ and navigate back to ‘Deal Worksheet.’
The signer will have the option to select if they would like to use a typed or drawn signature.
- If typing, no further action is needed, as the signature is already typed for the customer.
- If drawing, the buyer can draw a signature using a mouse or using any touch-enabled device.
In order to continue, the signer must check the checkbox to accept its terms.
- The signer can view the ESIGN Consent form by clicking the ‘ESIGN CONSENT’ link.
- To advance to the signing process, the signer will need to click the ‘Begin’ button.
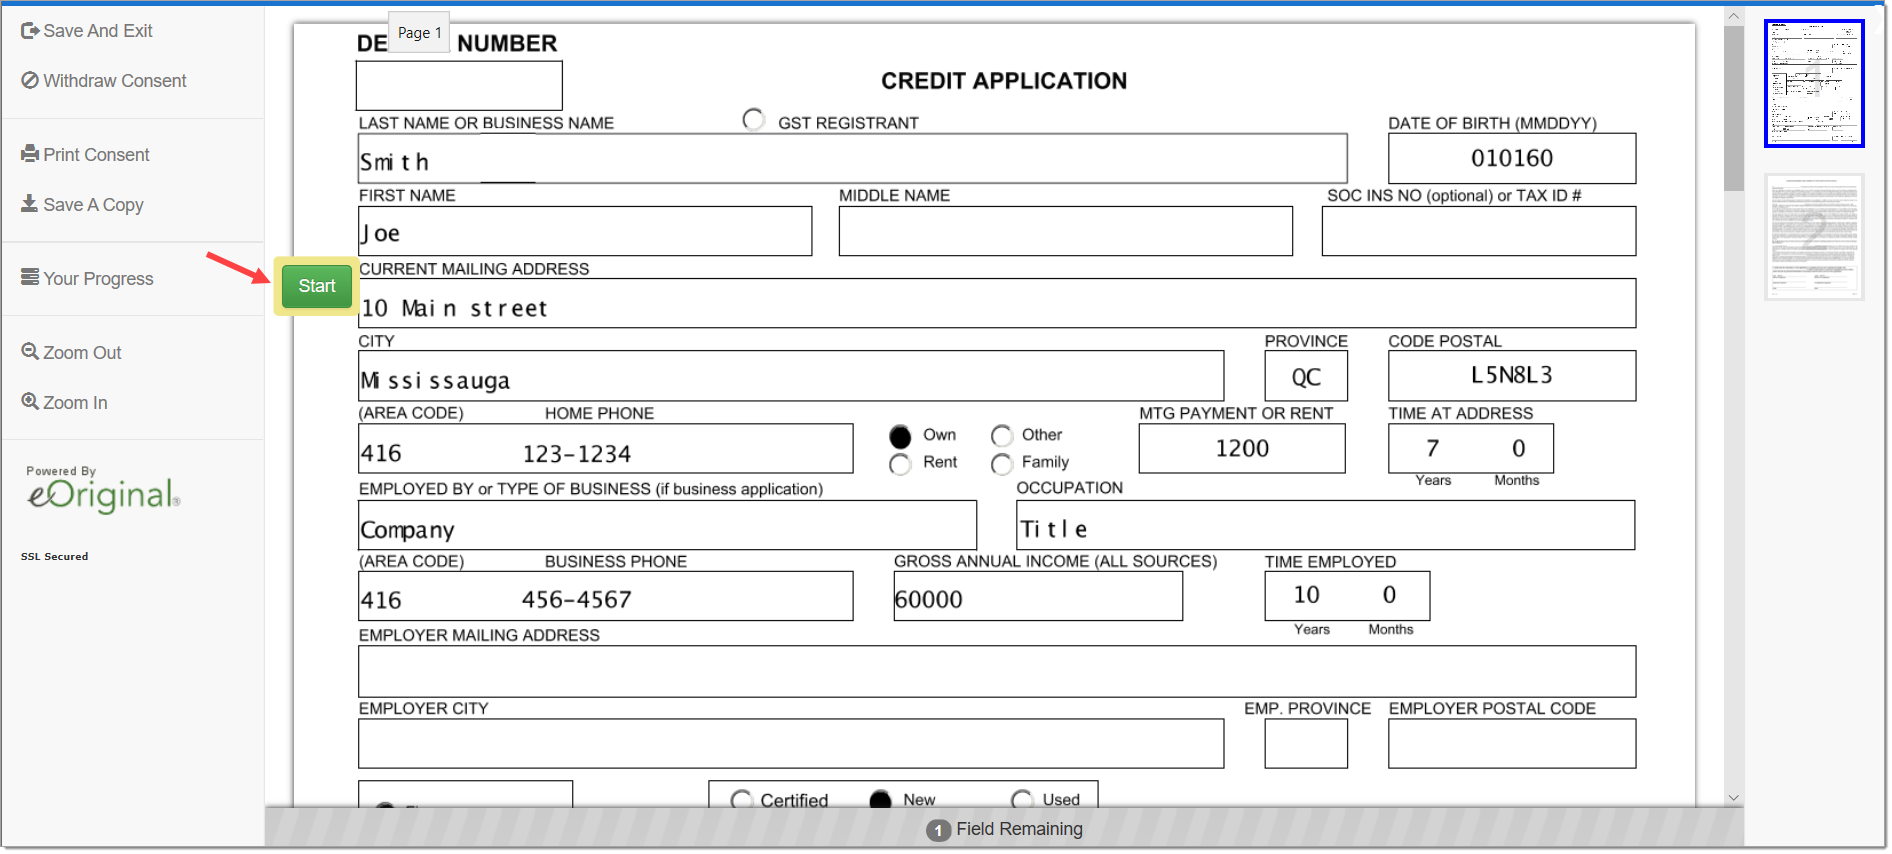
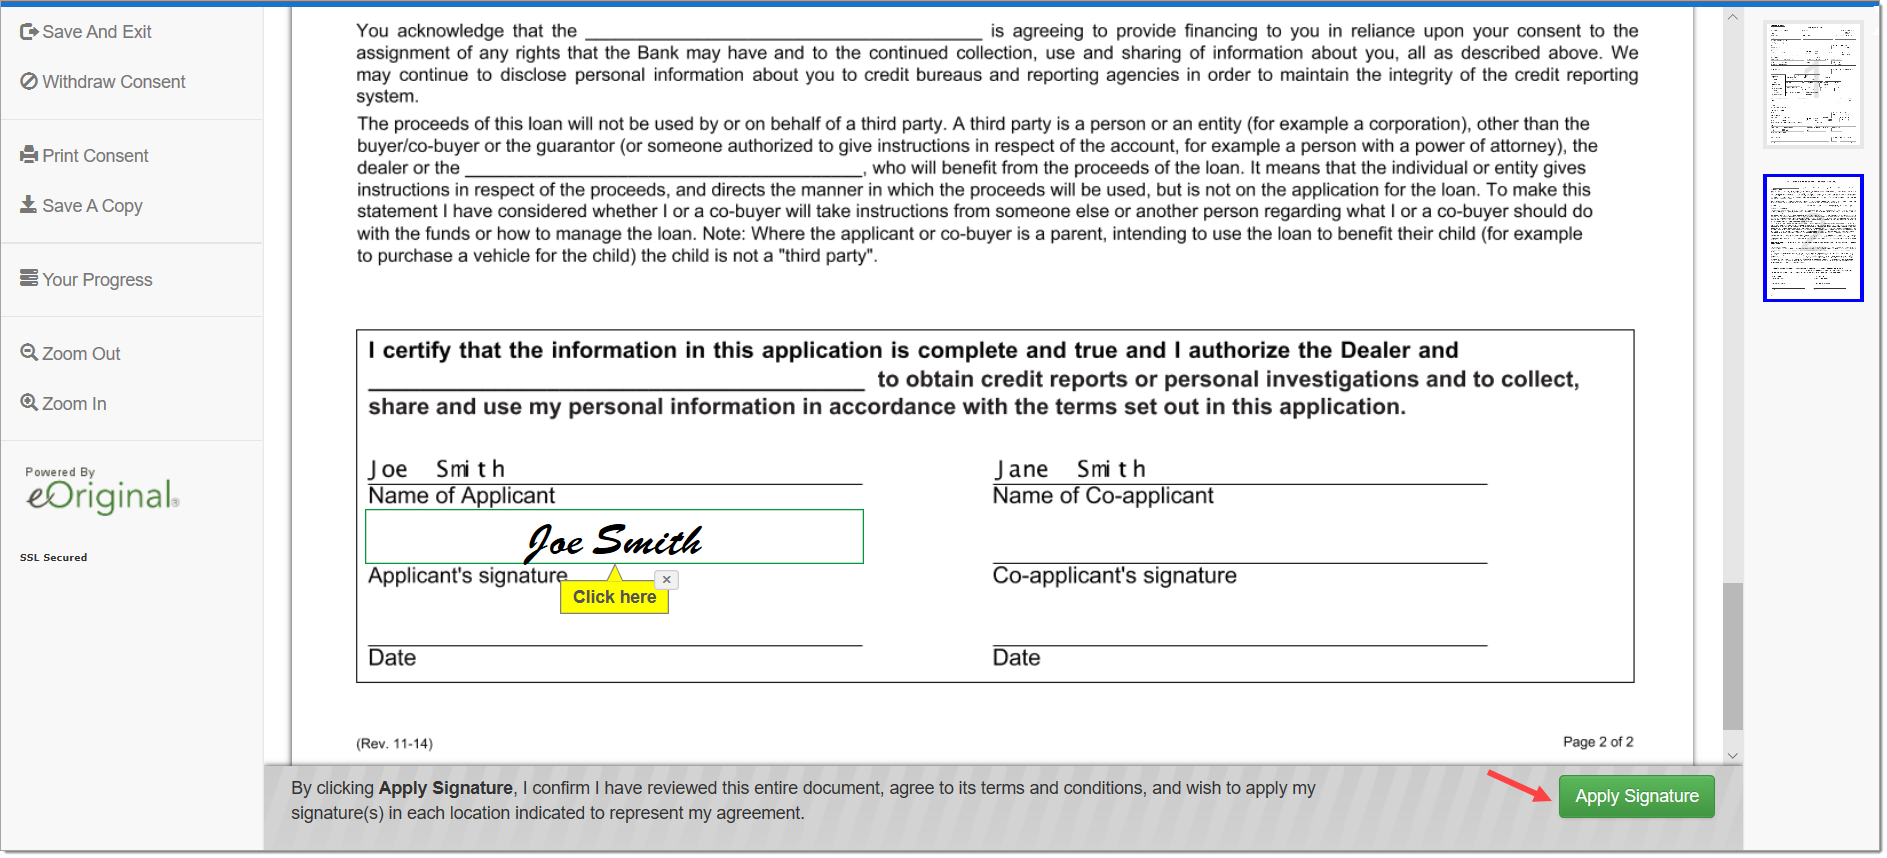
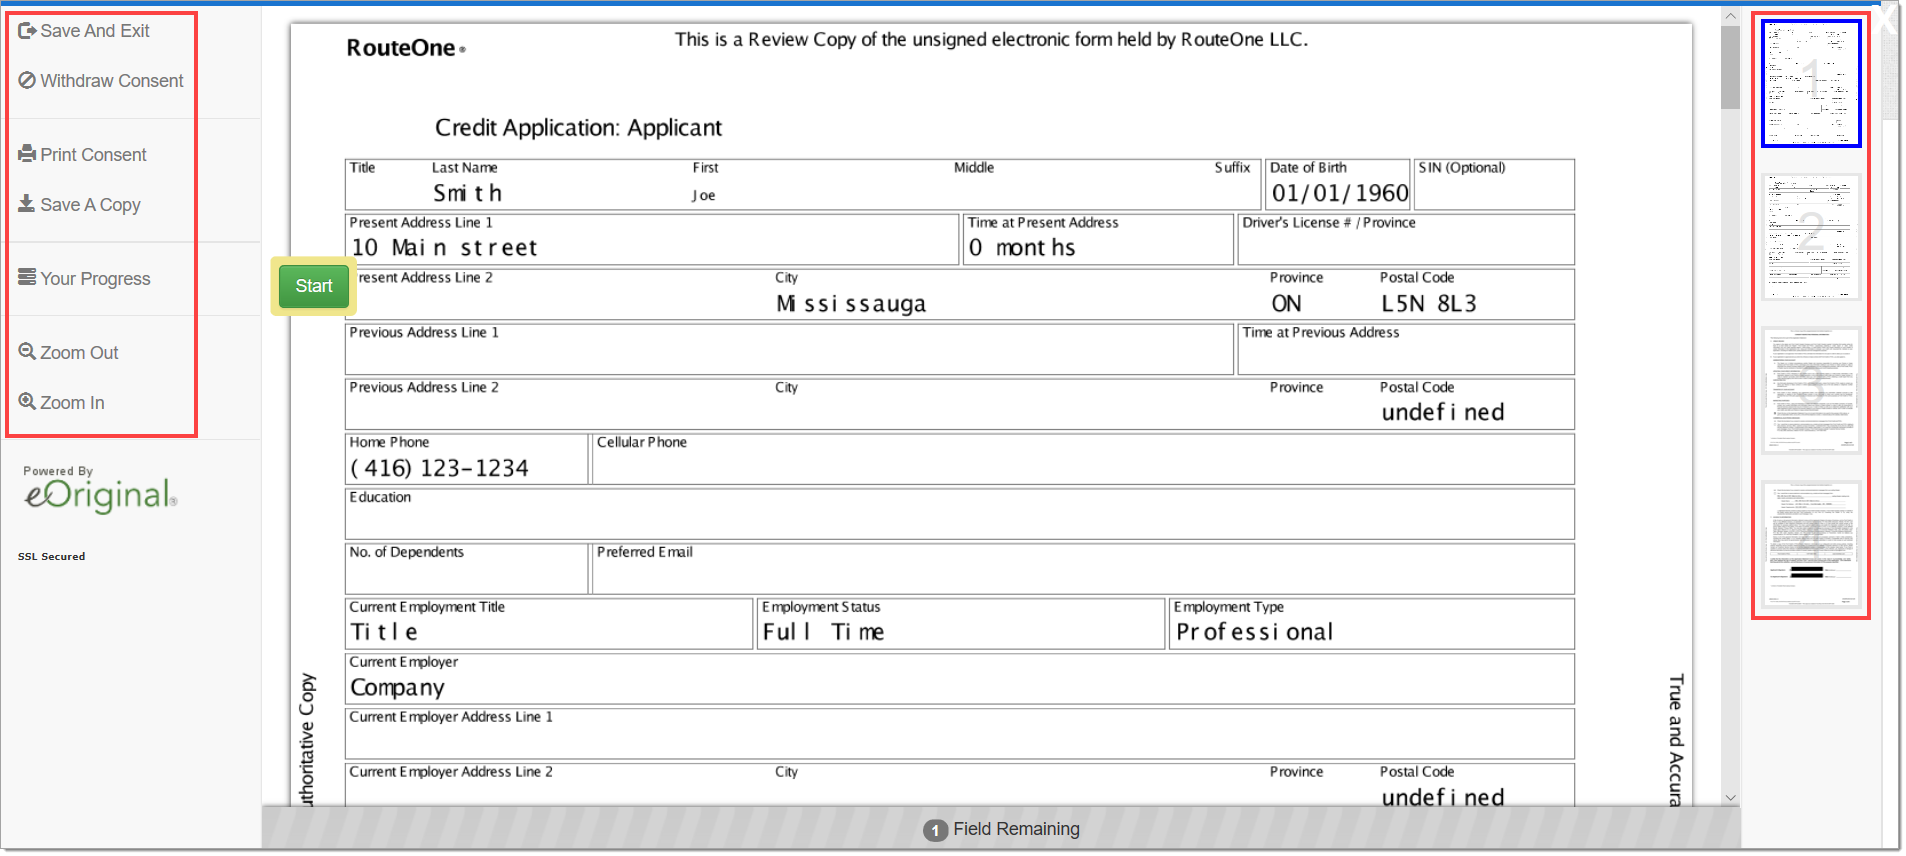
The signer can review and sign the contract documents. They can scroll through each document and apply their signature individually, or they can click the ‘Start’ button.
The ‘Start’ button will automatically direct them to each signature field on the document.
In each signature field, they will click the ‘Click here’ prompt to apply their signature to the highlighted field, and then click ‘Next’ to be directed to the next signature field.
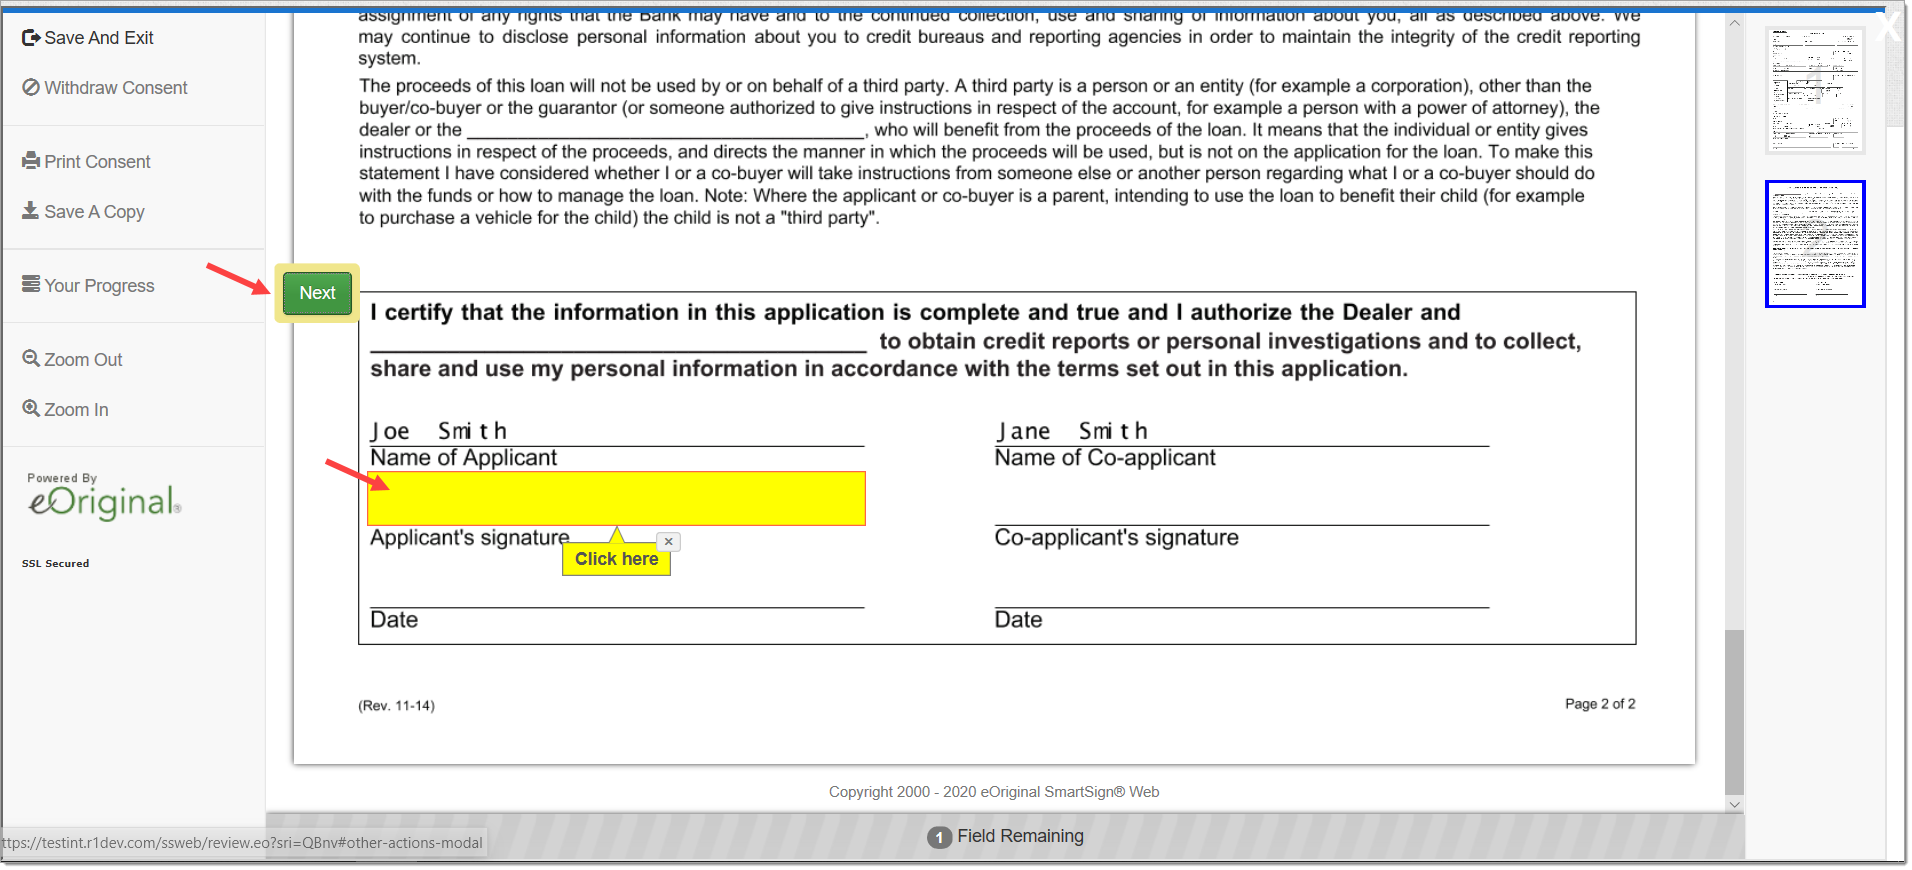
Once the signer has entered all signatures within a document, the ‘Apply Signature’ button displays.
Clicking the ‘Apply Signature’ button serves as confirmation that the signer has reviewed the document in its entirety, agrees to the terms and conditions, and is ready to apply their set of signatures to the document.
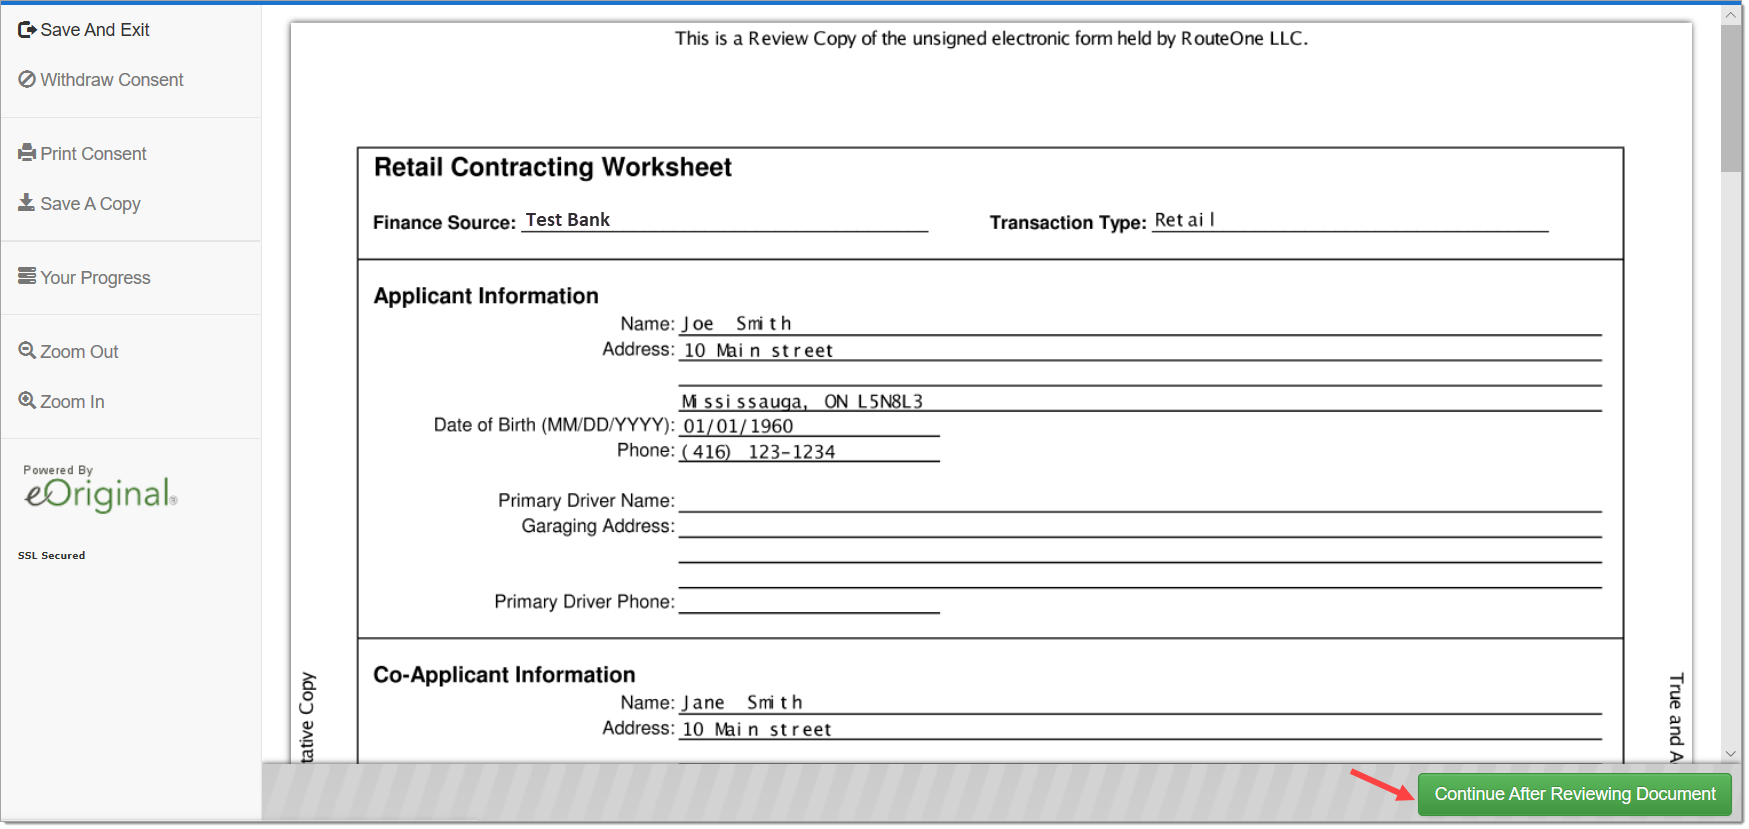
Documents that are intended for the signer’s review and do not require a signature, only require the individual to scroll through and indicate that they are ready to proceed, by clicking the ‘Continue after Reviewing Document’ button.
There are actions that signers can take in the Signing Room in addition to signing the documents. To learn more, visit the ‘Additional Actions in the Signing Room’ section of this guide.
The signer will repeat the signing and review process for each document until all of their contract documents are reviewed and signed.
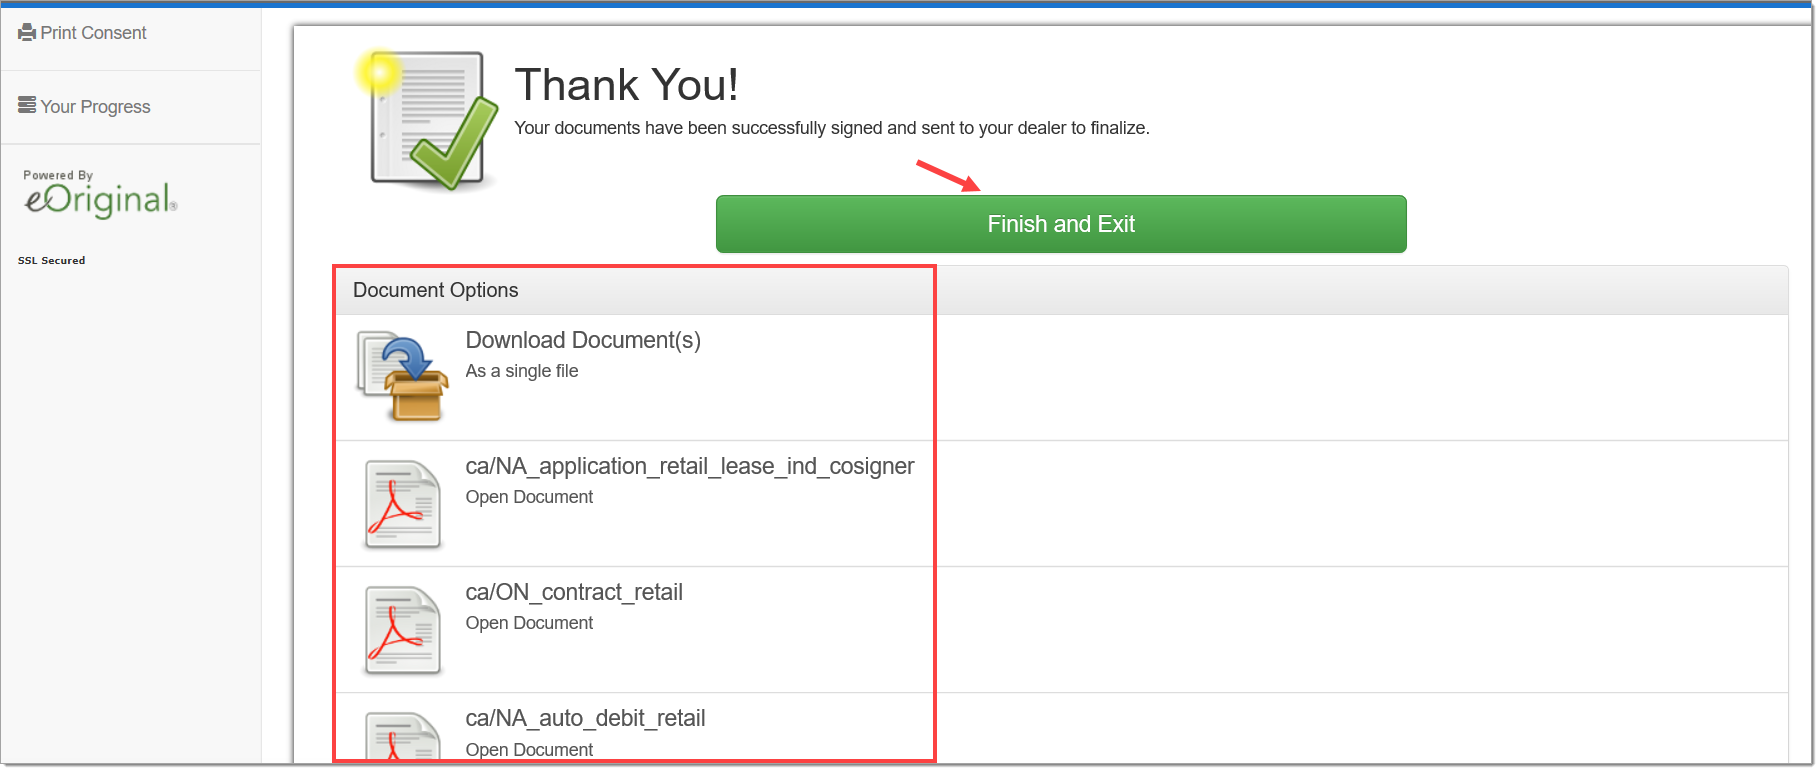
Once all documents have been signed, the customer will be directed to a ‘Thank You’ page where they will have the ability to download their documents in PDF format, either as a single combined file or individual files.
When finished, the signer will click the ‘Finish and Exit’ button.
Clicking the ‘Finish and Exit’ button will redirect the signer to the ‘Signing Room,’ where you will see the updated ‘Completed’ status for that signer.

Complete the signing process until all parties have electronically signed their documents and their statuses are updated to ‘Completed.’
When the signing process has been completed for all signers, click the ‘Deal Worksheet’ button to exit the Signing Room.

You can now exit the application on the tablet and complete the remaining steps on your laptop or desktop.
The progress bar on the Deal Worksheet will update, showing that the ‘eSign’ step is completed.
If changes need to be made to the contract, you can delete the signatures by clicking the ‘Delete Signed Documents’ button.
‘Deleting Signed Documents’ may require you to resubmit the application (depending on the changes that were made, and finance source’s business rules).
You will need to reapply signatures to the documents with all the required signing parties. This will involve clicking the ‘Validate and Review’ button again to regenerate the revised contract(s), clicking the ‘eSign’ button to enter the ‘Signing Room,’ and recapturing the electronic signatures on the revised contract(s).

Dealer Uploads
With the ‘eSign’ step completed, you will need to ensure that all additional documents required for funding are uploaded. This may include documents required for funding that are not currently generated in the RouteOne system (e.g., bill of sale, proof of insurance, etc.).
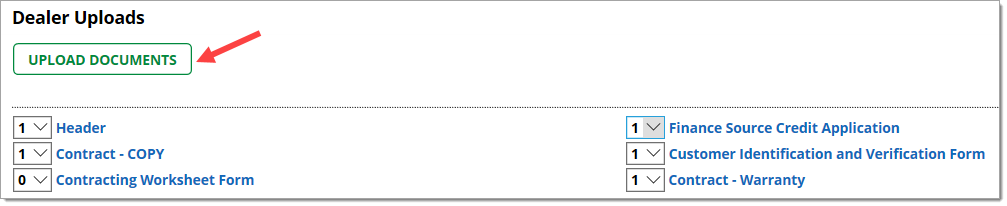
In the ‘Dealer Uploads’ section at the bottom of the Deal Worksheet, click the ‘Upload Documents’ button.
The ‘Upload Additional Documents’ screen will display.
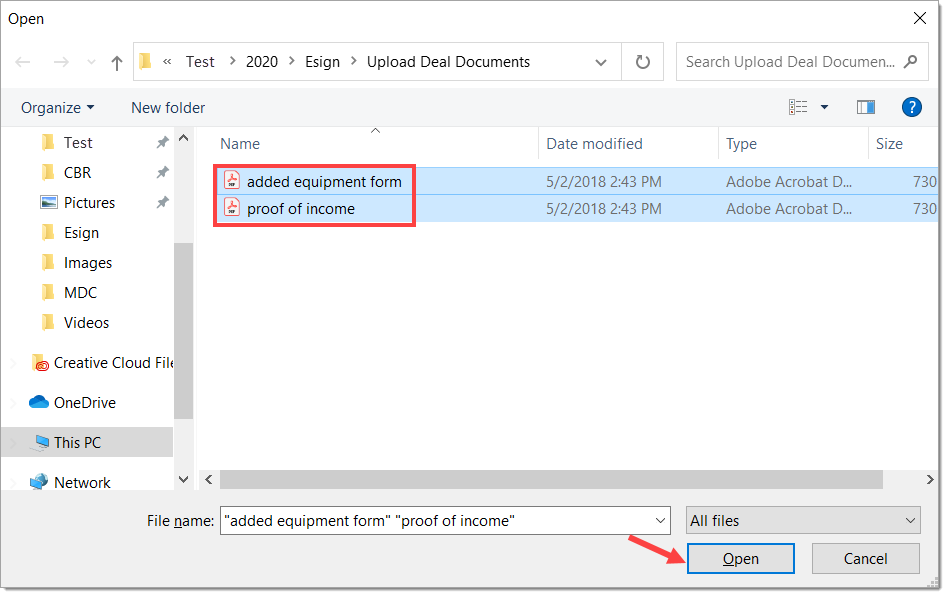
To add one or more documents to the contract package, either drag and drop them directly into the ‘Drag Files Here’ box or click ‘Browse’ to open the File Browser on your computer.
Important: The format for these documents must be PDF. The file size limitation may change depending on the finance source selected. Details on the file size limitation will be displayed in the ‘Upload Additional Documents’ screen. There is no limit on the number of files that can be uploaded.
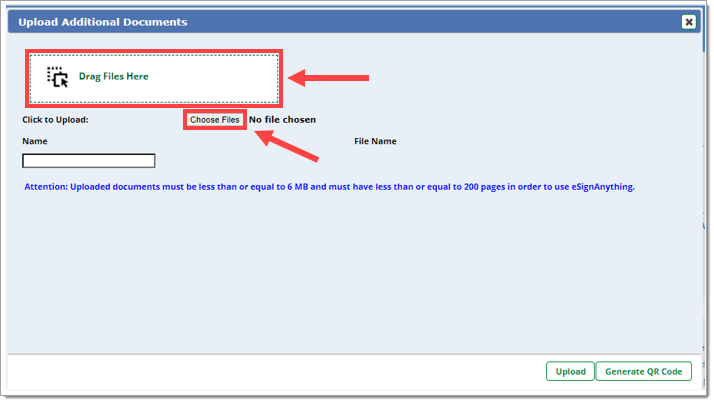
You can add one document at a time or select multiple documents to add together all at once. To select multiple documents at once, hold ‘Ctrl’ while clicking on each.
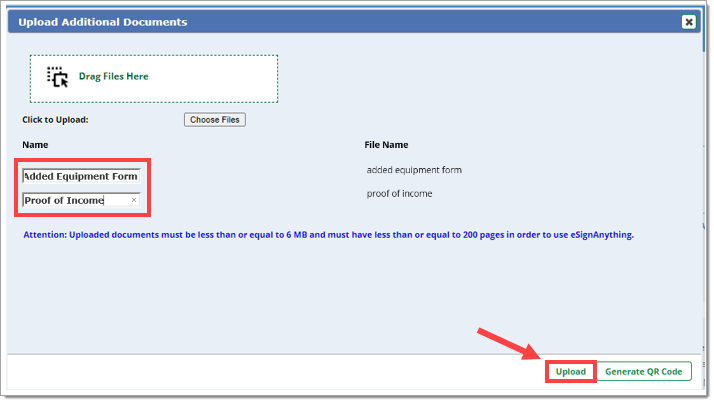
If added via the File Browser, you can enter revised name(s) for the documents on the ‘Upload Additional Documents’ screen to make them more easily identifiable.
Click ‘Upload’ to finish uploading the documents to the contract package.
If added via Drag and Drop, the page will automatically refresh, and the new documents will be visible under Dealer Uploads.
To change the name of a document added via Drag and Drop, you must delete the uploaded file by clicking the red ‘x’ icon and reupload it under the new name.
The uploaded documents will be added to the ‘Dealer Uploads’ section of the Deal Worksheet.
- Click the dropdown to the left of the document name(s) to indicate the number of copies to be included in the package.
- To delete a document, click the red ‘X’ to the right of the document.

Ready to Fund
When you are ready to submit the entire contract package to the finance source for funding, click the ‘Ready to Fund’ button on the righthand side of the Deal Worksheet. This will submit the contract package and trigger an electronic message to the finance source.
Important: This final step must be taken to complete the transaction for the dealer.

Once the ‘Ready to Fund’ button has been clicked, the progress bar in the Deal Worksheet will indicate that the final step in the transaction has been completed by the dealer – the documents and electronic message have been sent to the finance source’s funding team for review.

eSigning a Lease Contract
If the finance source offers a lease product, much of the eSigning process is similar to the process for a retail transaction.
If needed, refer to the corresponding steps outlined in the ‘eSigning a Retail Contract’ section of this guide.
The following steps occur on a tablet.
Switch to the tablet and log into your RouteOne account.
If needed, refer to the corresponding steps outlined in the ‘eSigning Documents Within the Signing Room’ section of this guide.
Click on ‘Customer Manager’ or ‘Deal Manager,’ find the desired transaction for eSigning, and click on the customer’s name to navigate to the ‘Deal Worksheet’ page.
A Lease transaction may require the signatures of the dealer, buyer(s), and the salesperson.
If a business is listed as the primary applicant, an authorized individual buyer’s name may also be required in the ‘Signing Room.’


Once the information from the required signing parties is entered, proceed to the Signing Room by clicking the 'eSign' button in the Deal Worksheet.
Important: The signing parties' details cannot be changed within the signing room. Changes must be made within the Deal Worksheet.
If you must correct the signing party’s information, return to the Deal Worksheet by clicking on the ‘Deal Worksheet’ button and updating the corresponding fields.
If you have already begun the eSign process, you can select ‘Withdraw Consent’ in the ‘Signing Room’. Selecting ‘Withdraw Consent’ will direct you back to the ‘Deal Worksheet’ where you can make any necessary changes. Once the changes have been made, click on ‘Validate & Review’ to being the eSign process again. For more information, refer to the ‘Additional Actions in the Signing Room’ section of this guide.
Clicking the ‘Sign’ button will launch the screen that begins the self-guided process for capturing signatures (similar to the retail eSigning process). If needed, refer to the corresponding steps outlined in the ‘eSigning Documents Within the Signing Room’ section of this guide.
- Complete the signing process until all required parties have electronically signed their documents, and their statuses are updated to ‘Completed.’
- When the signing process has been completed for all signers, click the ‘Deal Worksheet’ button to exit the Signing Room.
- The required documents for funding can be uploaded in the ‘Dealer Uploads’ section of the ‘Deal Worksheet.’
- If needed, refer to the corresponding steps outlined in the ‘Dealer Uploads’ section of this guide.
- When you are ready to submit the entire contract package to the finance source for funding, click the ‘Ready to Fund’ button in the ‘Deal Worksheet.’ This will submit the contract package and trigger an electronic message to the finance source.
Important: This final step must be taken to complete the transaction for the dealer.
- If needed, refer to the corresponding steps outlined in the ‘Ready to Fund’ section of this guide.
- Once the ‘Ready to Fund’ button has been clicked, the progress bar in the ‘Deal Worksheet’ will indicate that the final step in the transaction has been completed by the dealer – the documents and electronic message have been sent to the finance source’s funding team for review.
Additional Actions in the Signing Room
There are actions that signers can take in the Signing Room in addition to signing the deal documents.
On the left side of the page
Save And Exit
The signer can click ‘Save and Exit’ and select ‘I want to exit now and come back later.’ This will allow them to save their work, exit the session, and return to the session without having to reapply signatures that had previously been applied.
Reminder: RouteOne will save the completed signatures in the contract until midnight, local time. If the Finance Source supports flexible eSign dating, this time frame may be extended. If all signatures have not been completed for all signing parties by the designated time, the system will clear the existing signatures, and they will have to be recaptured.
Withdraw Consent
The signer can withdraw consent and opt to not sign the contract. The signer will be prompted to provide a reason for withdrawing consent.
Important: If a customer withdraws consent, the contract document is voided. If the customer later decides to move forward with the deal, you will need to regenerate the contract and reapply signatures.
Print Consent
The signer can choose to print a hard copy of the ESIGN Consent form. Clicking the ‘Print Consent’ link will open the ESIGN Consent form as a printable PDF.
Save A Copy
The signer can download and save a copy of all documents as a single PDF file to their laptop or desktop.
Your Progress
Clicking this link will display a popup with information on documents that have been signed and documents that still need to be signed.
From this page, the signer can view or print any document.
Zoom Out/Zoom In
Clicking these buttons will zoom in or out on the document that the signer is currently reviewing.
On the right side of the page
The customer can see the pages in the document.
Clicking on a page will navigate to that specific page in the document. The current page is outlined by a blue border.
While it is possible to navigate to any page in the document, the customer will not be able to move to the next step without applying signatures to each of the required fields.
iPad® and App Store® are trademarks of Apple Inc.
Google Play™ and Android™ are trademarks of Google LLC.
FAQs
Remote eSign is available as a subscription product. For instructions on how to subscribe, refer to the ‘Subscribing – Remote eSign’ guide.
Using the eSign Anything tool, you can upload PDF documents and add signature boxes as needed. For instructions on how to use eSign Anything®, refer to our ‘eSign Anything®' user guide.
ROUTEONE SUPPORT
Hours (EST)
Monday - Friday: 8:00 AM - 9:00 PM
Saturday: 9:00 AM - 9:00 PM
Can’t find what you need?
Try our search
