Related Guides:
Credit and Contracting - Canada
eSign Anything®
What is ‘eSign Anything®’?
RouteOne’s eSign Anything® allows you to electronically capture your customer(s) signatures on all eSignable deal documents through our secure signing portal in one signing ceremony in-store on your desktop, laptop, or a tablet device. Along with RouteOne generated documents, you can also upload PDF(s) into the RouteOne platform and easily create signature fields as needed.
These dealer uploaded documents are then integrated with eligible RouteOne-generated documents (e.g. retail or lease agreement etc.) in the signing room. This creates a complete, electronically signed package, resulting in a more secure and fully compliant customer experience.
Defining eSignable Areas
You can access the signature tool to define signable areas on uploaded documents via the ‘Dealer Uploads’ section at the bottom of your Deal Worksheet:
Accessing the Signature Tool through the Deal Worksheet
To create an eSignable form, the document must first be uploaded from the ‘Dealer Uploads’ section of your Deal Worksheet.
Begin by navigating to ‘Deal Worksheet’ of your transaction and scrolling down to the ‘Dealer Uploads’ section.
Click the ‘Upload Documents’ button in the bottom left hand corner.
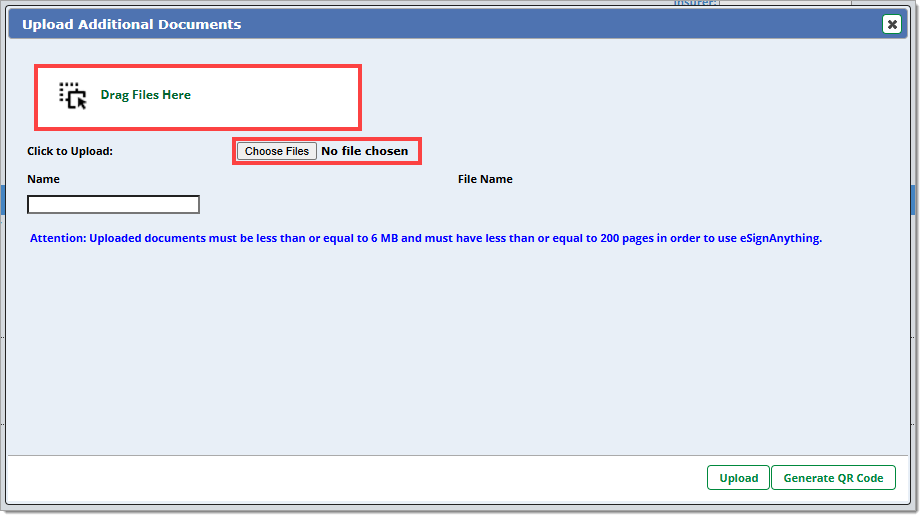
The ‘Upload Additional Documents’ screen will display. Drag and drop a document or click the ‘Choose Files’ button to browse your computer and select the document you want to upload.
Once you have selected the file(s) you want to upload, the Upload Additional Documents screen will display the name of the file that you are about to upload.
In the ‘Name’ field, enter the name that you want to be displayed for the document.
You cannot include special characters.
Click the ‘Upload’ button.
Your uploaded document will be displayed in the ‘Dealer Uploads’ list.
To the right of the uploaded document, you will see a ‘Draw’ button, which indicates that signature fields may be created and defined for the document.
Click the ’Draw’ button to open the signature tool.
Proceed with defining your signature fields as described in the ‘Creating Signature Fields’ section below.
Important: RouteOne’s Mobile Document Capture (MDC) app cannot be used in conjunction with eSign Anything. Any documents uploaded by the MDC app will appear as review only documents and will not have a ‘Draw’ button beside them.
Creating Signature Fields
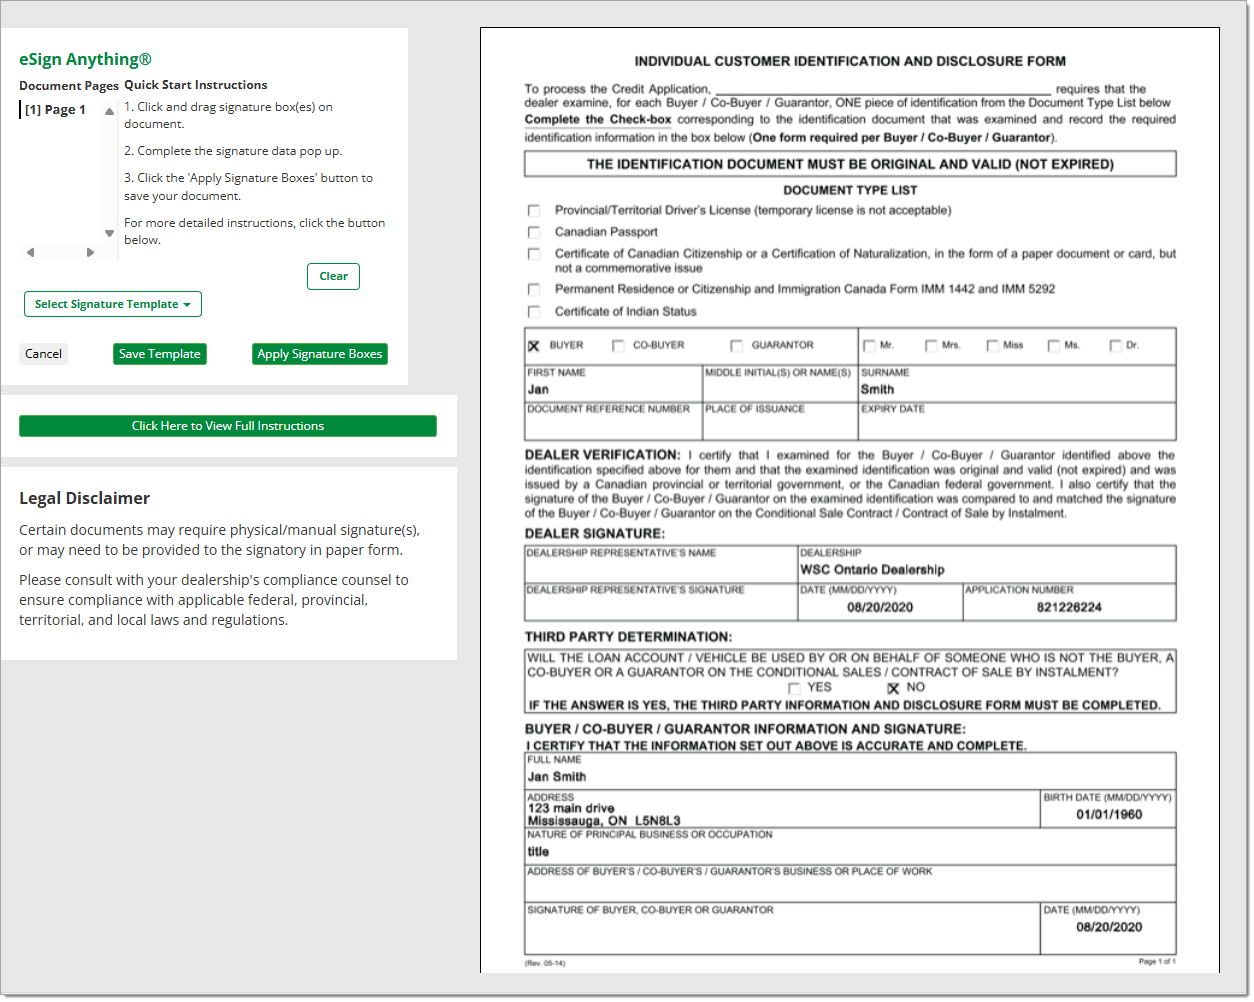
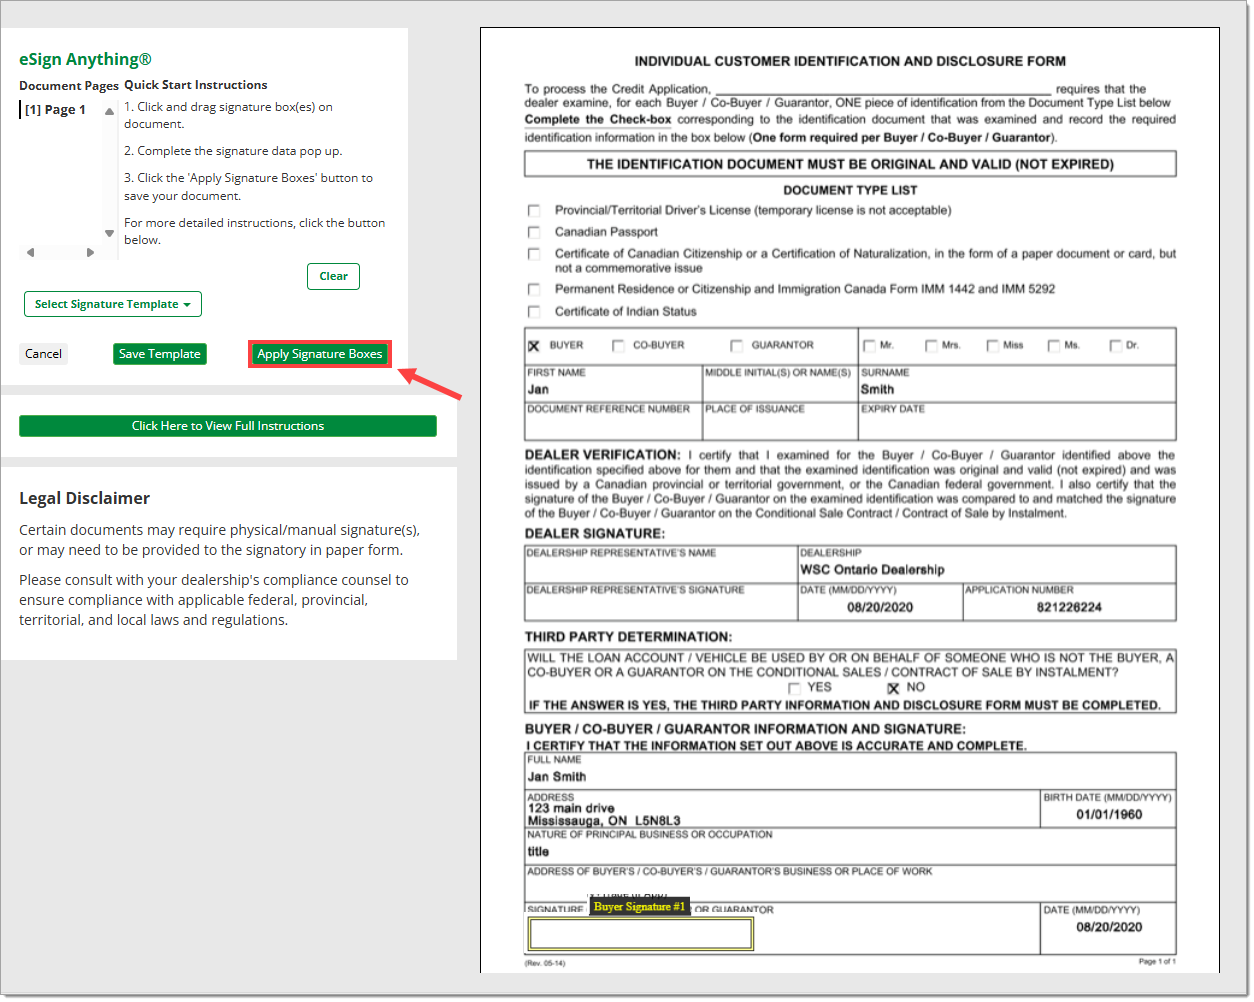
When the signature tool opens for the uploaded document, create and define the relevant fields. You can create a full signature field, initial field, or date field.
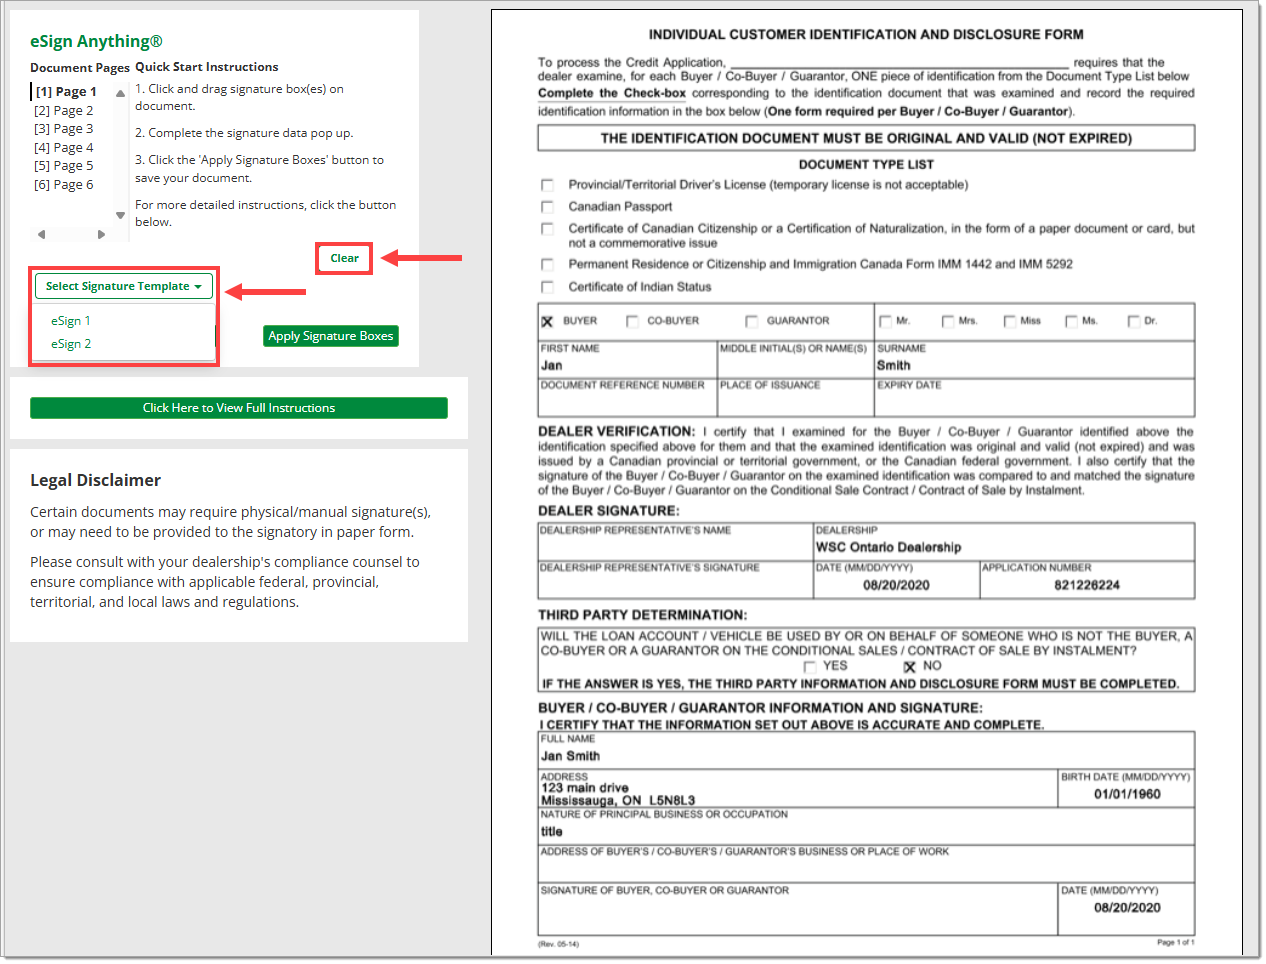
If you have an existing Signature Template you would like to use, click on the ‘Select Signature Template’ drop down menu and select the desired template.
To clear an applied template, click ‘Clear.’
To add a signature field, click and drag anywhere on the document to create a box for a field.
Please note the following when creating fields:
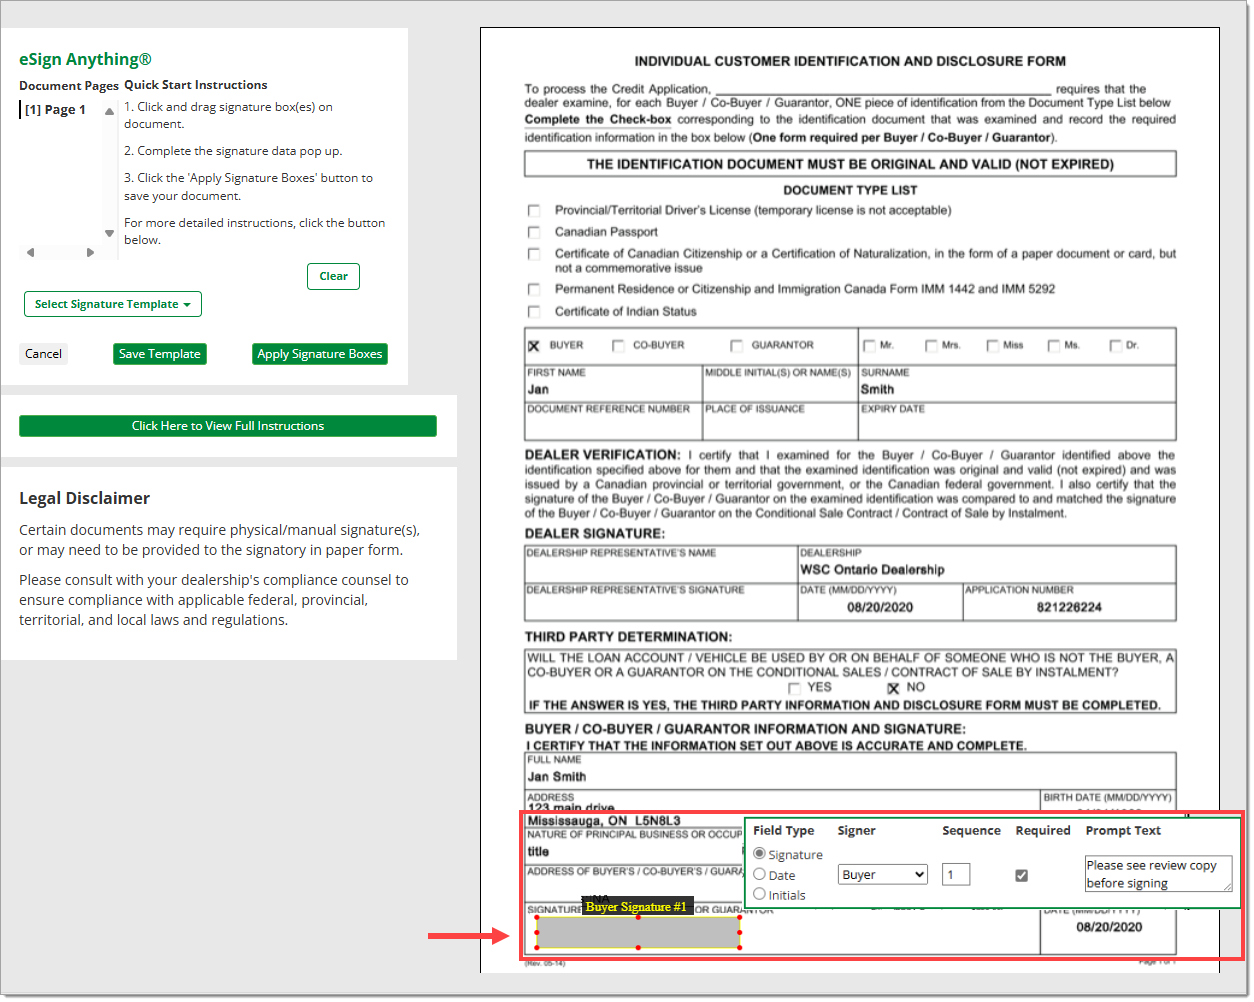
- To edit field information, click on the field and edit the ‘field type,’ ‘signer,’ ‘sequence,’ and ‘prompt text.’ You can also designate each field as ‘required’ or ‘optional’ by checking or unchecking the ‘Required’ box.
- To delete a field, click on the box to highlight it, then press the ‘Delete’ key on your keyboard.
- Fields can only be edited or deleted before saving the document. Saving the document occurs when you click the ‘Apply Signature Boxes’ button.
Once the document is saved, if you need to edit or delete fields, you will need to delete the document, re-upload it, and redefine the fields. Editing or deleting fields after the document has been saved is not available at this time.
‘Signer’ types include Buyer, Co-buyer, Salesperson, or Dealer.
- Additional ‘Signer’ types not listed in the dropdown menu (e.g., spouse, guarantor, representative, etc.) will be mapped automatically to either a buyer or a co-buyer.
A Spouse or a Guarantor should be created with a Signer selection of ‘Co-buyer.’
You must first create a signature field before you can create a date field. This is because a date field must be associated with a signature field.
Although you will create a date field for a given signature field, the customer will not complete the date fields.
The date field will be populated automatically by the RouteOne system with the date that the document is signed.
The ‘Signature Sequence’ indicates the order that the field will be completed by the ‘Signer.’
- This will ensure the signing process for each signer is sequential and easy to follow.
- For example, if the ‘Signer’ for the field is the Buyer, a ‘Signature Sequence’ of ‘1’ will mean that field is the first field signed by the Buyer. A ‘Signature Sequence’ of ‘2’ will mean that field is the second field signed by the Buyer.
- If there are multiple signature fields for the same signer on a document, create the signing order sequentially for each signer, starting at the top of the document and working your way down.
- For example, the first Buyer signature field would be Buyer 1. The first Co-Buyer signature field on the page would be Co-Buyer 1. The first Buyer Initial field on the page would be a Signature Type of ‘Initial,’ a ‘Signer’ of Buyer, and a sequence of ‘1.’
Note that a ‘Signature Sequence’ cannot be repeated for the same type of ‘Signer,’ as the signer would not know which field to sign first.
- For example, if the ‘Signer’ for the field is the Buyer, there can only be one signature field with a ‘Signer’ type of Buyer and a ‘Signature Sequence’ of ‘1’ in that particular document.
By default, fields are considered to be required. To make a field optional, uncheck the ‘Required’ box.
- If you have a document with both required fields and optional fields, the signer will be able to skip past the optional fields with no additional prompts.
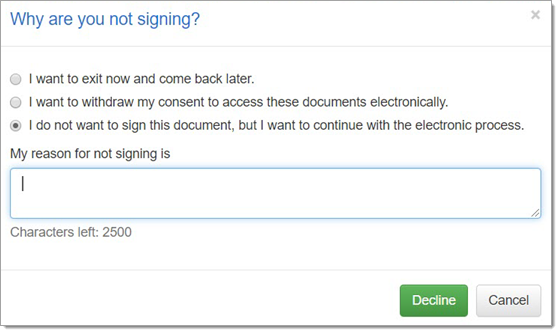
- If you have a document with only one field and that field is optional, the signer can skip past it; however, the signer will be asked why they are skipping signature on that page:
It will always be the dealer’s responsibility to ensure that any documents requiring ‘wet ink’ signatures are also collected.
Certain documents may require physical signature(s). Please consult with your dealership’s compliance counsel to ensure compliance with applicable federal, provincial, and local laws and regulations.
Once you have finished creating a signature field, you can click anywhere on the PDF to create another signature field.
When you are finished creating signature fields, click the ‘Apply Signature Boxes’ button on the left side of the screen.
Clicking the ‘Apply Signature Boxes’ button will navigate you back to the ‘Deal Worksheet’ page.
- In the ‘Dealer Uploads’ section of the Deal Worksheet, you will see your uploaded document(s) and that the ‘Draw’ button to the right of the uploaded document is now greyed out. This is an indicator that the signature fields have been created for the document.
Once your contract package is ready, proceed with the signing process by clicking the ‘eSign’ button.
Your signable documents will be included in your preferred RouteOne signing process, whether that is via a tablet, desktop, or laptop.
- Refer to the ‘Signing Example’ section below for an example of the signing process.
- For more information on RouteOne eSigning, click here.
- For instructions on how to proceed with eSigning eligible documents (e.g. dealer uploaded documents, RouteOne-generated documents), refer to the 'eSigning Documents Within the Signing Room' section of the eSigning guide.
Signing Example
Click the ‘eSign’ button on the ‘Deal Worksheet’ page.
Once you click the ‘eSign’ button, you will begin the RouteOne eSigning workflow via the ‘Signing Room.’
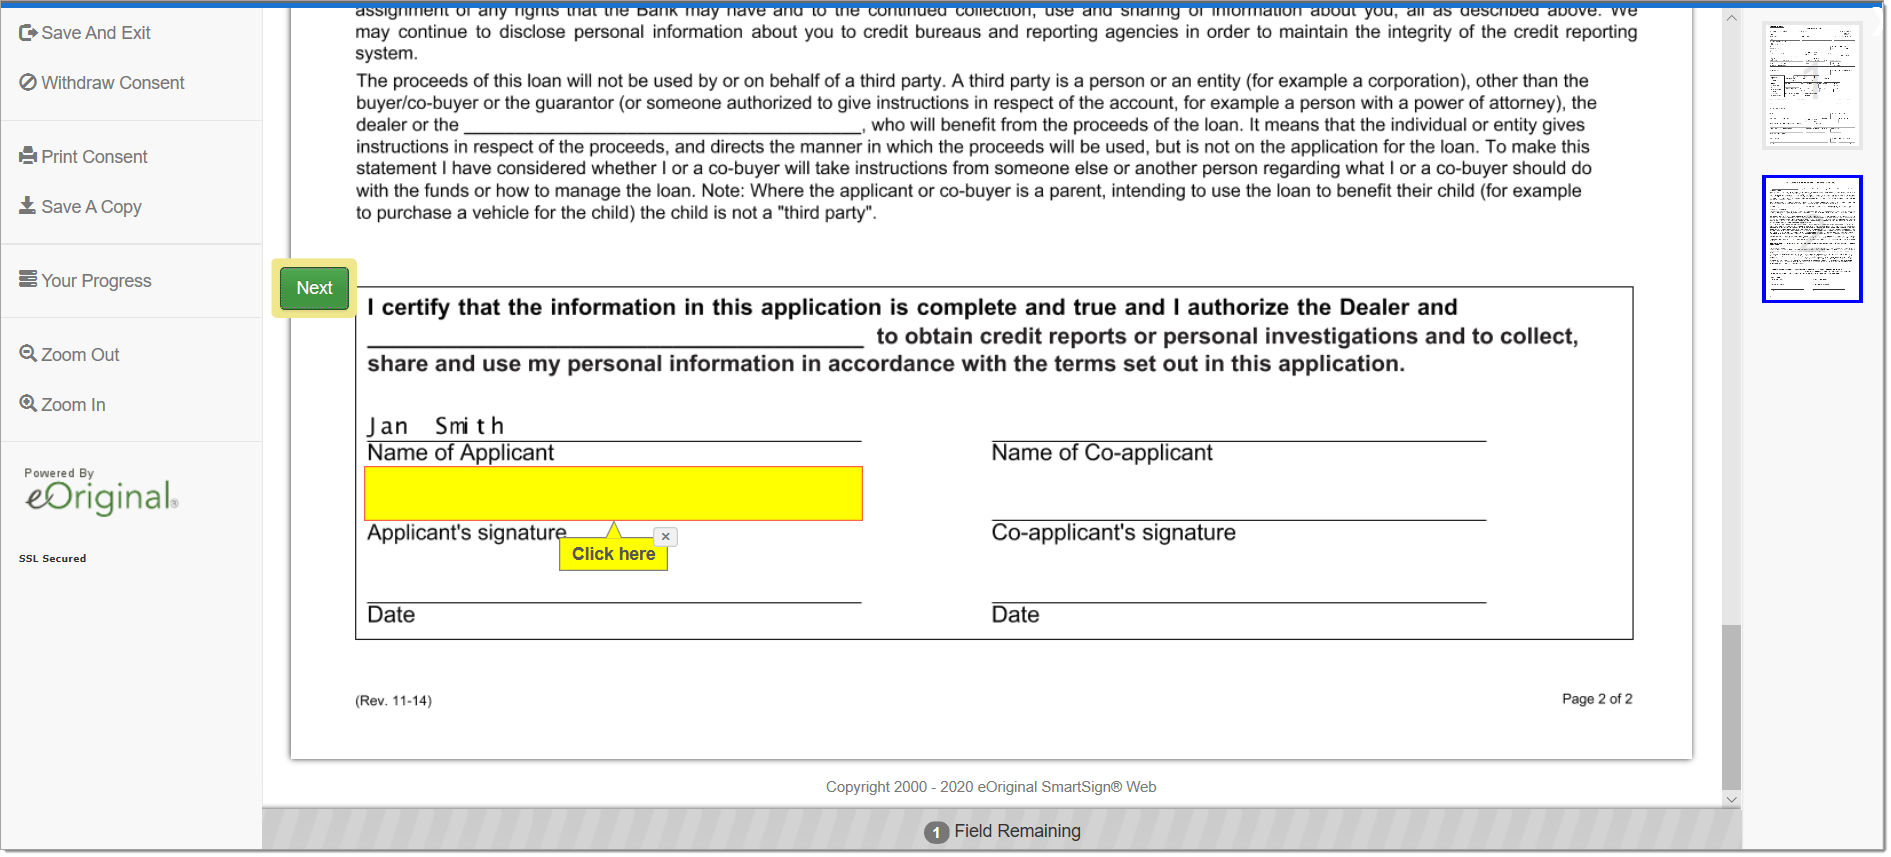
The signature field(s) that you defined on the uploaded document will be signable for your customer.
Once all signatures are captured, be sure to review all contract documents and ensure signatures are properly applied before sending the contract package to the finance source for funding via the ‘Ready to Fund’ button.
Signature Templates
Signature templates can save time by allowing you to designate a signature template for your uploaded documents, which allows you to skip the steps for creating signature fields each time the document is used.
Your saved Signature Templates can be found in the Signature Templates page and will be available to all eSign Anything users at your dealership.
There are two ways to create a signature template- through the Signature Templates page, and during the contracting process within the signature field creation page.
Creating Signature Templates through the Signature Templates Page
To access the Signature Templates page, hover over the ‘Contracts’ tab, then select ‘Signature Templates’ from the dropdown menu.
On the Signature Templates page, click the ‘Add Template’ button to create a new template.
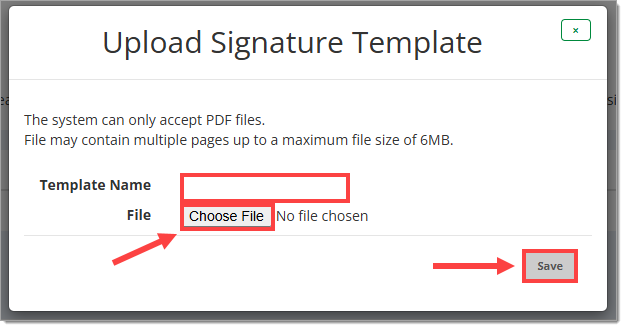
An ‘Upload Signature Template’ screen will display. Click the ‘Choose File’ button to select a document to upload from your PC.
Enter the template name. This will be the name displayed in the ‘Select Signature Template’ list when uploading documents during the contracting process, which will allow you to automatically apply the signature template to a document.
Click the ‘Save’ button.
You will then be able to create the signature fields that will appear in the template. For more information, refer to the ‘Creating Signature Fields’ section in this guide.
Once you have finished creating your signature fields, click the ‘Apply Signature Boxes’ button.
You will then be directed back to the Signature Template page, where your newly added signature template will be listed.
To delete a previously created template, click the ‘X’ next to the corresponding template.
Creating Signature Templates from the Signing Tool Page
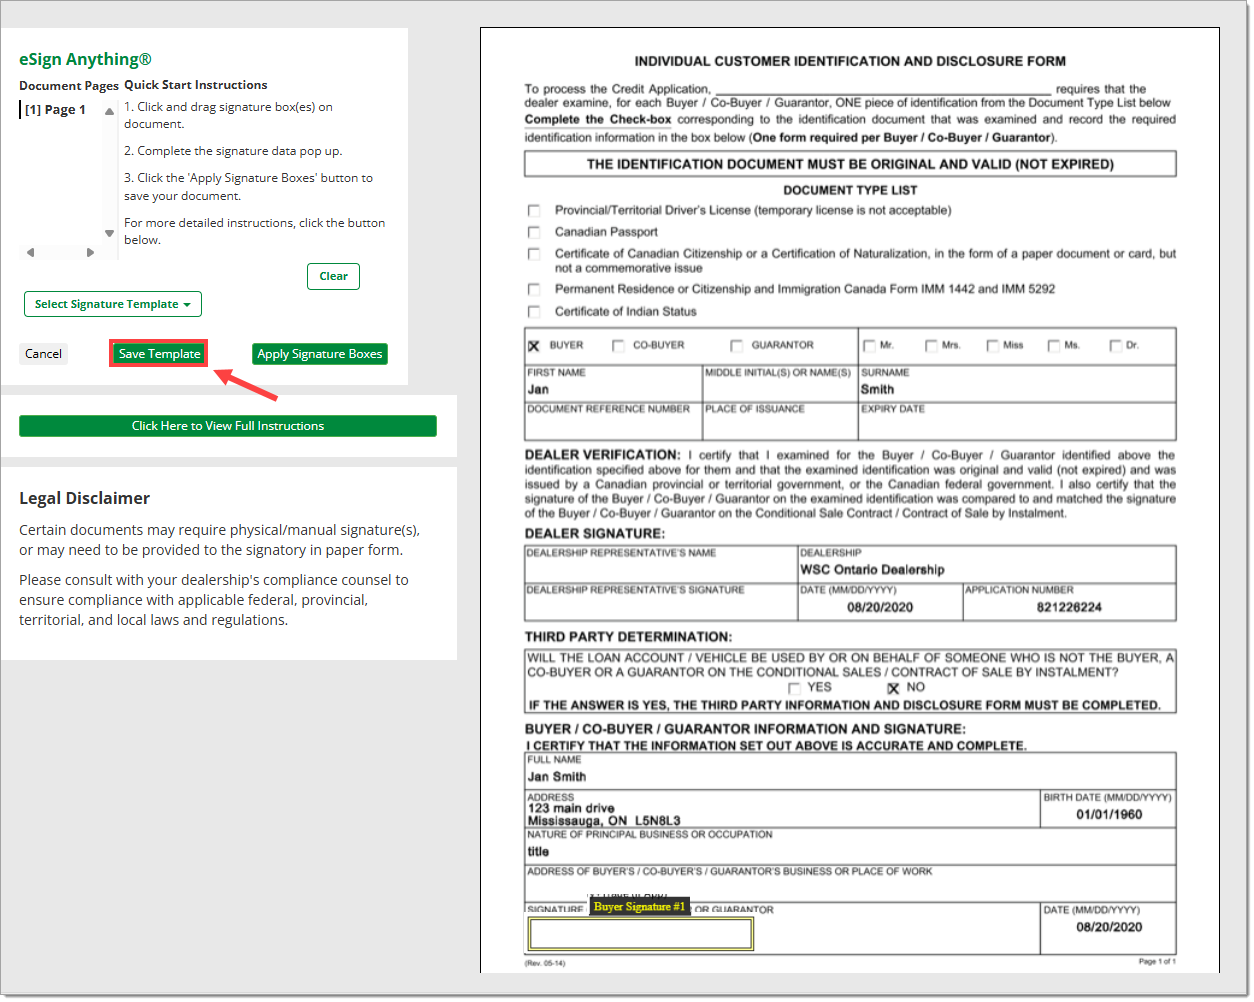
Signature templates can also be created during the contracting process. To save a template directly from the signature field creation page, create and apply the signature fields as normal, then click ‘Save Template.’
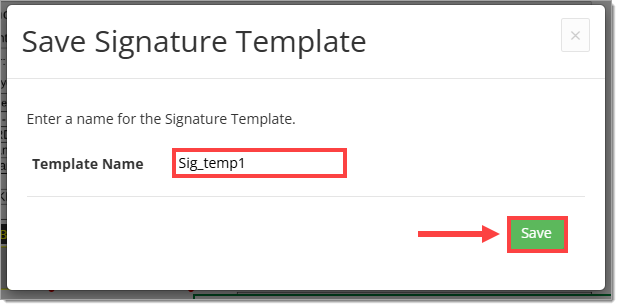
A pop-up will appear where you can add a unique name for the new template.
Click ‘Save.’
The new template will be added to the Signature Templates page, and you can continue with the contracting process as normal.
FAQs
This feature is available to all eSigning dealers.
Currently, the MDC app cannot be used to upload documents for use with eSign Anything. Only a scanned document uploaded via ‘Dealer Uploads’ section is eligible for eSign Anything.
The dealer can create a full signature field, initial field, or a date field.
Only the signature and initial fields are signed by the customer(s).
Date fields do not display as signable areas on the document. The date field is automatically populated by the RouteOne system when the document is eSigned.
If you have not yet clicked the 'Apply Signature Boxes' button, you can edit your field by clicking on it and modifying the settings in the toolbox.
If you have already saved your document with signature boxes, you will have to delete the document, re-upload it, and redefine the fields. Editing fields after the document has been saved is not available at this time.
We are addressing this issue. The current solution is to delete that box and redraw it.
Currently the file size for defining signature fields is limited to 4 MB per file.
See the file size information in the FAQ above. If you upload a file that is over 4MB, you will receive an error at the top of the ‘Deal Worksheet’ page and the file will not appear in the ‘Dealer Uploads’ section.
No, not at this time.
ROUTEONE SUPPORT
Hours (EST)
Monday - Friday: 8:00 AM - 9:00 PM
Saturday: 9:00 AM - 9:00 PM
Can’t find what you need?
Try our search


