Related Guides:
Credit and Contracting - Canada
Submitting a Credit Application
With RouteOne's credit application platform, you will get access to a large network of finance sources to give you and your customers a wide range of vehicle financing options. Whether your lead comes in online, in the showroom, or through one of our integrated Dealership Service Providers (DSPs), RouteOne's Credit Application System can streamline your workflow. The following is a step-by-step guide to submitting a credit application and worksheet, as well as validating and printing the contract.
Completing a Credit Application
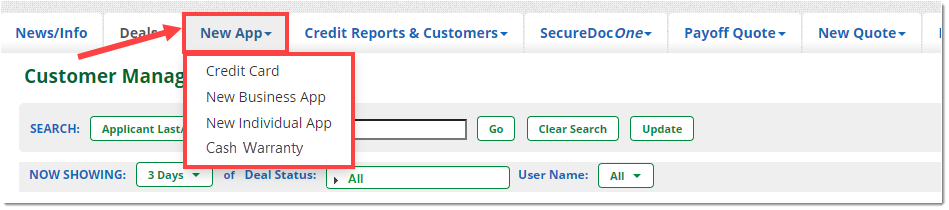
From the ‘New App’ tab, select the type of credit application you will be submitting from the dropdown. Each dealer may have different options, including: Credit Card, New Business App, New Individual App, or Cash Warranty.
Within the credit application, select the type of transaction you will be submitting.

Select the finance source to whom you will be submitting the credit application.
Each finance source may have different requirements for credit application submissions.
Only the Finance Sources which support the type of transaction you have selected will be available to select.

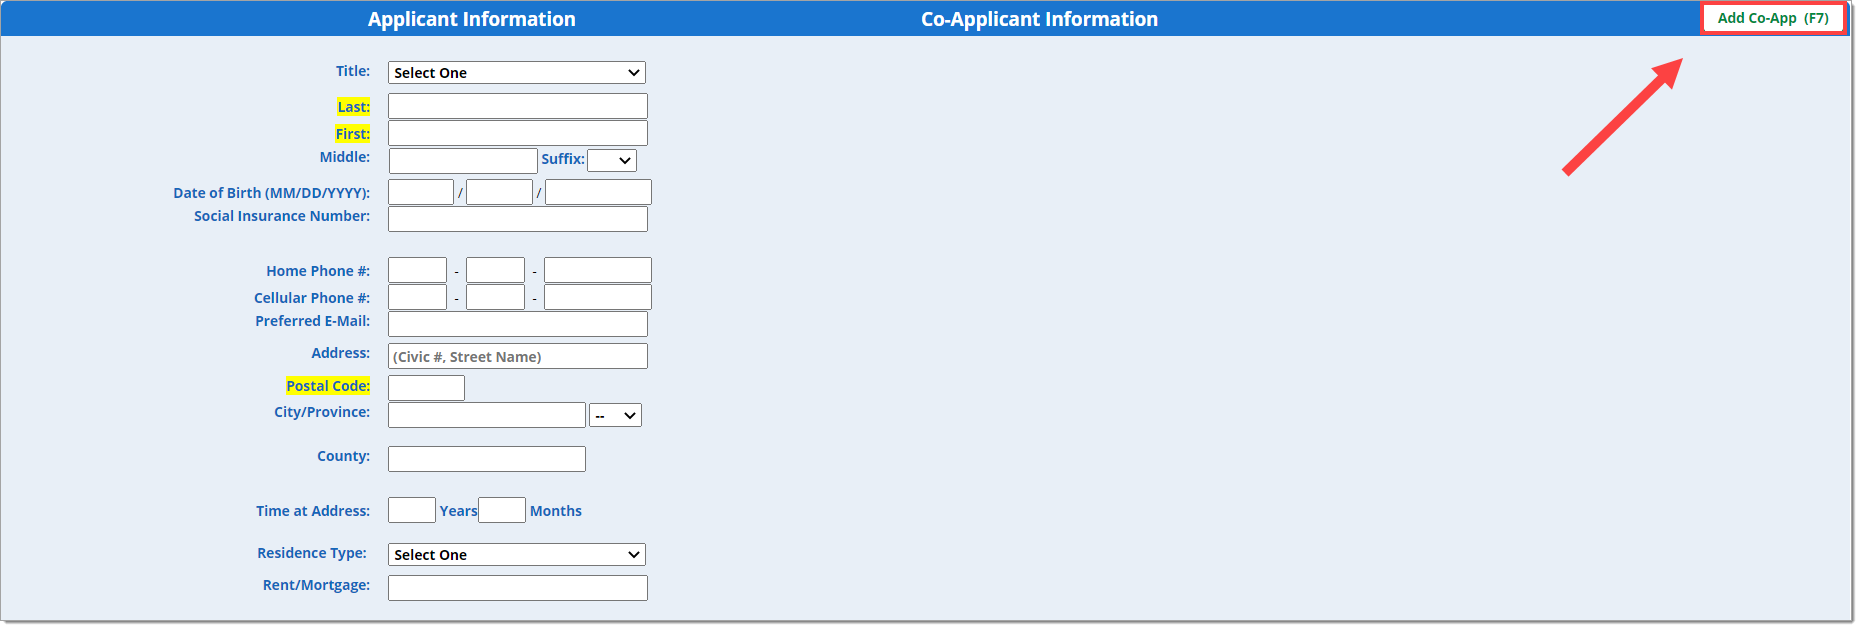
Complete the Applicant and Co-Applicant information (required fields are highlighted).
You can ‘Add’ or ‘Remove’ a Co-Applicant at any point by clicking on ‘Add Co-App' or pressing ‘F7’ on your keyboard.

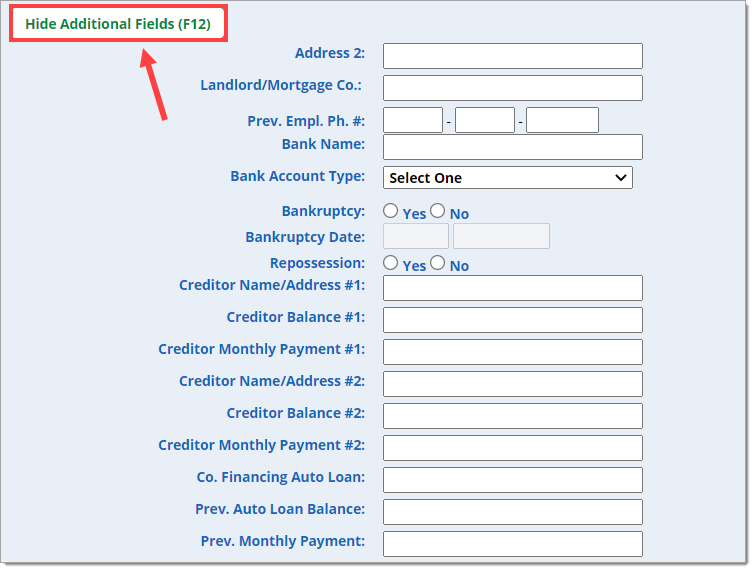
Click the ‘Show Additional Fields’ button to show fields related to the customer’s mortgage.
The additional fields may vary depending on the finance source.

Within the 'Finance Source Specific Information' section, complete any required fields using the drop-down menus.
Each finance source will have its own unique requirements.

At the bottom of the credit application, you can change the finance source you are sending the credit application to, using the radio buttons.
If you change the finance source, you will need to review if any of the required highlighted fields have changed for that specific finance source.
The credit application can now be saved to complete at a later time by clicking the ‘Save & Exit’ button or saved and printed by clicking the ‘Save & Print’ button.

- Clicking the ‘Save & Print’ button will create the Consent Form that needs to be signed. Please ensure that you obtain the applicants’ signatures on the Consent Form. Then, click the ‘Next’ button to move to the Deal Worksheet to create the contract.
- Clicking the ‘Next’ button will take you directly to the Deal Worksheet to create the contract.
When attempting to move forward using ‘Save & Print’ or ‘Next,’ the RouteOne system will check the credit application information provided against the validation rules specific to the selected finance source.
If there are any errors while submitting the credit application, an error or information message will appear at the top of the page and will specify the information needed to proceed.
Editing a Credit Application
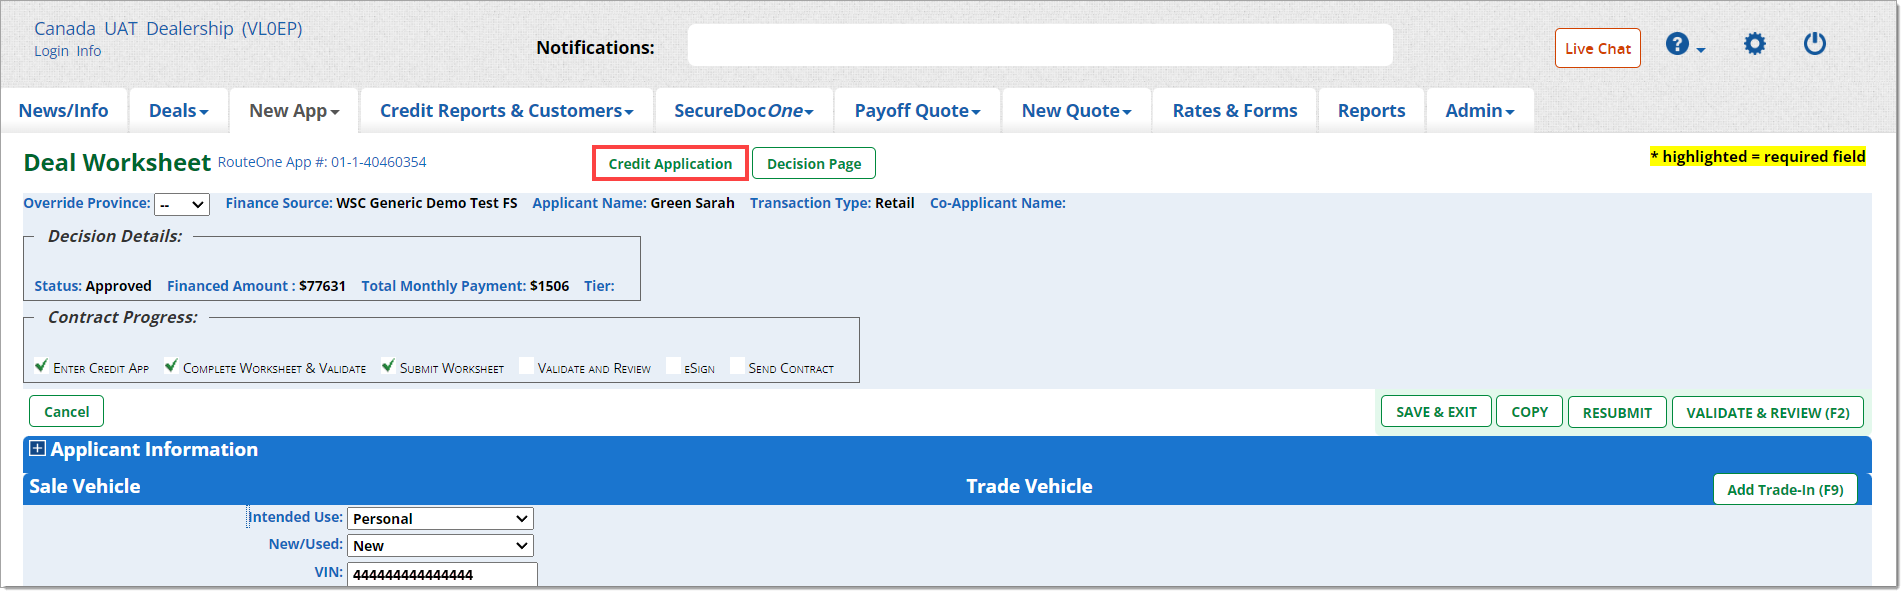
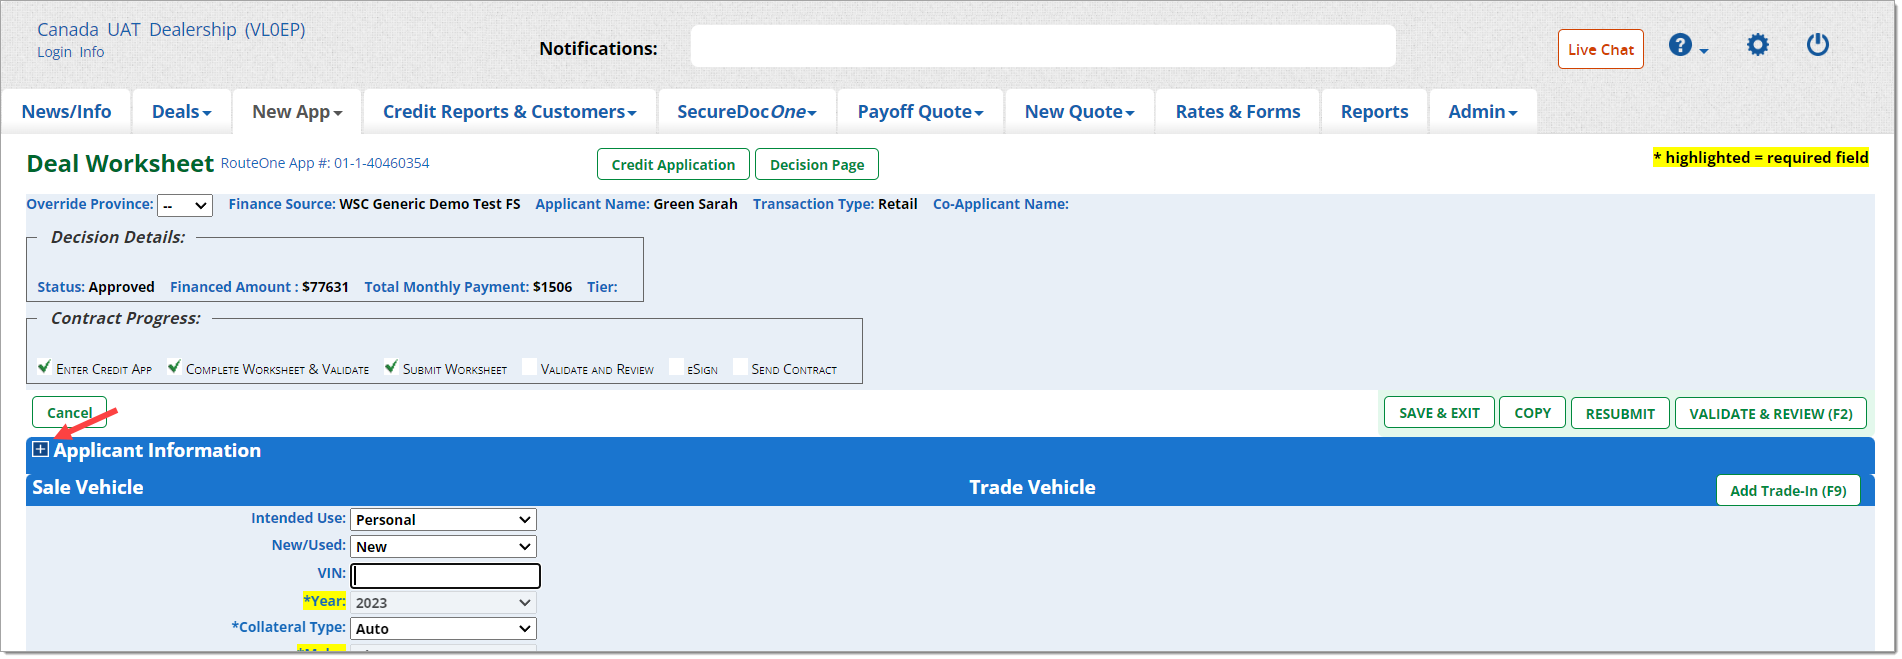
Prior to submitting the deal to the selected finance source, you can return to the Credit Application pages to edit the Applicant Information as needed. Click on the ‘Credit Application’ button at the top of the deal worksheet.
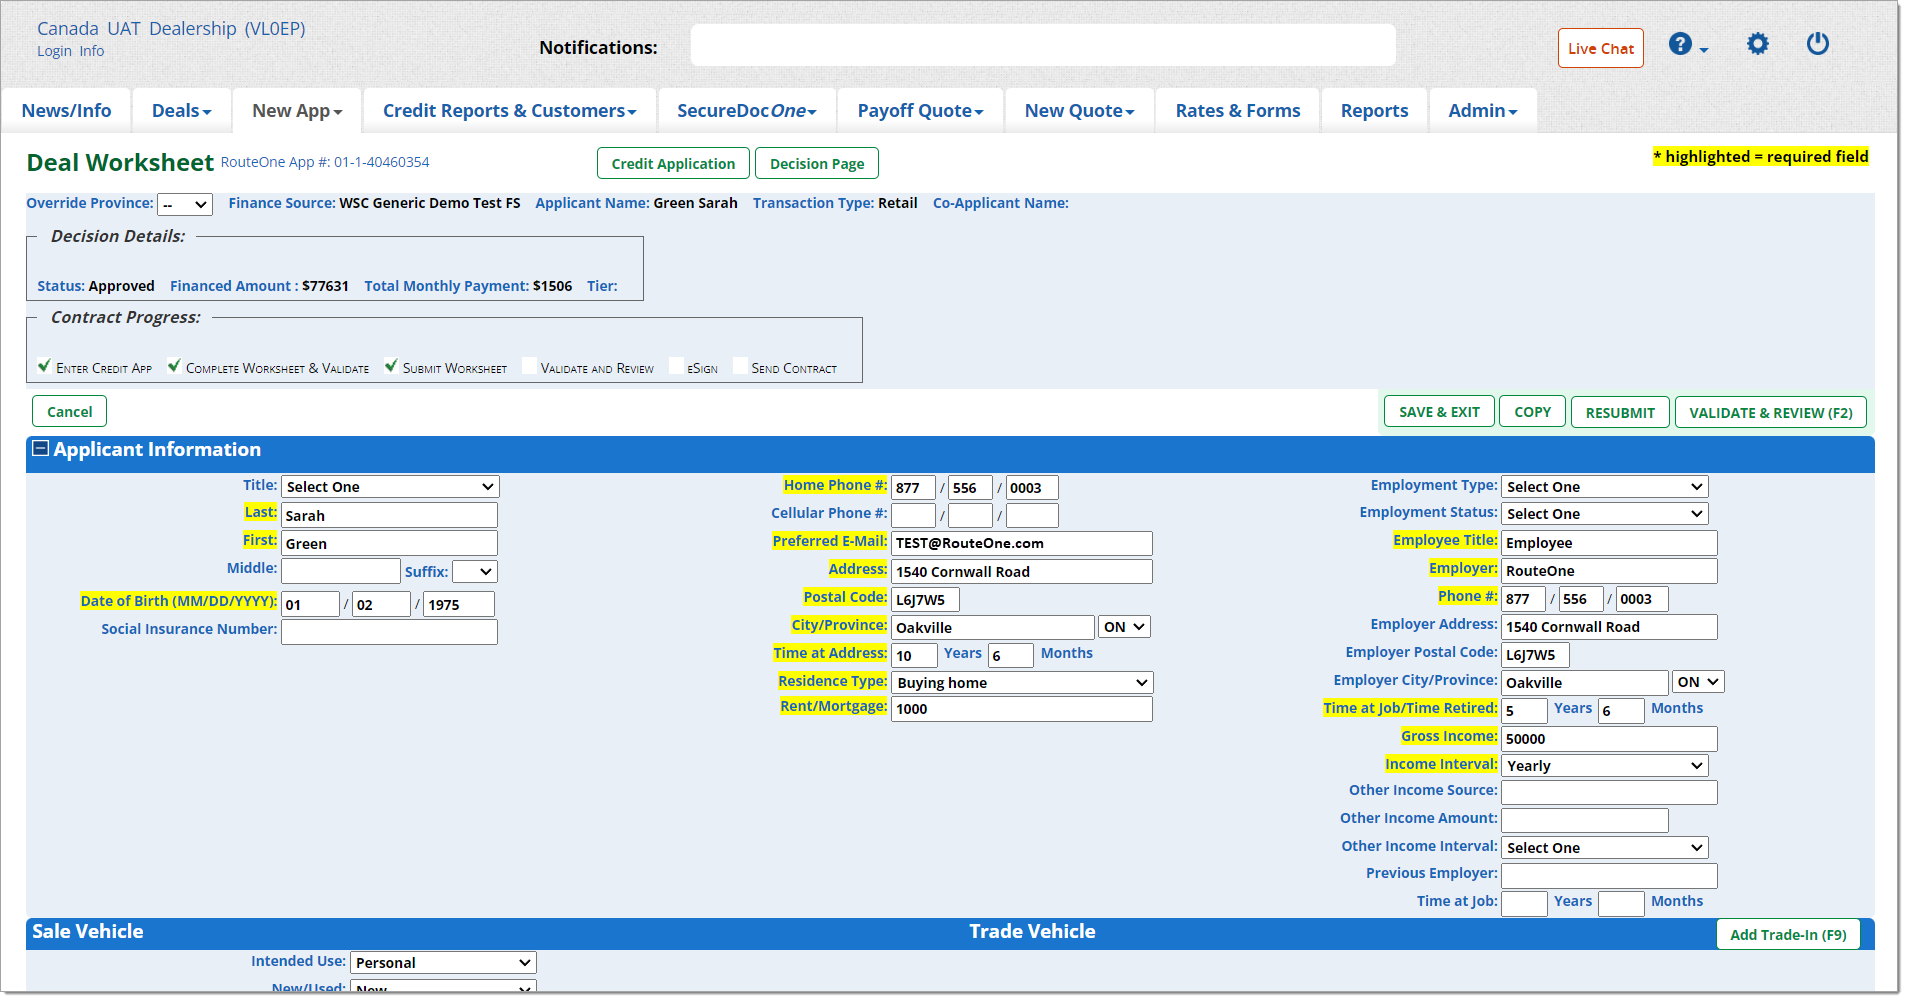
If changes to the applicant information are required after a deal has already been submitted, return to the worksheet and expand the ‘Applicant Information’ section. This section is collapsed by default; clicking on the ‘+’ icon will expand the section to reveal the ‘Applicant Information from the Credit Application’ page. A one-time modification to the Applicant Information can be made.
Important: Any modification to the fields in the ‘Applicant Information’ section will require the deal to be resubmitted to the Finance Source.
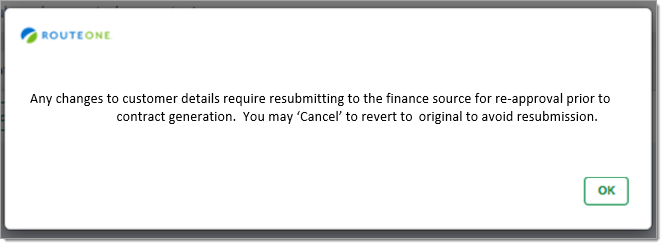
To undo any changes prior to resubmission, simply revert the Applicant Information to its previous version or click the ‘Cancel’ button to cancel any changes and exit the deal.
Editing the Deal Worksheet
The data in the Deal Worksheet can be revised without creating a duplicate deal in RouteOne. These revisions can be made after the application is submitted and adjudicated by the finance source, but not after the contract has been submitted for booking.
Auto-approved applications can be revised at your convenience and will provide an immediate update to the credit decision.
Resubmission is not required to increase the advance for approved insurance premiums sold after initial approval unless the credit decision stipulates “Maximum Financing.”
To edit the Deal Worksheet, go to the Customer Manager page.
Click the Worksheet icon next to the customer name.

Make any desired edits.
Click ‘Validate and Print Contract.’
Add Details to the ‘Other Income Source’
If the customer has a secondary or additional income, add specific details in the 'Other Income Source' text box in the credit application, for example, “part-time job” or “rental property.”
More information can be input to the 'Comments' section. Submitting specific details about the applicant’s other income sources can reduce the amount of time the finance source spends on verifying employment and income information and enable the finance source to deliver faster credit decisions.
Completing a Contract
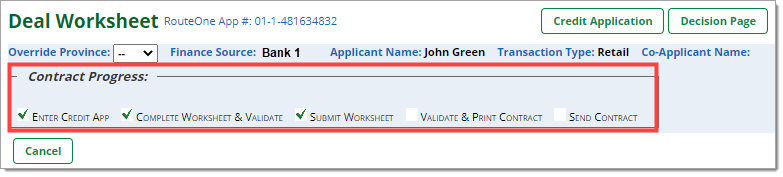
Once you have completed the credit application, you will be directed to the Deal Worksheet to create the contract. Each step of the contract’s progress will be tracked at the top of the page.
Not all sections will be relevant or required for all deals or dealerships. They are available to complete if your dealership uses that information.

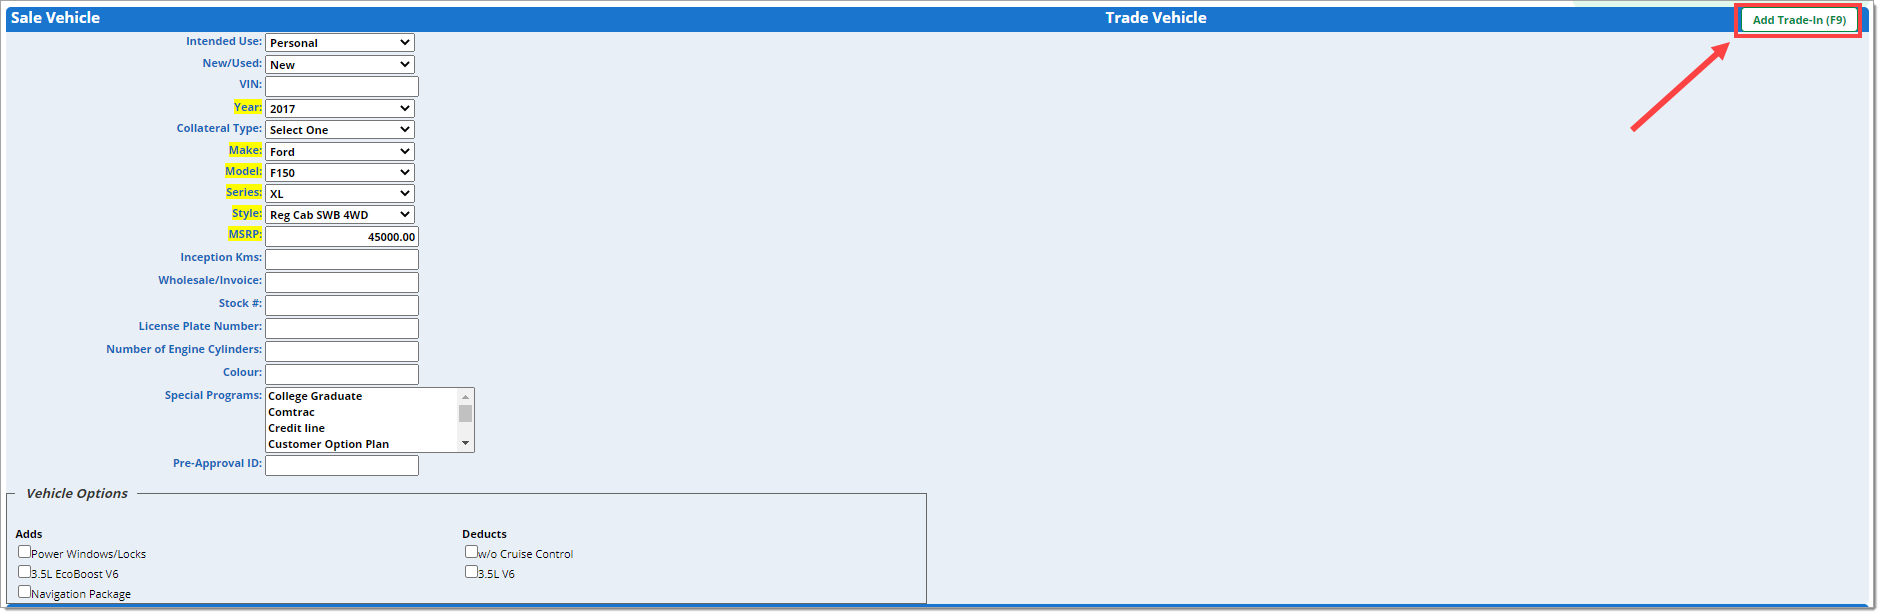
Complete the required, highlighted fields in the ‘Sale Vehicle’ section.
- Inputting the ‘VIN’ will activate RouteOne’s VIN decoding feature, which auto-fills the year, make, and model.
The ‘Sale Vehicle’ information is updated weekly from data provided by Canadian Black Book to ensure that the most current vehicle model information is available to users. When a new vehicle model launches, model descriptions are not always provided to Canadian Black Book right away. If the model is not available in the drop-down menu, select the ‘Other’ option, and type the model name in the new field.
- To add trade-in vehicle information, click the ‘Add Trade-In’ button.
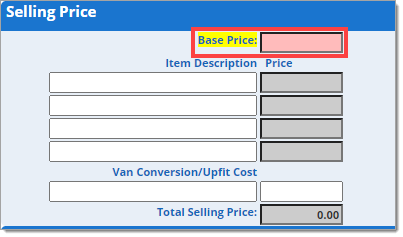
Complete the required, highlighted fields in the ‘Selling Price’ section.
- Input the base price your dealership is selling the vehicle for.
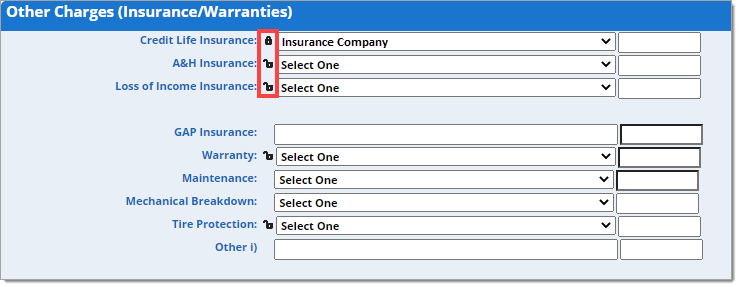
Tip: To save time and minimize the need to re-enter common information, you can use RouteOne’s Locking Fields within the ‘Other Charges (Insurance/Warranties),’ ‘Fees and Taxes,’ ‘Client Identification,’ and ‘Salesperson Information’ sections. Once information has been entered into a field, click the ‘Lock’ icon next to that field to change it to ‘Locked.’ This means that when you generate a new Deal Worksheet in the future, this information will automatically populate in the locked fields. Locked fields will be saved to your individual username (at the finance source and transaction type levels). This ensures that different finance sources, and transaction types within those finance sources, can be customized without affecting each other. Since this information is saved at the individual user level, it will not impact the settings of other RouteOne users at your dealership. This enables users to customize and tailor their experience to their unique individual needs.
Within the ‘Program Selection’ section, select a program, and you can use the drop-down menus to customize the details (such as the ‘Term’ and ‘Amortization’) for each of the listed interest rates to see the impact on the dealer reserve (1).
If the finance source you have selected supports custom programs, you can click the ‘Custom Program’ button to create a program with a specific term, amortization, months deferred, and interest rate (2). To learn more about how to use Custom Programs, go to the Custom Program User Guide here.
- Tip: Click the ‘Hide Reserve Info’ button to hide the ‘Reserve’ column from the screen view (3).
- Tip: Click the ‘+’ or ‘-’ icons in the upper left-hand corner to expand or collapse a section (4).

You can now submit the Deal Worksheet to the selected finance source by clicking the ‘Submit’ button.
- Optional: You can confirm the information you have entered satisfies the validation rules for the finance source prior to submitting the Deal Worksheet by clicking the ‘Validate’ button.
RouteOne will automatically check the Deal Worksheet information against all validation rules for the selected finance source.
- If there are any errors while submitting the Deal Worksheet, an error or information message will appear at the top of the page specifying the information needed to proceed.
Validating and Printing the Contract
Once the Deal Worksheet has been submitted, you can validate and print the contract on the Deal Worksheet page.
On the Customer Manager page, navigate to the Deal Worksheet by clicking the ‘Worksheet Submitted’ icon found next to the customer’s name.
You can learn the definition of the status icon by hovering over a status icon.
Within the Deal Worksheet page, you can see what step you are on in the ‘Contract Progress’ tracker.
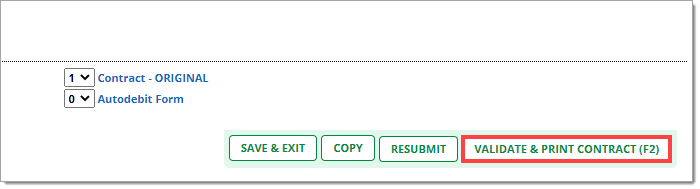
At the bottom of the screen, you can customize how many copies of each document you would like printed. For future deals, these choices will be saved as the default at the individual user level.
To check the contract against all post-submission validation rules for the finance source, click the ‘Validate & Print Contract’ button.

Once the form has been validated, the ‘Validate & Print Contract’ button will become a ‘Print’ button. Clicking ‘Print’ will generate a PDF of the contract that can be downloaded, printed, and signed.
Once the form has been signed, you can send the contract to the finance source using the ‘Ready to Fund’ button.

Managing Deals in the ‘Customer Manager’ Page
The ‘Customer Manager’ page allows your dealership to manage deals more easily from a single glance by grouping all deals for a single customer together.
There are five status icons that represent the status of the deal. Hover over an icon to learn the definition of the status icon. You can also click the ‘Show/Hide Legend’ at the bottom of the page for status definitions of un-submitted deals.

Use the ‘Edit/More’ button next to the applicant to quickly run credit reports or view a credit report summary (1).
After a credit report has been run, a ‘Credit Report Ran’ icon will be shown next to the applicant’s name, allowing you to easily locate the credit bureau pulls within one location (2).
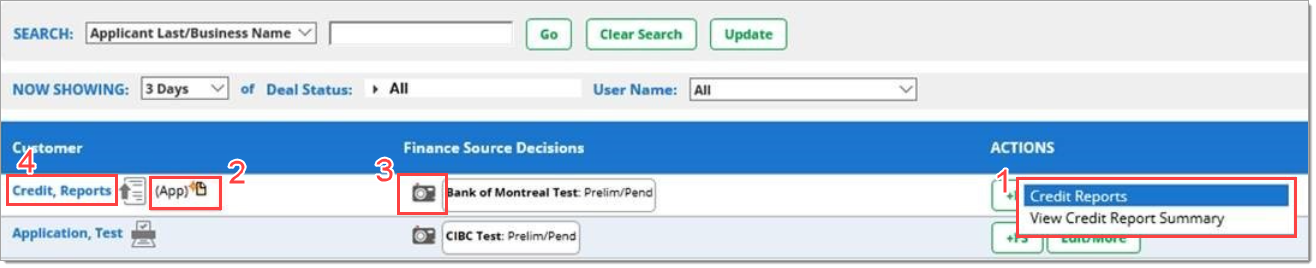
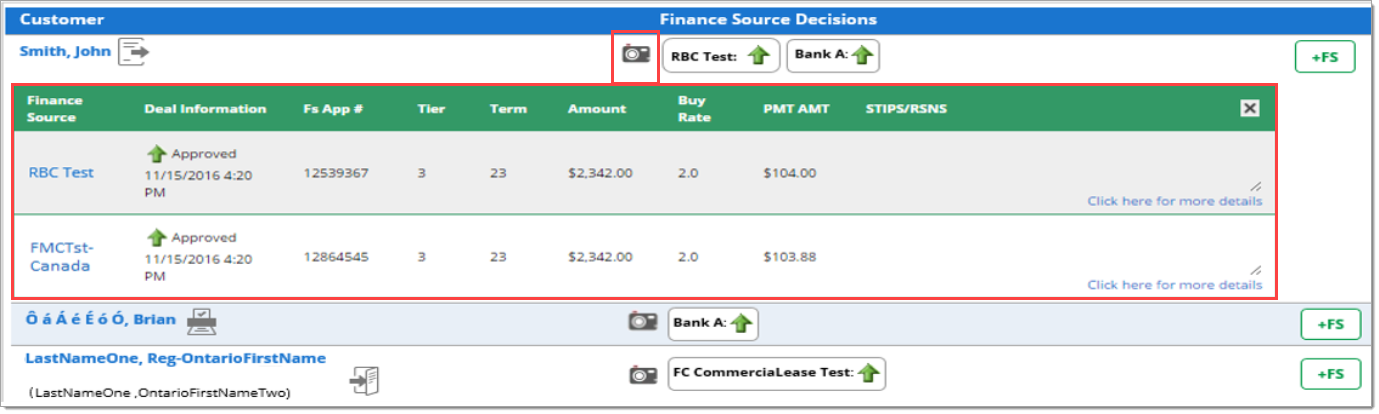
Click the ‘Camera’ icon to view the Decision Snapshot (3), with which you will be able to compare the customer’s deal details without having to navigate between different tabs to collect and access the information.
Clicking on the customer’s name will direct you to the credit application (4).
Common Status Icons
| Status Icons | Description |
|---|---|
 | Error |
| Decision Substatus | |
| Approved | |
| Conditioned | |
| Declined | |
 | Booked: Contract booked by finance source. |
| Funded: Contract funded by finance source. | |
| Contract Held | |
| Application sent from finance source through another platform. | |
| Application from Dealer Service Provider. | |
| Sold (Cash/Other deals only): Available to dealerships who don’t have DMS/DSP integration. If a user fills out the ‘Sold Date’ within a new ‘Cash/Other Deal’ and saves the app, this icon will appear in the Deal Manager page. | |
| Delivered (Cash/Other deals only): Available to dealerships who do not have DMS/DSP integration. If a user fills out the ‘Delivered Date’ within a new ‘Cash/Other Deal’ and saves the app, this icon will appear in the Deal Manager page. | |
| New Text: New text message from finance source available in Deal Summary. | |
| Read Message | |
| New Quote created for applicant(s). Only available in Canada. | |
| Decision Snapshot: Overview of essential deal details from each finance source. This icon is found in the ‘Customer Manager’ page. Click on the Decision Snapshot to compare a customer’s deal details without having to navigate between different tabs to collect and access the information. | |
| Credit report has been run. | |
| Locked: The field has been saved and pre-filled. | |
| Unlocked: The field has not yet been customized to be pre-filled, but can be customized by entering data in the field and clicking the icon to change it to a ‘Locked’ icon. | |
| Credit App Entered: The credit application has been entered. | |
| Worksheet: Worksheet has been pre-filled, but not yet sent. | |
| Worksheet Submitted: Worksheet has been submitted. | |
| Contract Printed: Contract has been printed. | |
| Contract Sent: Contract has been sent electronically. |
Frequently Asked Questions
You can manage your deals within the ‘Customer Manager’ page. Within the Customer Manager, there are five status icons that represent the status of the deal. Hover over an icon to learn the definition of the status icon. Click the ‘Camera’ icon to view the Decision Snapshot, with which you will be able to compare customers’ deal details without having to navigate between different tabs to collect and access the information.
If you received an error or information message when running the finance source validation rules for a credit application or Deal Worksheet, please refer to the error message below:
-
Red Error Messages: Error messages in red text indicate that the error must be corrected before you can proceed to the next step. The specific error will be described, and the field where an error is contained will also be highlighted in red to easily determine what needs to be corrected and where.
-
Blue Error Messages: Error messages in blue text indicate that although you can proceed to the next step, you may need to take caution when doing so. It is recommended that you review and address these fields before proceeding.
-
Green Information Messages: Messages in green text provide information about best practices or processes to engage in.
Within the Deal Worksheet, you can click the ‘Hide Reserve Info’ button when showing the screen to a customer, so the reserve amounts will not be shown.
If you would like to resubmit a deal (to increase the down payment, for example), the RouteOne system allows you to change information within the Deal Worksheet and resubmit to the same finance source. Simply return to the Deal Worksheet page, make the changes to the relevant fields, and click the ‘Resubmit’ button.

Please contact your RouteOne Business Development Manager for information on this process.
Locked fields will be saved at the individual user level (by finance source and transaction type). This ensures that different finance sources, and transaction types within those finance sources, can be customized without affecting other deals. Because this information is saved at the individual user level, it will not impact the settings of other RouteOne users at your dealership. This enables users to customize and tailor their experience to their unique needs.
ROUTEONE SUPPORT
Hours (EST)
Monday - Friday: 8:00 AM - 9:00 PM
Saturday: 9:00 AM - 9:00 PM
Can’t find what you need?
Try our search
