In This Guide:
Related Guides:
Access and Administration
Customizing Customer Quote - Digital Retail Services
Accessing the Customer Quote Configuration Options
Your Dealer System Administrator may access the Customer Quote configuration options to customize the Customer Quote by following the steps below.
Within the ‘Admin’ tab, select the ‘Premium Services’ option, and open the ‘Digital Retail Panel.’
If you have already subscribed to Digital Retail Customer Quote, there will be a Customer Quote Configuration section. In this section, click the ‘Edit Configuration’ button to access the customizable options associated with your Digital Retail Customer Quote.
For tips while setting up Customer Quote, hover over the ‘?’ icons.
For instructions on installing Digital Retail Customer Quote, click here.

You will be redirected to a page with the configuration options available to you.
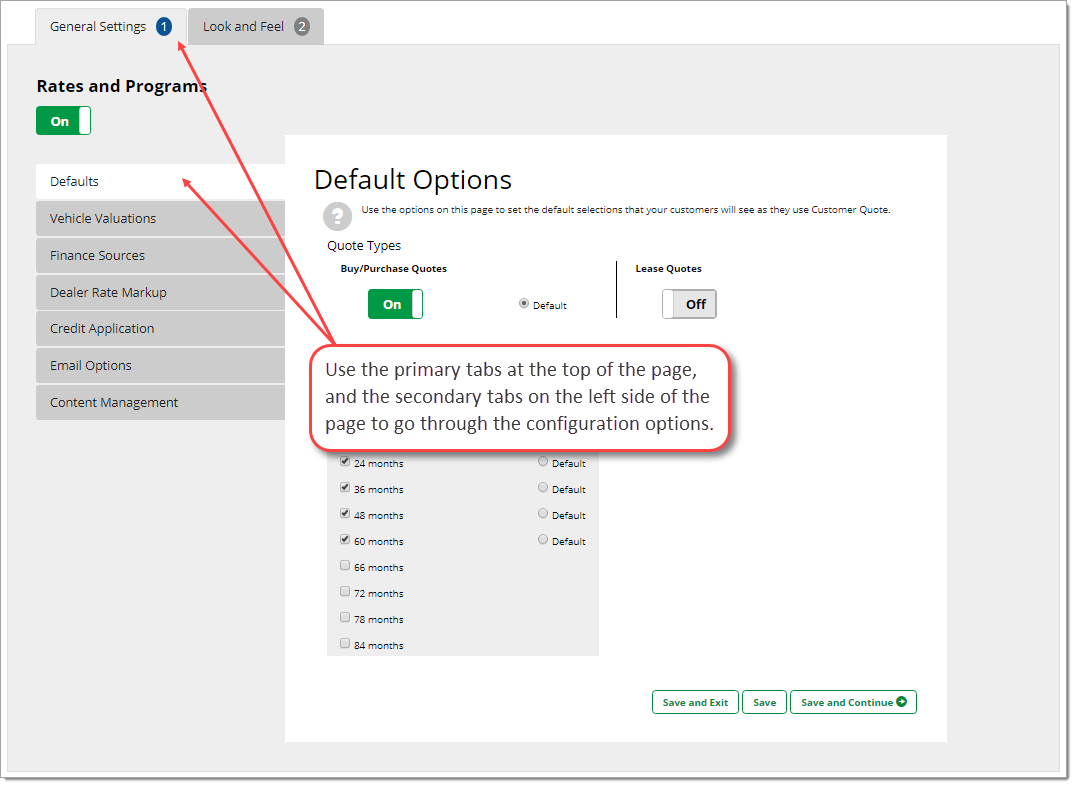
The first time you set up your Digital Retail product, it is recommended that you go through each of the top tabs and review each of the side tabs that are available for your subscription. You may choose to use the default settings or make changes based on your dealership preferences.
The ‘Global Settings’ Tab
Available tab options within ‘Global Settings’ tab:
Defaults
Options on this page drive the default selections that your customers will see as they use the Customer Quote tool.
The ‘Quote Types’ option allows for ‘Buy/Purchase Quotes’ and ‘Lease Quotes’ to be turned on/off for your customers, as well as the ability to select the default quote type when both are enabled.
If ‘Rates and Programs’ is enabled, as in the example shown below, the dealer is able to select which terms to show in Customer Quote and select which should be the default term shown to the customer under the ‘Buy/Purchase Term Defaults’ section.
If ‘Rates and Programs’ is not enabled, the ‘Credit Score Selection’ toggle will allow the dealer to show customizable APR and Term independent of the customer’s credit score, or Term and APR specific to the customer’s credit rating with customizable credit score ranges.
If your account is not subscribed to ‘Rates and Programs,’ please contact salessupport@routeone.com for further assistance.

Vehicle Valuations
Turning on the ‘Vehicle Valuations’ toggle enables your customers to enter information about a trade-in vehicle, which will be factored into their Customer Quote.
To configure ‘Vehicle Valuations,’ click the ‘Click here to configure vehicle valuations’ button. You will be navigated to another section of the system to complete your configuration changes.
Upon completion, you will have the option to save your changes and return directly to the Customer Quote Configuration screen to proceed with configuring your setup.

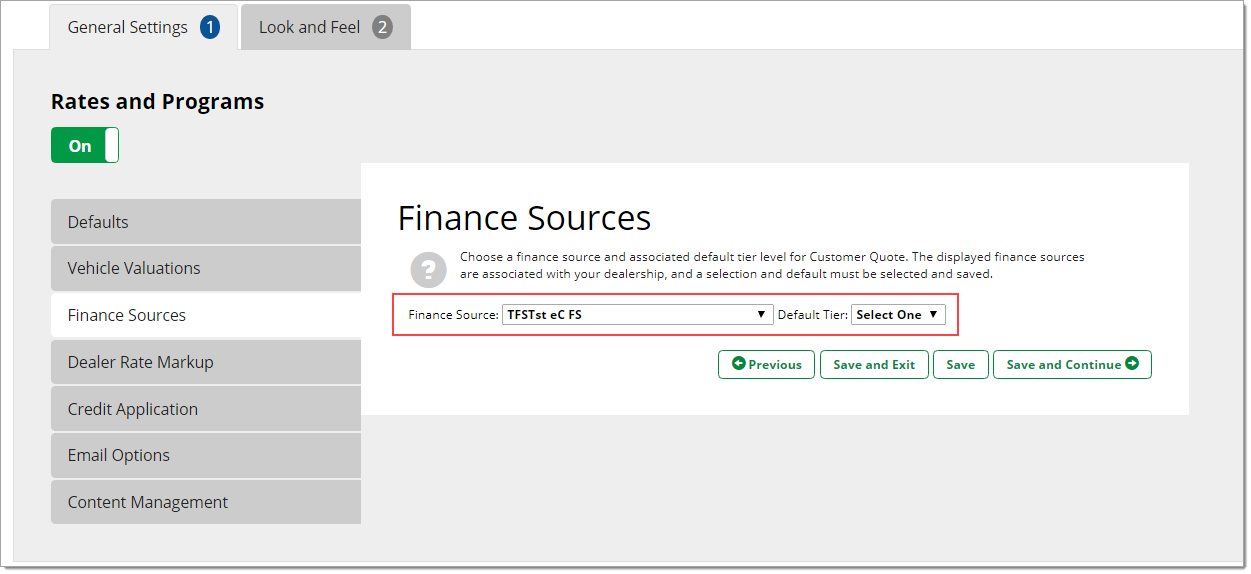
Finance Sources
Finance source configuration is only available when ‘Rates and Programs’ is enabled.
If your account is not subscribed to ‘Rates and Programs,’ please contact salessupport@routeone.com for further assistance.
If finance source configuration is available, you can choose from your available finance sources in the dropdown menu and select the default tier for Customer Quote.
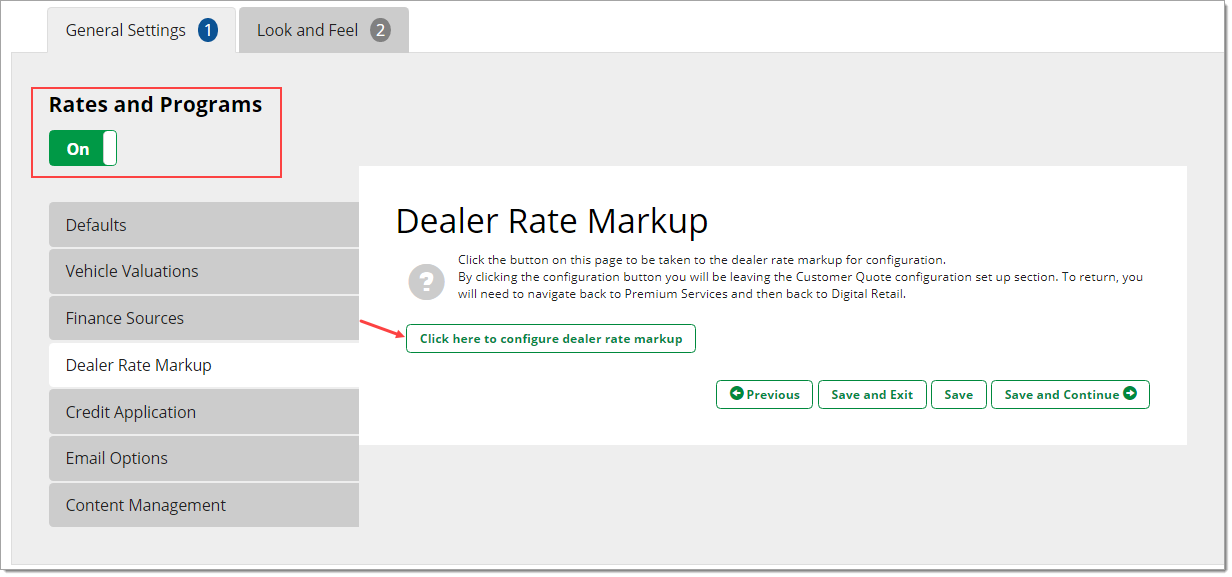
Dealer Rate Markup
‘Dealer Rate Markup’ configuration is only available when ‘Rates and Programs’ is enabled.
If your account is not subscribed to ‘Rates and Programs,’ please contact salessupport@routeone.com for further assistance.
To configure ‘Dealer Rate Markup,’ click the ‘Click here to configure dealer rate markup’ button. You will be navigated to another section of the system to complete your configuration changes.
Upon completion, you will have the option to save your changes and return directly to the Customer Quote Configuration screen to proceed with configuring your setup.
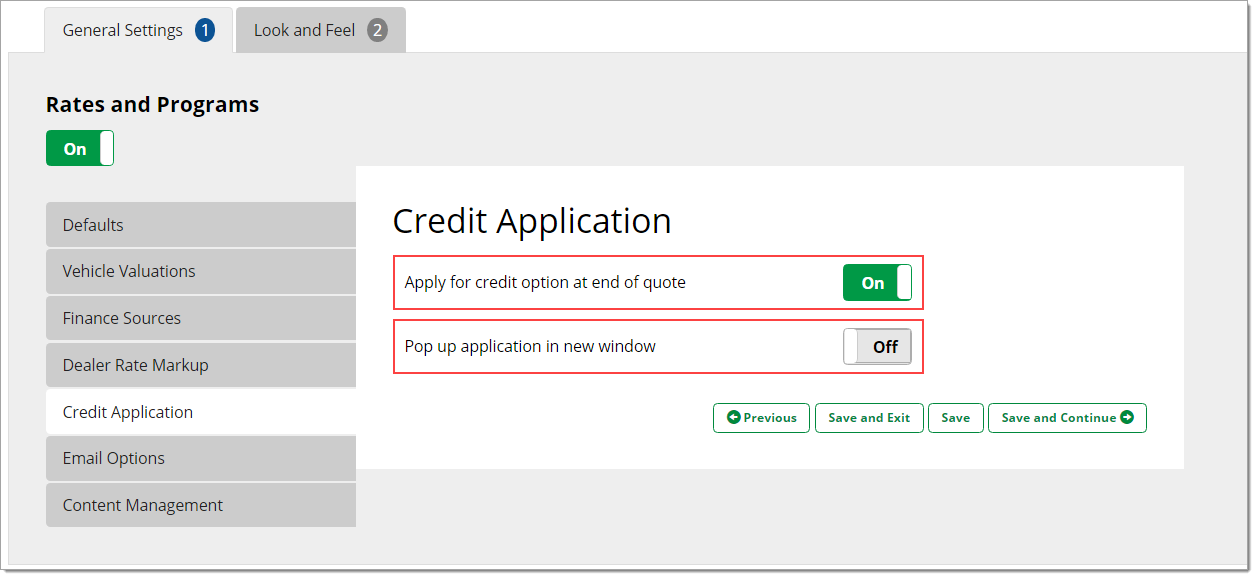
Credit Application
Within the ‘Credit Application’ tab, dealers can turn on/off the ability for a customer to apply for credit upon completion of the quote process using the toggle.
If enabled, the application can be configured to appear in the existing tab or a new window.
Email Options
Within the ‘Email Options’ tab, dealers can turn on/off functionality that sends customers an email containing a basic summary of their quote terms and the dealership contact details upon completion of the quote process. You may also customize the text that appears at the top of the email body.
Additionally, you may enter a dealership email address that you would like to receive a lead notification when the customer has completed the quote process.

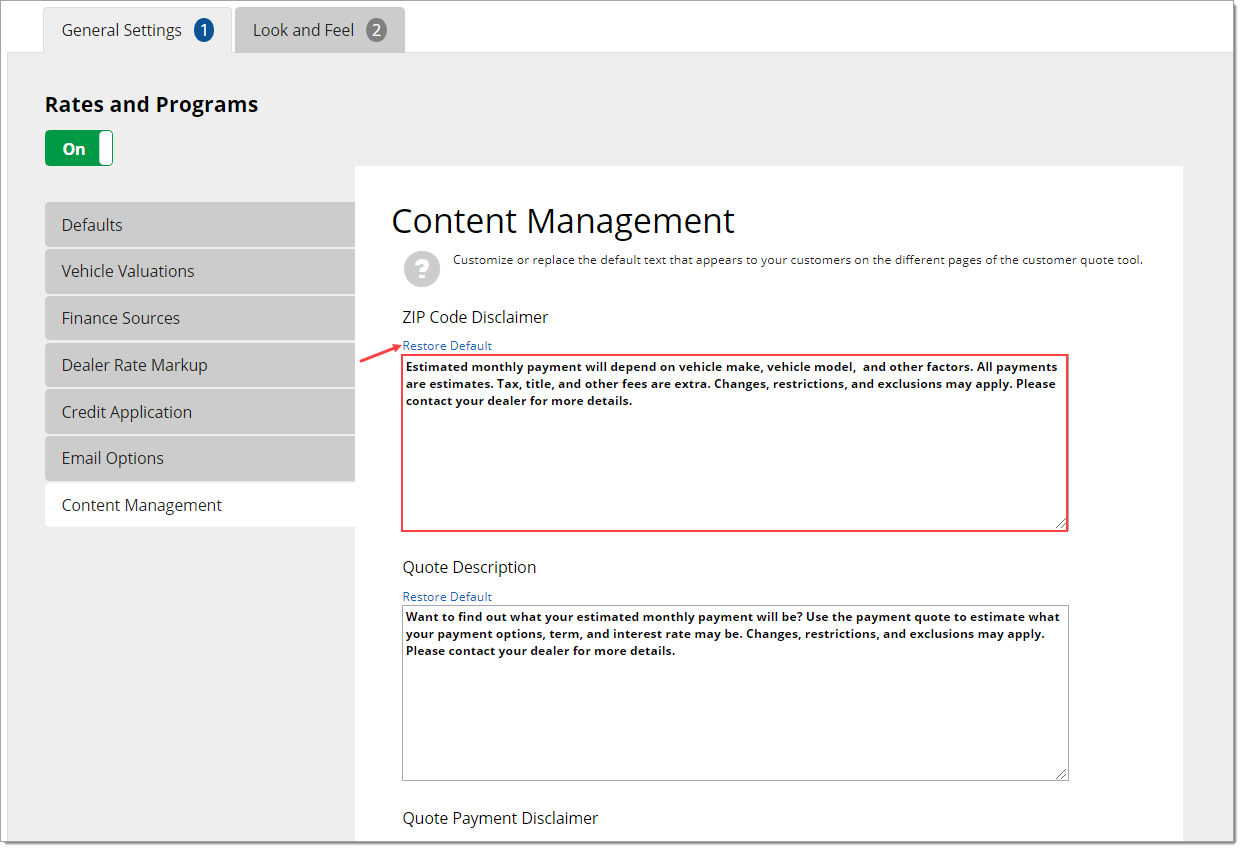
Content Management
Within the ‘Content Management’ tab, dealers can replace the default text that appears to customers on the various pages of the Customer Quote tool. Each text box is labeled with the corresponding page name.
Clicking the ‘Restore Default’ link above each text box will replace any customized text with the standard Customer Quote default text.
The ‘Look and Feel’ Tab
Available tab options within the ‘Look and Feel’ tab:
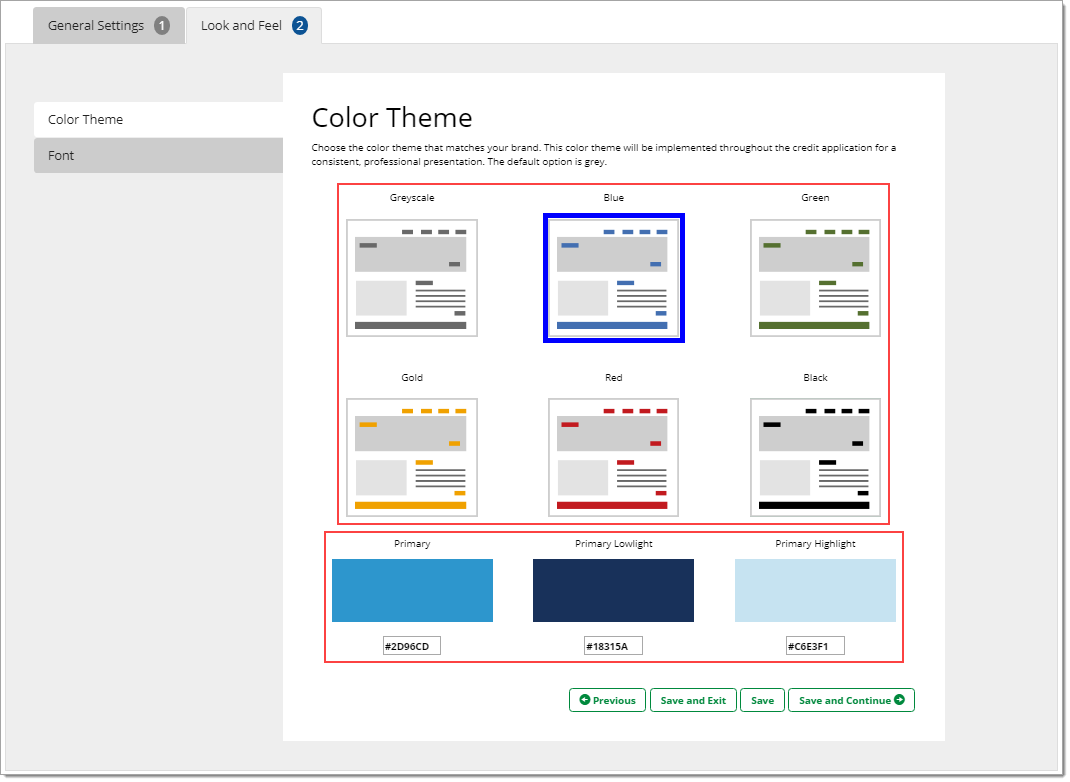
Color Theme
The selected color theme will be implemented throughout the Customer Quote tool for a consistent, professional presentation. Design elements such as buttons will also be updated to this color (the default option is grey).
To select a color, click the preferred color thumbnail. You may also add your customized colors by typing in the HEX color codes. Your selection will be highlighted with a border. Click one of the save options to store your change.
When entering HEX color codes, enter in a code for the ‘Primary’ color, ‘Primary Lowlight’ color, and ‘Primary Highlight’ color.
If you do not know the HEX color codes, you can use a HEX converter tool online to help populate the desired HEX color code.
Font
You can customize the font that is used throughout the Customer Quote tool to best match your website and brand.
To change the template selection, click on an alternate template. Your selection will be highlighted in a green border.

ROUTEONE SUPPORT
Contact
Phone: 866.768.8301
Email: r1support@routeone.com
Hours (EST)
Monday - Friday: 6:00am – Midnight
Saturday: 9am – 9pm
Can’t find what you need?
Try our search
