In This Guide:
Related Guides:
Access and Administration
Dealer Information and Preferences
The Dealership System Administrator (DSA) for your dealership will need to make any changes to dealership information and preferences.
To locate the DSA for your dealership, click the ‘Gear’ icon in the upper right-hand corner of the screen. A pop-up window will appear, and your DSA will be listed at the top of the window.
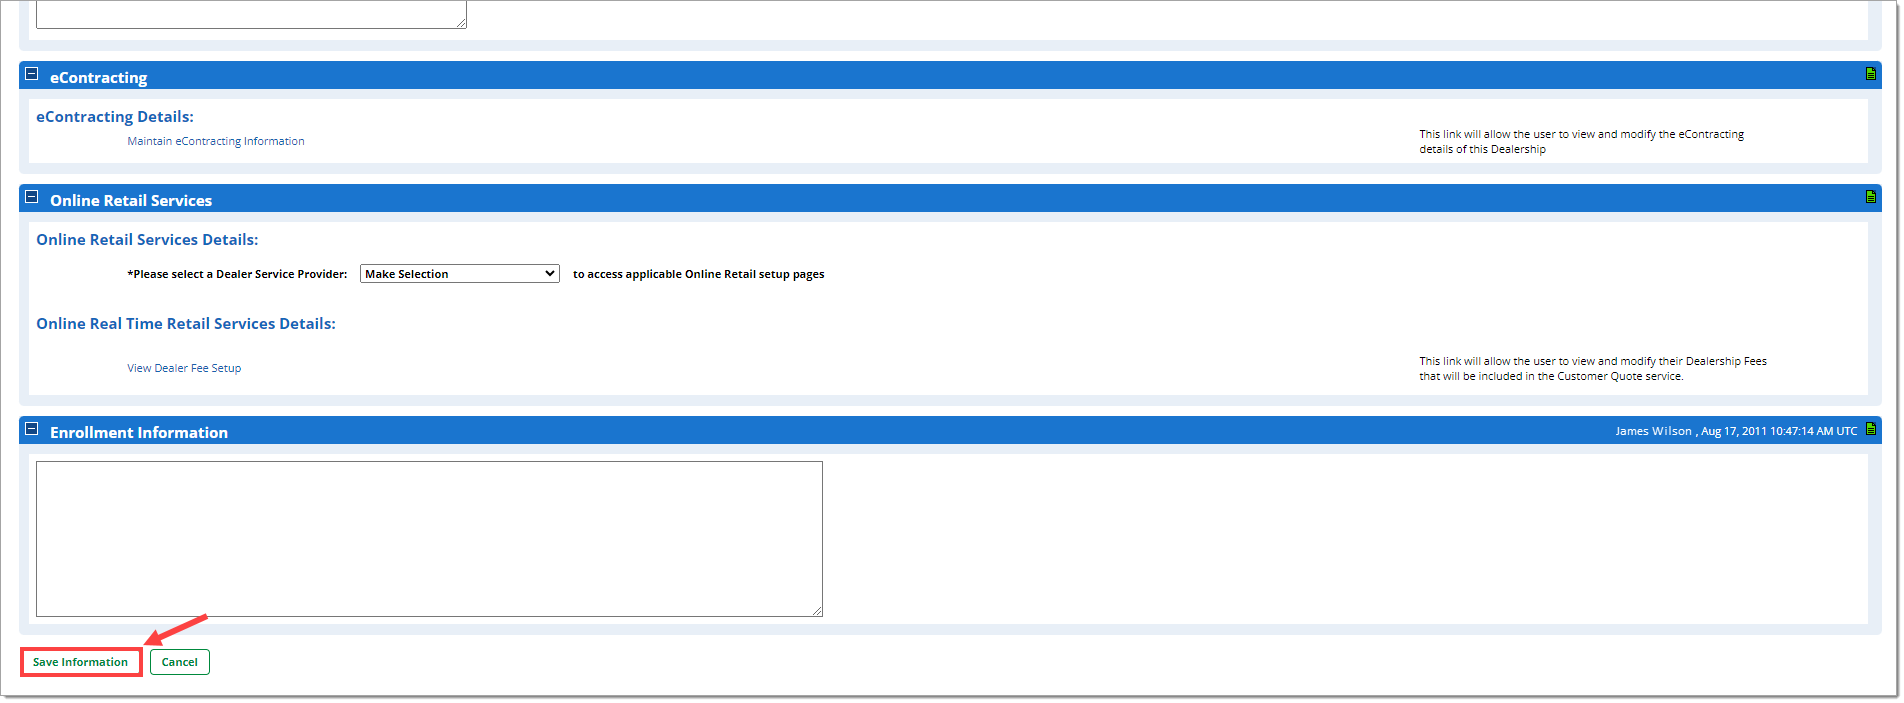
Important: To apply any changes to your Dealership Preferences, ensure you click the ‘Save Information’ button at the bottom of the page.
To learn about user information and how to set individual user permissions, see our User Information and Permissions guide here.
Setting Dealer Information
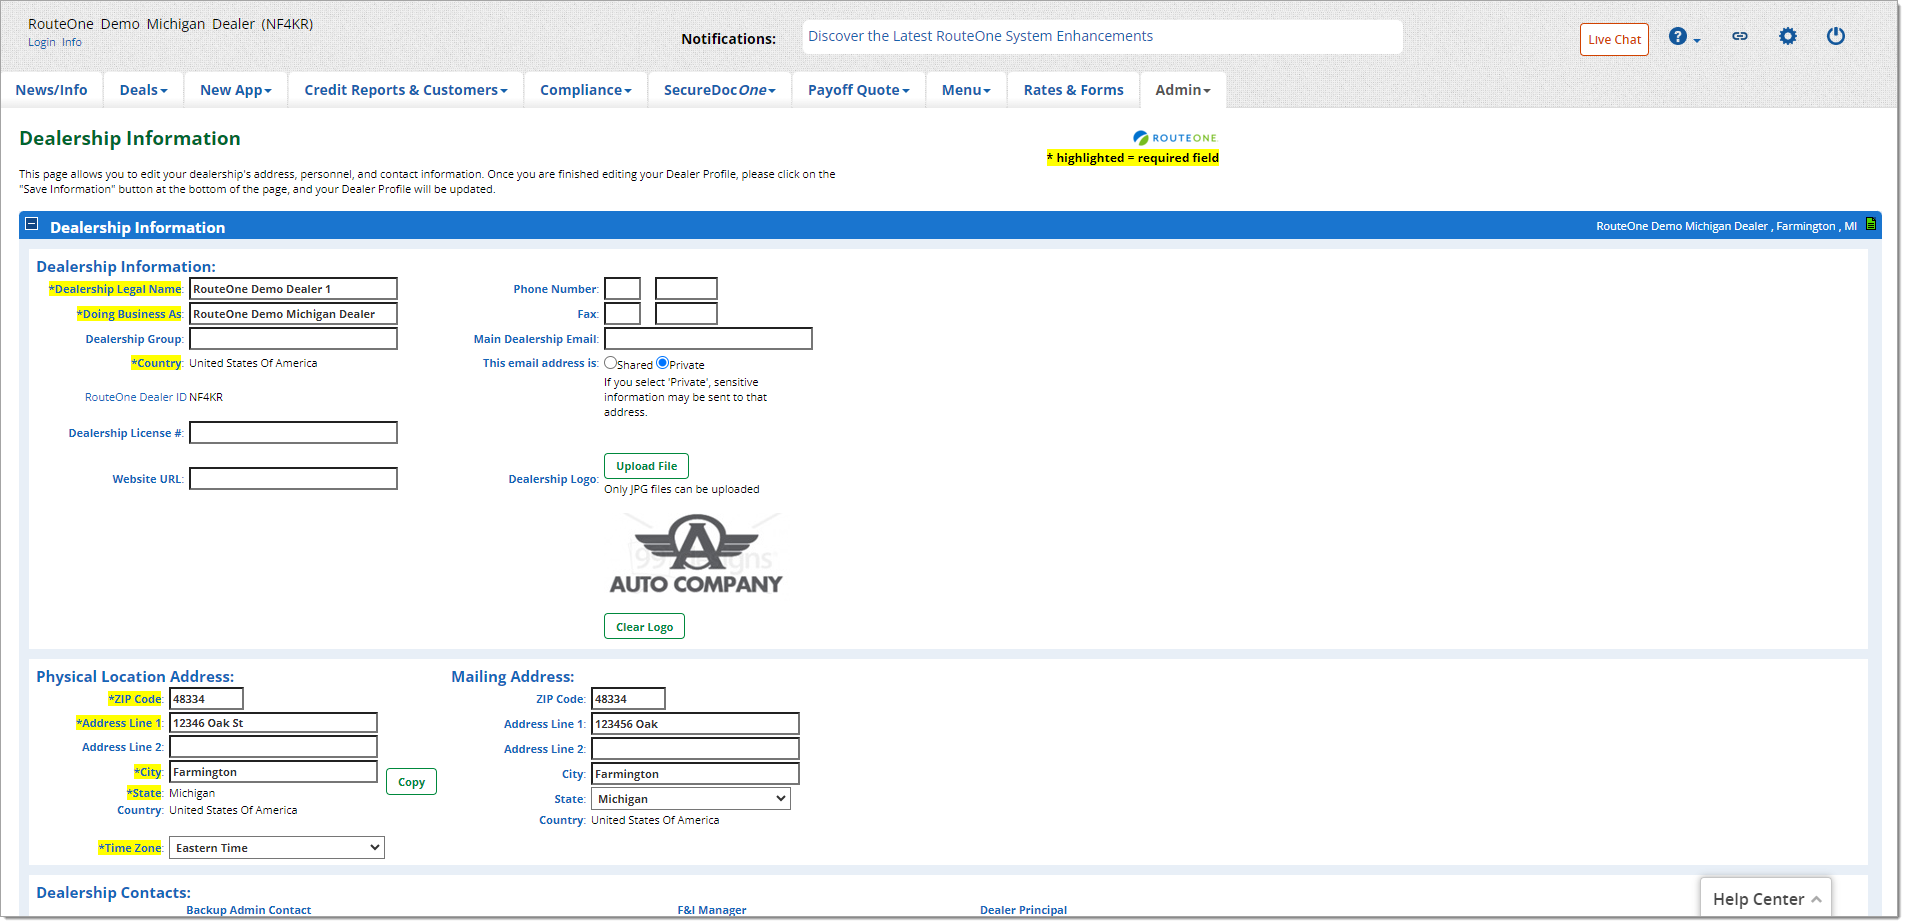
Hover over the ‘Admin’ tab in the top navigation and select ‘Dealer Info’ from the dropdown menu.
- Dealership Information
- eContracting
- Online Digital Retail Services
- Enrollment Information
Required information is highlighted and marked by an asterisk (*).
Click the ‘Save Information’ button at the bottom of the page to save your settings.
Dealership Compliance Preferences
Hover over the ‘Admin’ tab in the top navigation and select ‘Preferences’ from the dropdown menu.
Setting Risk Models: CSDN and Adverse Action Notice Generation
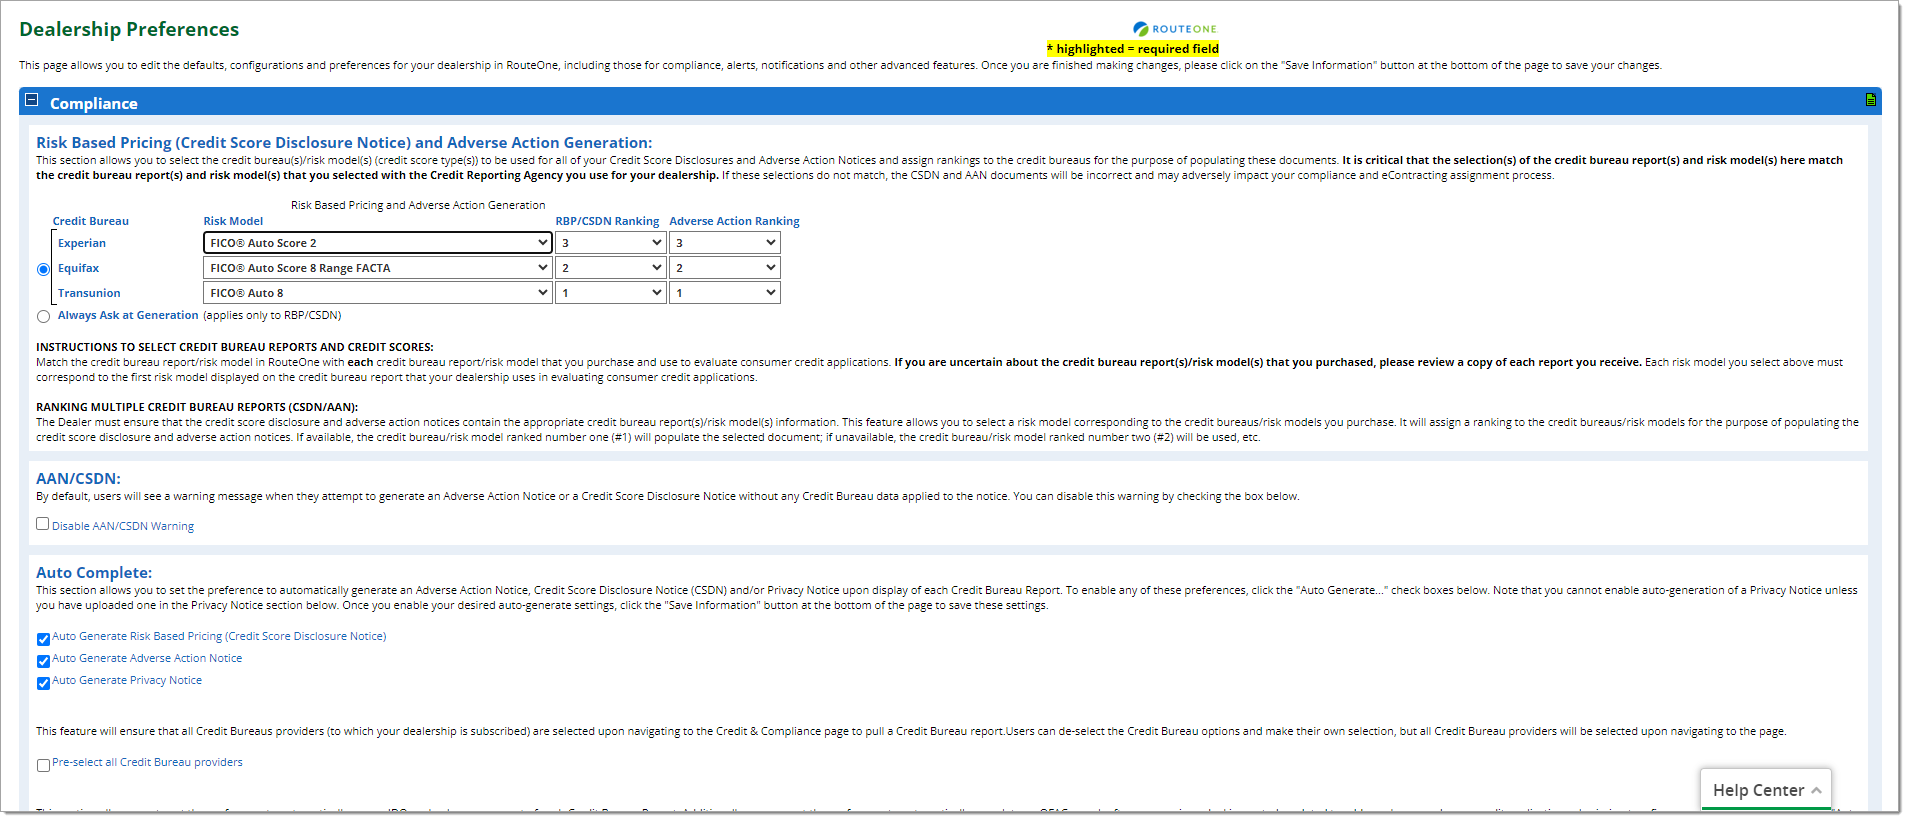
This section allows you to select the credit bureau(s)/risk model(s) (credit score type(s)) to be used for all of your Credit Score Disclosures and Adverse Action Notices and assign rankings to the credit bureaus for the purpose of populating these documents. It is critical that the selection(s) of the credit bureau report(s) and risk model(s) here match the credit bureau report(s) and risk model(s) that you selected with the Credit Reporting Agency you use for your dealership. If these selections do not match, the CSDN and AAN documents will be incorrect and may adversely impact your compliance and eContracting assignment process.
In the case where you purchase only one risk model, RouteOne will populate your Adverse Action Notices and Credit Score Disclosure Notices with the risk model and score information from the credit report you pull.
If there are multiple risk models within your pulled credit reports, RouteOne needs to know which risk model and score information you prefer to display on your Adverse Action Notices and Credit Score Disclosure Notices.
For each Credit Bureau to which you are subscribed, select the appropriate ‘Risk Model’ from the dropdown.
Match the credit bureau report/risk model in RouteOne with each credit bureau report/risk model that you purchase and use to evaluate consumer credit applications. If you are uncertain about the credit bureau report(s)/risk model(s) that you purchased, please review a copy of each report you receive. Each risk model you select above must correspond to the first risk model displayed on the credit bureau report that your dealership uses in evaluating consumer credit applications.
Next, select the ‘Ranking’ for both ‘RBP/CSDN Ranking’ and ‘Adverse Action Ranking,’ to designate which risk model displays when only one exists in the report. When there are multiple risk models in the report, your number one ranked risk model will always display.
The Dealer must ensure that the credit score disclosure and adverse action notices contain the appropriate credit bureau report(s)/risk model(s) information. This feature allows you to select a risk model corresponding to the credit bureaus/risk models you purchase. It will assign a ranking to the credit bureaus/risk models for the purpose of populating the credit score disclosure and adverse action notices. If available, the credit bureau/risk model ranked number one (#1) will populate the selected document; if unavailable, the credit bureau/risk model ranked number two (#2) will be used, etc.
Dealers can generate and print a CSDN for all consumer applicants to help manage compliance under the Fair Credit Reporting Act’s Risk-Based Pricing Rule. For more information on generating and printing a CSDN, see the Understanding the Credit & Compliance Page guide here.
If the credit report was pulled from within RouteOne, the CSDN will be generated automatically and populated with the credit score (Experian, Equifax, or TransUnion, depending on your subscription), and all consumer information, including consumer street address, city, state, and zip code.
If the credit report was pulled outside of RouteOne, you can still generate a CSDN. The CSDN will be automatically populated with all consumer information, including consumer street address, city, state, and zip code. However, you will need to manually input the credit score, score date, and credit bureau name.
AAN/CSDN Warnings
To disable the warning messages from coming up each time a user attempts to generate an Adverse Action Notice (AAN) or Credit Score Disclosure Notice (CSDN) for an application without credit bureau information, make a dealer preference change by clicking the 'Disable AAN/CSDN Warning' checkbox.
Auto Complete
To automatically generate a Credit Score Disclosure Notice (CSDN), Adverse Action Notice (AAN), Privacy Notice, or run Identity Verification (if subscribed to IDOne) when a credit report is requested, click the corresponding checkbox(es).
- As soon as the credit report generates, the AAN, CSDN, and Privacy Notice will pop up on the screen in one window for both the applicant and co-applicant. ‘Results’ will also show a green check mark under the Adverse Action Notice and Credit Score Disclosure Notice icons.
Click the ‘Pre-select all Credit Bureau providers’ checkbox to ensure that all credit bureau providers to which your dealership is subscribed are selected upon navigating to the Credit & Contracting page to pull a credit bureau report.
To automatically run an IDOne check upon request of each credit bureau report, check the ‘Auto run IDOne upon every Credit Report request’ checkbox.
- When Auto Complete is selected here for IDOne and the credit report generates, results will pop-up on the screen in a single window for both the applicant and co-applicant.
If Auto Complete is also set for AAN, CSDN, and Privacy Notice, the IDOne results will display in the same window.
Auto-Run OFAC is available to provide multiple checks throughout the deal process. You can set the preference to automatically conduct an OFAC search in the following circumstances by clicking the respective checkbox(es):
- Upon every Credit Report request
- After every unique deal is created or an existing deal is updated to add a co-buyer
- Upon submission of a credit application to a finance source
The IDOne and OFAC results will be displayed via the icon in the 'Results' section, indicated by a ‘Pass,’ ‘Fail,’ ‘In Progress,’ or ‘Caution.’ Users can click the icon to see the full results page.
While one email address is required to be notified when these selections are changed, you can choose to notify up to five email addresses.
Risk Based Pricing (Credit Score Disclosure Notice) Customer Score Graph
To generate CSDNs with a graph of the score ranges, in addition to the standard statement of the customer's credit score ranking, go to the ‘Risk Based Pricing (Credit Score Disclosure Notice) Customer Score Graph’ section and select ‘Enable Customer Score Graph on Credit Score Disclosure Notice (CSDN).’
To enable eSigning of CSDNs by your customers from the Credit & Compliance page, this preference must be selected.
To view a sample of this format of the CSDN, click the ‘Click here to access the Sample PDF with Graph’ link.
Compliance Dashboard Sync
This section allows you to select the Compliance functions you would like to sync across deal jackets. To select a Compliance item for sync, check the corresponding box. Compliance Sync is based on an exact match of the Customers' first name, last name, and Social Security Number (SSN). Merging deal jackets helps simplify compliance tracking.
The dealer is responsible for all compliance related matters. By unchecking these boxes, the dealer will have to manually maintain their Compliance Dashboard.
Sync AAN
- Only one AAN will be sent per 30 day period.
- Sync AAN is required for subscribers to the RouteOne AAN Mailing Service per the functionality described in the Dealer's agreement for such service.
SYNC AAN: Automatically Exclude Approvals
- Automatically Exclude Approvals will exclude approved customers from receiving Adverse Action Notices, so that no Adverse Action Notices will be sent for a customer SSN that received an approval within the preceding 30 days.
- Adverse Action Notices that are excluded from generation will appear in the Compliance Dashboard as meeting AAN requirements and will be differentiated with an asterisk. Regardless of any AAN Mailing Service subscription, excluded AANs will not be mailed.
Privacy Notice Settings
To use the Privacy Notice functionality in the Credit & Compliance page, you must upload a privacy notice. To upload a privacy notice, click the ‘Select File’ button.
The document must be a PDF and cannot exceed 2MB.
If you don’t have a privacy notice custom to your dealership, you can easily create one with the Federal Reserve Board’s privacy notice builder, which is also accessible from the Preferences page.
Once you’ve uploaded a privacy notice, you can indicate if you want to include a privacy notice when signing in dealership (‘Include PN’) and/or enable eSigning (‘eSign’) by checking the corresponding checkboxes.
Enabling eSign functionality will allow your customers to eSign a short document that states that they’ve acknowledged receipt of your privacy notice.
If you enable eSign functionality, once your privacy notice is uploaded, you’ve checked the eSign checkbox, and clicked the ‘Save Information’ button at the bottom of the page, you’ll be able to print and eSign your privacy notice from the Credit & Compliance page.
It will take 24 hours for the Credit & Compliance page to update if you’re replacing an old privacy policy with a new version. If this is the first time you have uploaded a privacy policy, the update will take place immediately.
SecureDocOne subscribers will be able to pull up all eSigned privacy policies from within SecureDocOne.
Auto Complete Privacy Notice
To automatically generate a privacy notice for each applicant, scroll up on the Dealership Preference page to the ‘Auto Complete’ section and ensure that the ‘Auto Generate Privacy Notice’ box is checked.
If ‘Auto Generate Privacy Notice’ is selected, the Privacy Notice option will be automatically locked for all system users when they check one or more credit bureau boxes on the Credit & Compliance page. Users will not be able to uncheck the products, as the auto complete settings ensure that compliance documents are generated with every single credit report.
Although RouteOne does support the form generation, the forms must be manually handed to the customer by the dealer. RouteOne does not automatically provide this for the customer.
State-Specific Privacy Notices
Privacy notices mandated by specific state laws can also be uploaded and presented in the system throughout the credit application process to be printed and provided to the customer.
To upload a State-Specific Privacy Notice, click ‘Select File’ in the row corresponding to the appropriate state.
Only PDF files 5MB or smaller may be uploaded.
To remove an uploaded document, click the ‘Remove’ link under the ‘Actions’ column for the appropriate state.
Other Dealership Preferences
Hover over the ‘Admin’ tab in the top navigation and select ‘Preferences’ from the dropdown menu.
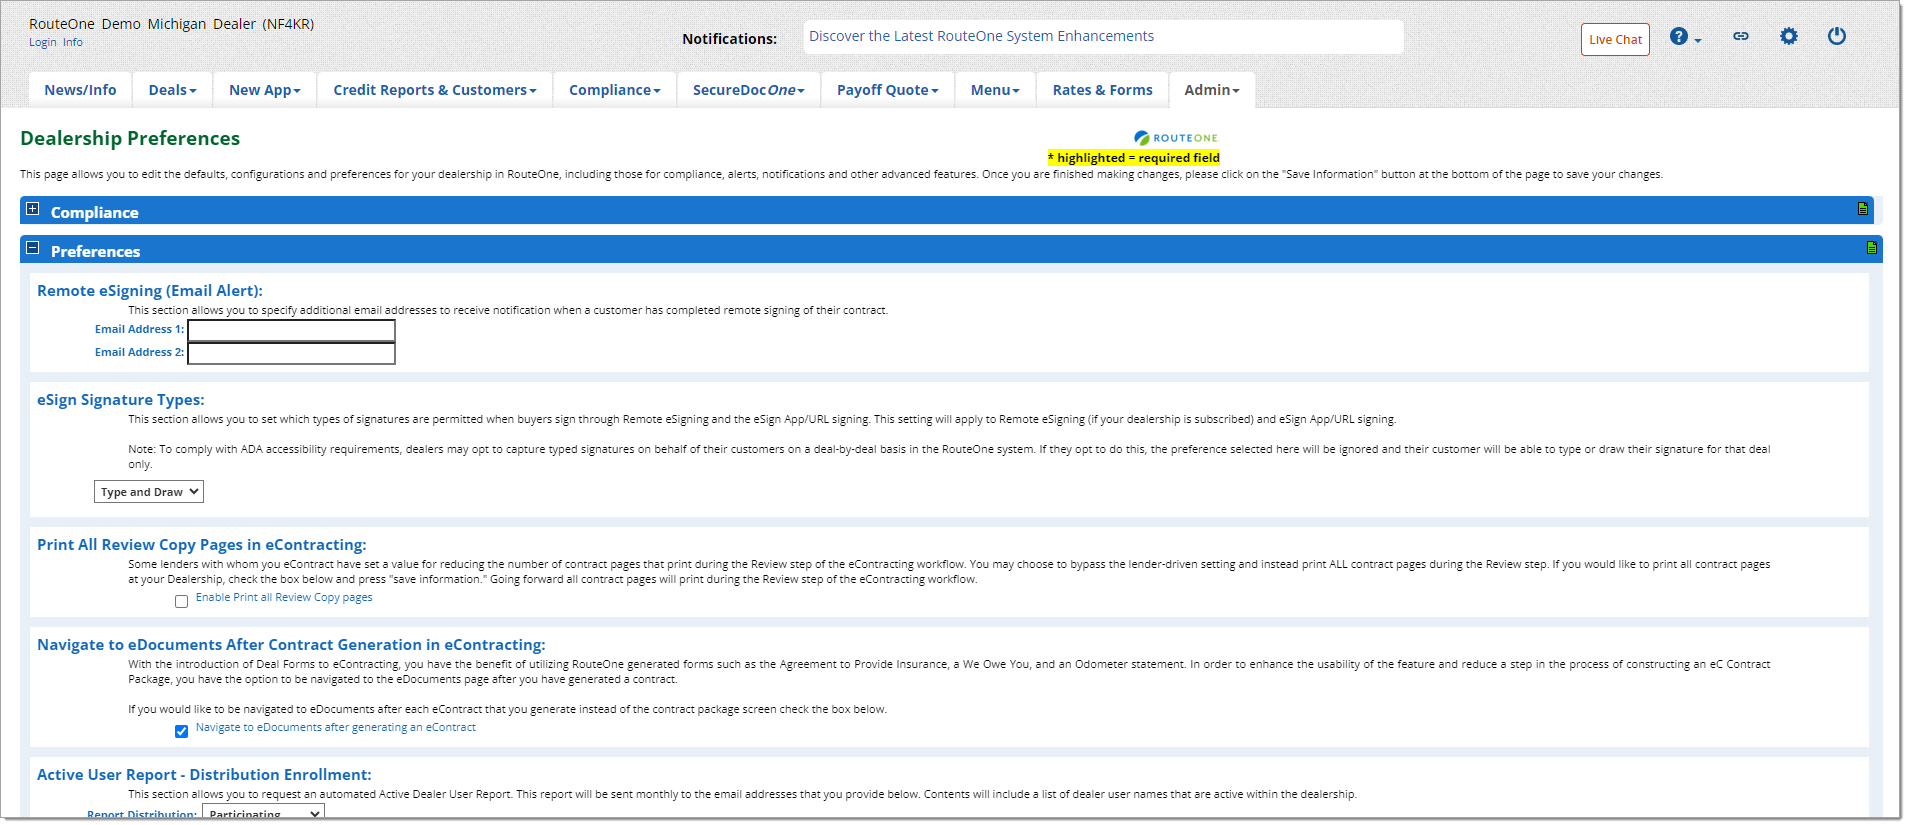
Scroll down to the ‘Preferences’ section.
To reduce your scrolling, click the ‘-’ symbol to minimize the ‘Compliance’ section and quickly view the ‘Preferences’ section.
Remote eSigning (Email Alert)
You may input up to two additional email addresses to receive notifications when a customer has completed remote signing of their contract package.
eSign Signature Types
The ‘eSign Signature Types’ section allows you to set the types of signatures that are permitted when buyers sign through:
- Remote eSigning
- In-store eSigning (via desktop, iPad®, Android™ or another tablet device)
The types of signatures that are accepted in RouteOne are ‘Draw,’ ‘Type,’ and ‘Draw and Type.’ To select the allowed signature types, use the drop-down menu.
For more detailed information on eSign Signature Types, see our settings guide here.
Print All Review Copy Pages in eContracting
Some finance sources with whom you eContract have set a value for reducing the number of contract pages that print during the Review step of the eContracting workflow.
To bypass this setting and instead print all contract pages during the Review step, click the checkbox for ‘Enable Print all Review Copy pages.’
Once you click the ‘Save Information’ button at the bottom of the page, all pages of future contracts will print during the Review step of the eContracting workflow.
Active User Report
The ‘Active User Report - Distribution Enrollment’ section allows you to participate or not participate in the distribution of an automated Active Dealer User Report. The report will be sent monthly to the email addresses that you provide with a list of dealer user names that are active within the dealership.
To enroll in Report Distribution, set the ‘Report Distribution’ drop-down menu to ‘Participating.’
The report may be sent to a minimum of one email address and up to five.
Credit Application Defaults
This section allows you to set defaults for the Make, New/Used Indicator, and Retail Value (DMS/Vehicle Values Book) fields for your dealership. The value you select here will be the default value on each credit application that is created in the RouteOne Credit Aggregation System (CAS).
Use the drop-down menus to select the default for each field.
Auto Save Vehicle Information
This section allows you to set the preference to ‘Auto Save’ a vehicle that has been entered on the Credit Application to the Vehicle Valuation Manager. Selecting this option allows you to reuse the previously entered vehicle information on the Vehicle Values page. The ‘auto saved’ vehicle will be stored in your used vehicle inventory as an unsold vehicle.
Information Masking Preferences
This section allows you to select whether the values for the Social Security Number (SSN), Tax ID, and/or Driver's License fields should be fully displayed or masked for your dealership.
The value you select here will be the default configuration in the RouteOne CAS.
If masking is chosen, the selected values will be marked as ‘****’ except for the last four digits, upon exit of the field.
These preferences do not apply to the printed applications.
Use the drop-down menus to select which fields should be masked.
While one email address is required to be notified when these settings are changed, you can choose to notify up to five email addresses by entering them here.
Deal Saver (Email Alert)
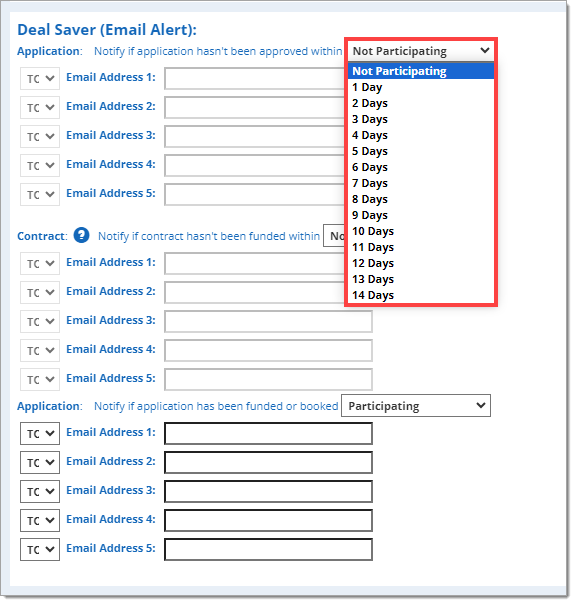
This section allows you to notify individuals by email if an application has not been approved within a desired time period, if a contract has not been funded within a desired time period, and/or if an application has been funded or booked.
Use the right-hand drop-down menu for application approval to select the amount of time before the system triggers a notification to the emails.
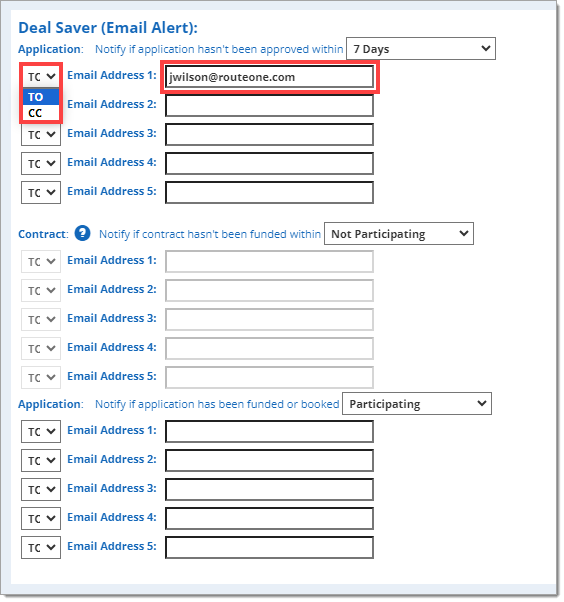
Enter up to five email addresses in the respective fields and use the drop-down menus on the left to designate whether the recipient gets a direct email (TC) or a copy (CC).
Repeat the above steps for notification if the contract has not been funded after a set amount of time.
The emails for each notification do not need to match.
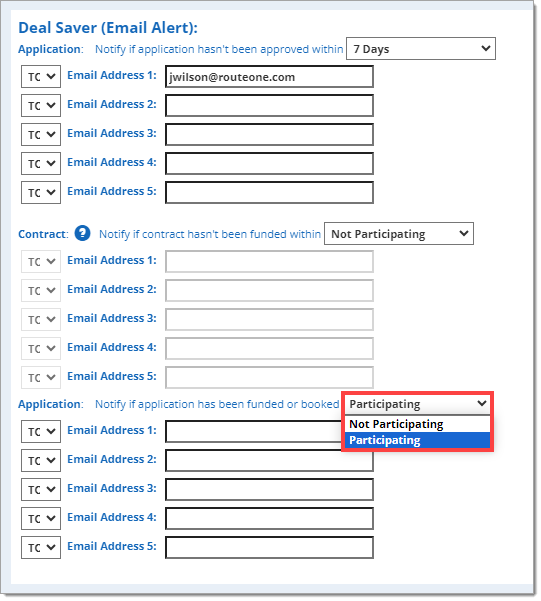
For notification when applications have been funded or booked, there is no time period; simply select the ‘Participating’ option from the drop-down menu if you would like to receive emails. Enter up to five emails and indicate whether each email should receive a direct email (TC) or a copy (CC).
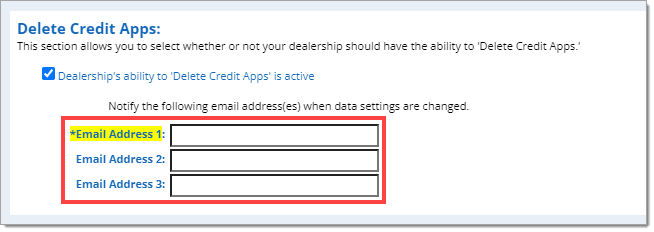
Delete Credit Apps
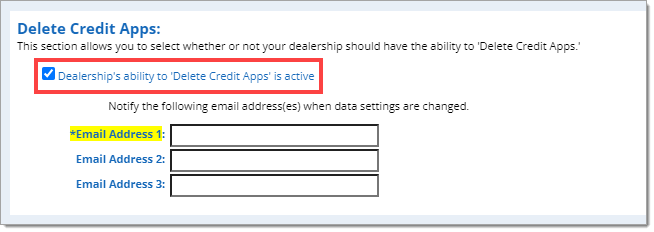
This section allows you to select whether or not your dealership should have the ability to ‘Delete Credit Apps.’
To enable this feature, click the 'Dealership's ability to 'Delete Credit apps' is active' checkbox.
While one email address is required to be notified when these settings are changed, you can choose to notify up to three email addresses by entering them into the respective fields.
Finance Source Auto Forward
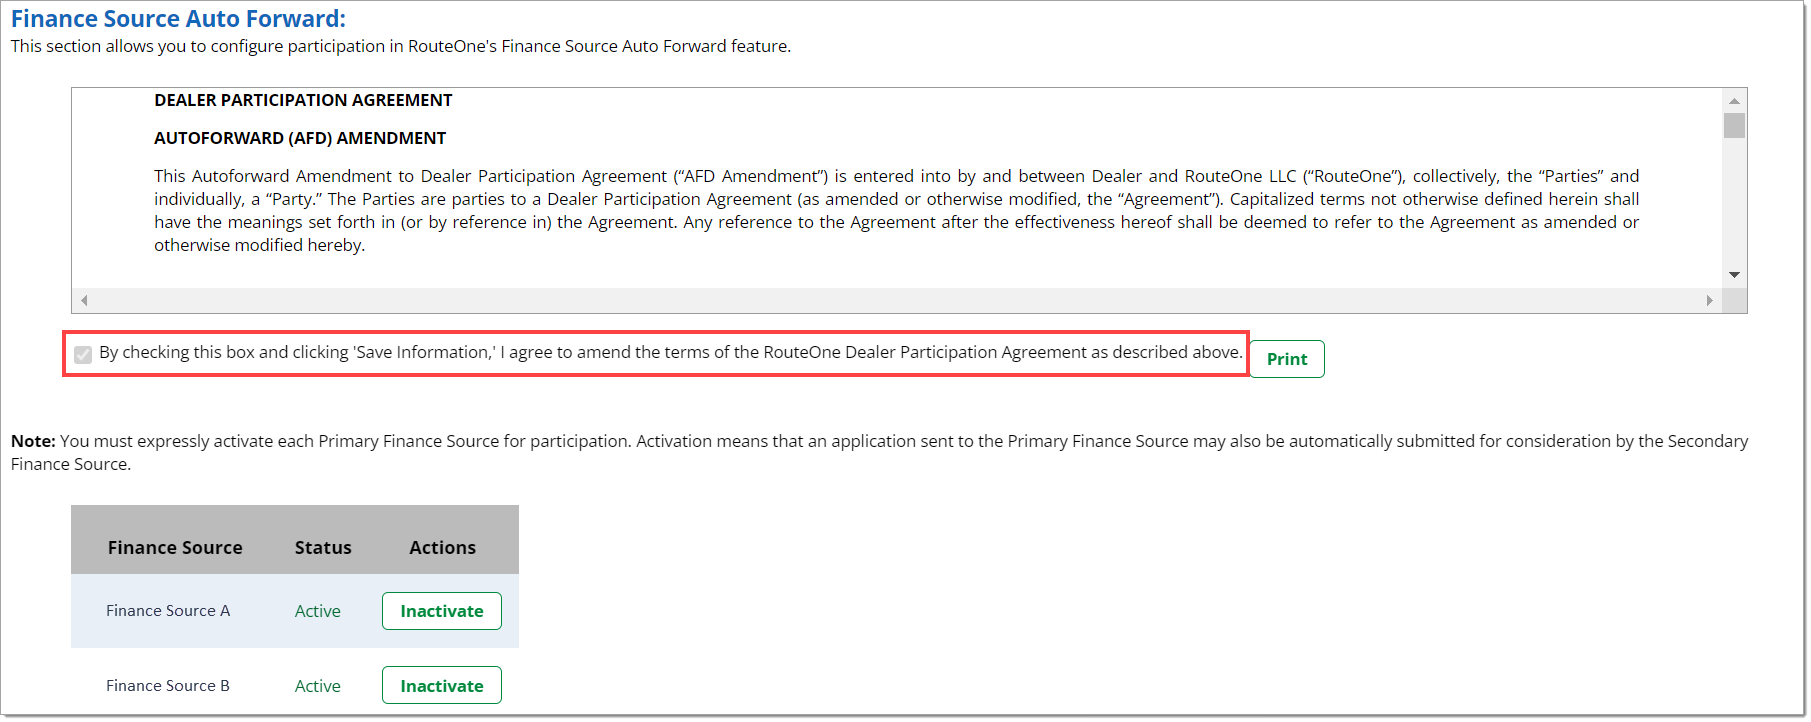
In order to participate in Finance Source Auto Forwarding, you must first agree to the ‘Dealer Participation Agreement Autoforward (AFD) Amendment.’ To agree, click on the checkbox under the agreement. Then scroll to the bottom of the Dealer Preferences page and click ‘Save Information’ to finalize the agreement.
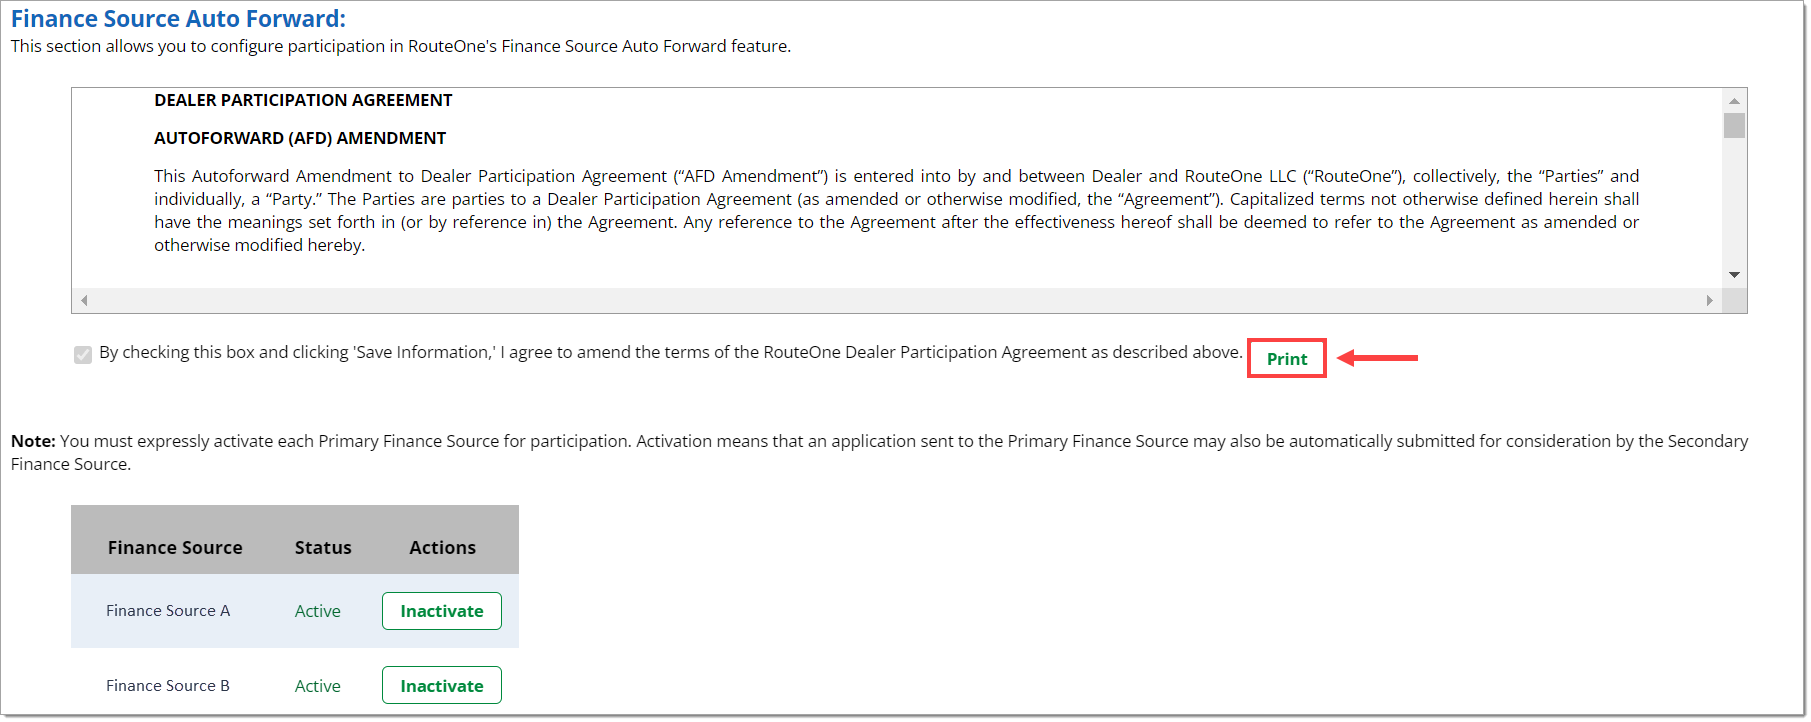
You can print the amendment by clicking the ‘Print’ button.
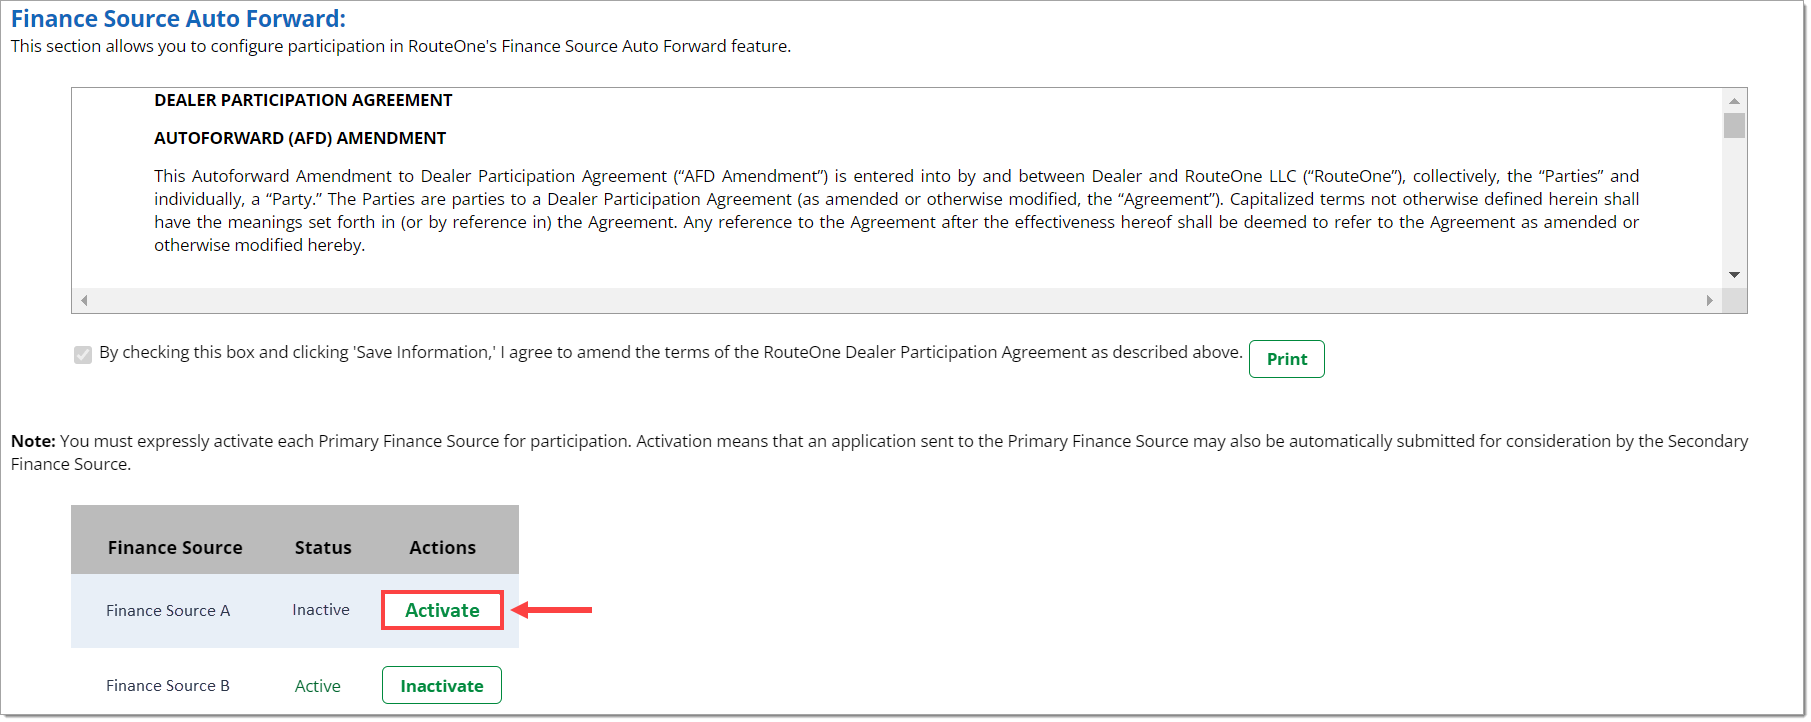
You must expressly activate each Primary Finance Source for participation. Activation means that an application sent to the Primary Finance Source may also be automatically submitted for consideration by the Secondary Finance Source.
To activate a Finance Source, click the corresponding ‘Activate’ button in the ‘Actions’ column. When a Finance Source is activated, the button will change to ‘Inactivate’ and the ‘Status’ will change to ‘Active.’
Mobile Services
This section provides settings related to RouteOne functionality accessed via a RouteOne-designed mobile application (e.g., iPhone® application).
To disable IP blocking on mobile, click the checkbox.
You can choose to notify up to five email addresses by entering them into the respective fields.
Preferred Finance Source Selection
This section allows you to choose which finance sources will receive credit applications for a specific transaction and vehicle type (e.g., new vs. used and retail vs. lease).
Once you have selected finance sources in this section, they will receive submitted RouteOne credit applications that meet the selected transaction and vehicle type, provided the finance source supports the selected transaction and vehicle type.
The designated finance source(s) cannot be deselected on credit applications at the time of submission, unless you specify that such finance source is ‘unlocked,’ by setting the lock icon to ‘unlock.’
Finance sources will be auto-selected on a credit application in the order they are set up. If more than 6 finance sources meet the criteria on a credit application, only the first 6 finance sources will be auto-selected.
Use the drop-down menu to select the desired finance source, then use the checkboxes to designate which Vehicle Type and Transaction Type combinations will be automatically sent to that finance source.
The system will only allow you to check types that the designated finance source accepts.
If you would like the finance source to be able to be removed from individual credit applications as needed, click the padlock icon to ‘unlock’ it.
To add a finance source, click the ‘+Add Row’ button.
To remove a preferred finance source selection, click the ‘Delete’ button next to that finance source.
At least one finance source must appear in this section. To disable the preferred finance source selection functionality, either set the ‘Finance Source’ to ‘Make Selection’ or click the ‘Clear’ button.
At least one email address must be entered in the Email Address fields which will receive email notification anytime these settings are change.
To finalize the settings, ensure that the acknowledgement statement has been checked.
Finance Source Associations
This section allows you to choose if finance sources can unilaterally activate an association with your dealership, so they can be selected for credit application submission without your explicit request for the association. Selecting this option will prohibit finance sources from activating your dealership without your explicit consent.
Post-Decision Submission Rules
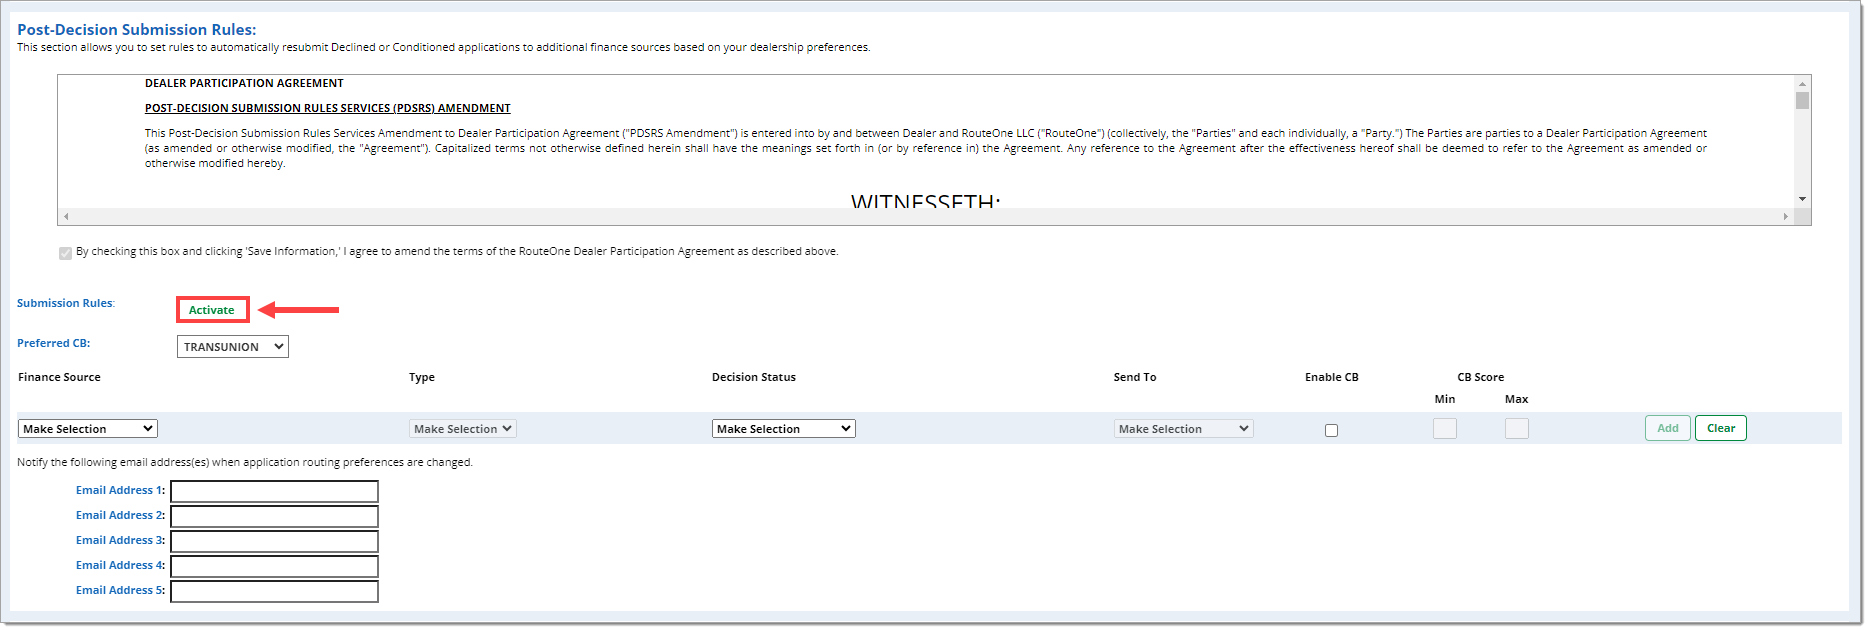
This section allows you to set rules to automatically resubmit Declined or Conditioned applications to additional finance sources based on your dealership preferences.
The eDPA Amendment in this section must be accepted in order to proceed with activating the functionality.
To activate the Post-Decision Submission Rules, click the ‘Activate’ button. When active, this button will say ‘Inactivate.’
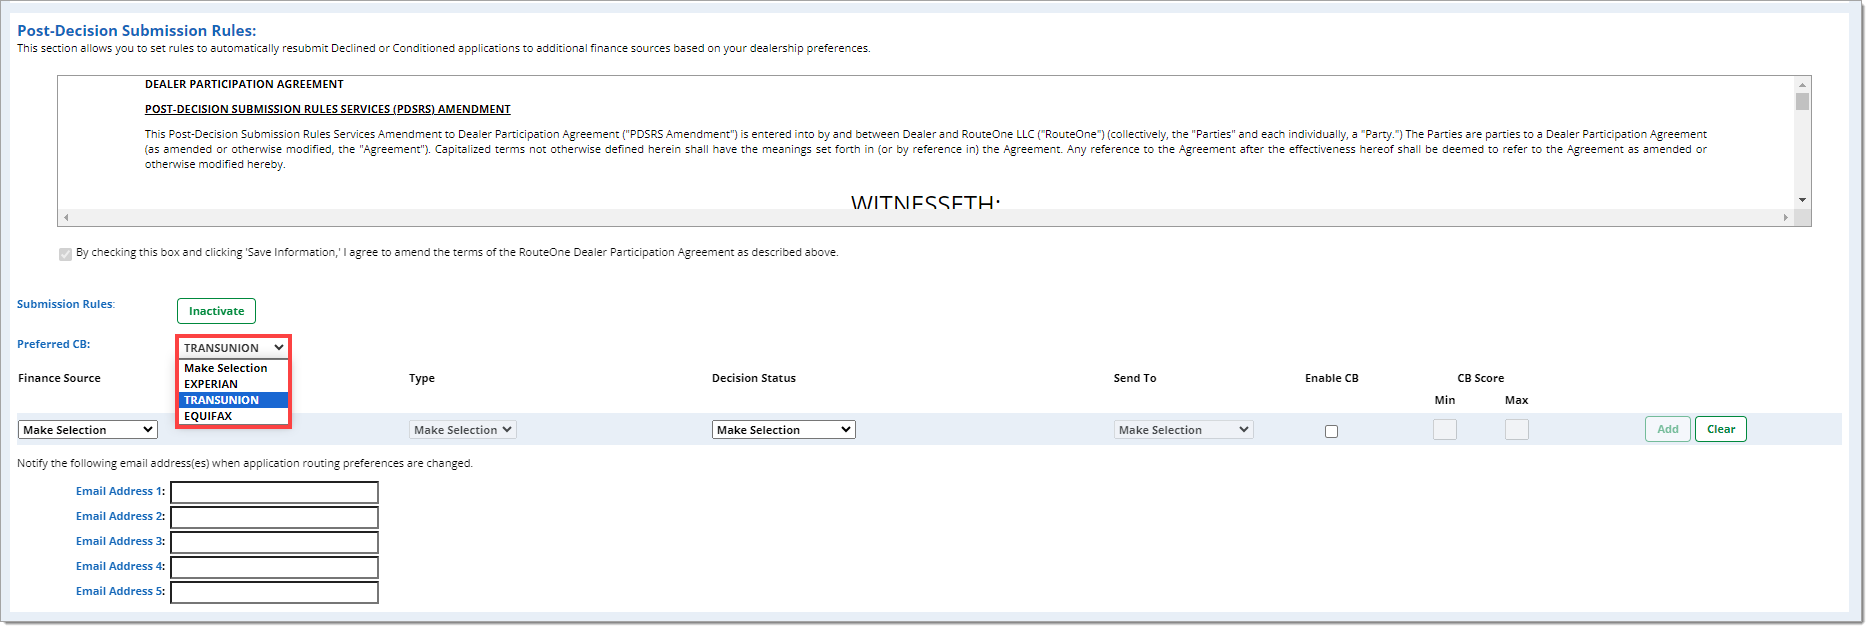
Select the preferred credit bureau to use for resubmission using the drop-down menu.
To add a new rule, use the ‘Finance Source’ drop-down menu to select which finance source the credit applications will have been sent to initially. Use the ‘Type’ drop-down menu to select whether this rule applies to ‘Lease’ or ‘Retail’ deals. Use the ‘Decision Status’ drop-down menu to select whether ‘Declined,’ ‘Conditioned,’ or ‘Declined/Conditioned’ applications will be resubmitted. Use the ‘Send to’ drop-down menu to select which finance source the credit applications will be resubmitted to.
To add an additional rule that the credit score must also lie between two numbers, click the ‘Enable CB’ checkbox. Then input the minimum and maximum credit scores that will be included in the ‘CB Score’ fields.
To complete adding the rule, click ‘Add.’ To remove the rule before adding, click ‘Clear.’
To remove the rule after adding, click ‘Delete.’
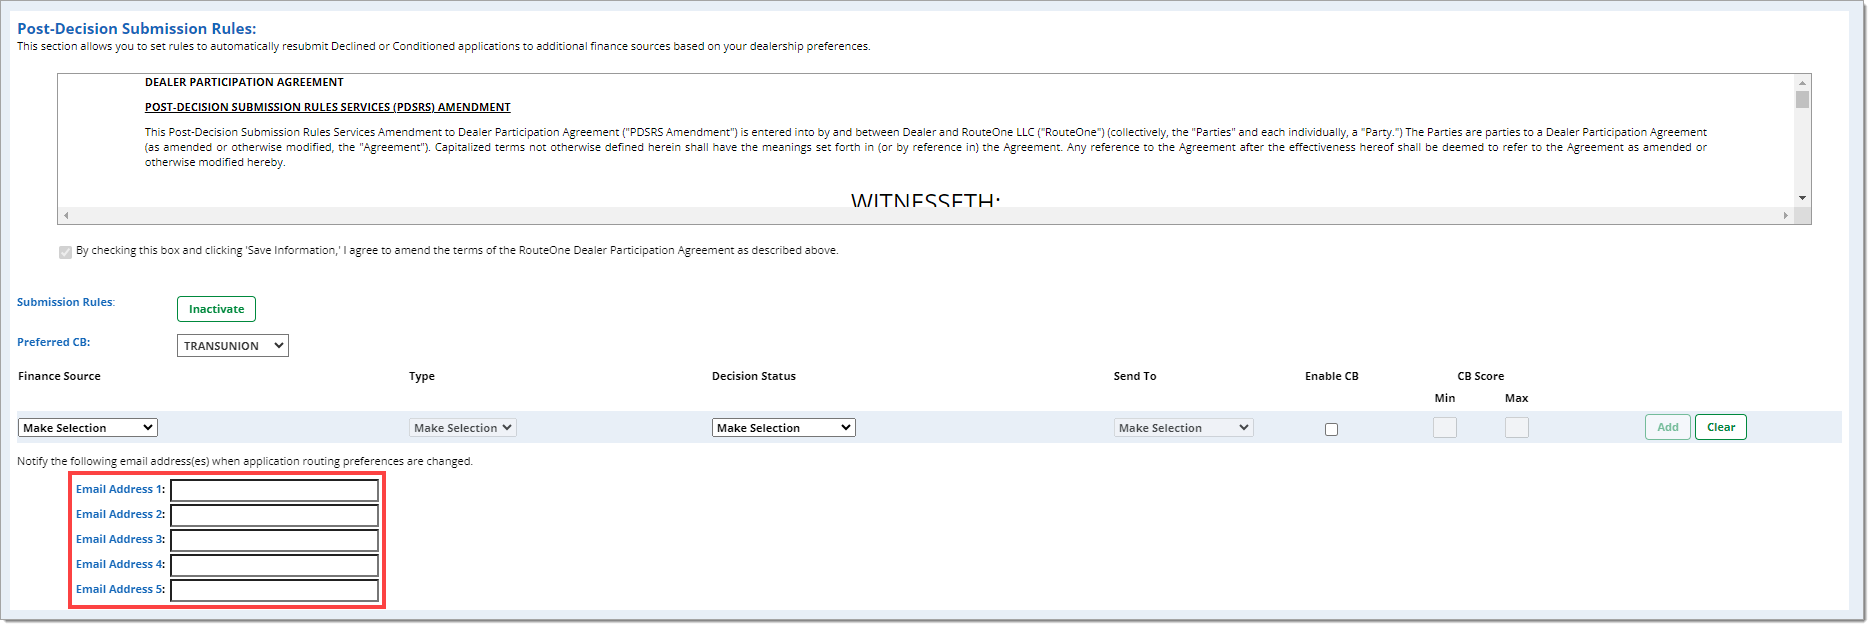
Optionally, email addresses can be entered that will be notified any time these setting are changed.
Third Party Lead Notification
This section allows you to configure which email addresses you would like notified once a new lead or application is imported into RouteOne.
The notification will only occur for the specific leads or applications you selected for each individual email you added. If an email address is added, it will receive a notification every time a new lead or application is imported from the selected source(s).
To enable Third Party Lead Notifications, set the ‘Third Party Lead Notification’ drop-down menu to ‘Participating.’
To set up a new notification, enter the desired email address in one of the ‘Email Address’ fields. Use the first drop-down menu to designate whether it is sent as ‘ADF’ or ‘Plain Text,’ then use the second drop-down menu to select the source(s) you would like notifications about.
If you would like to stop receiving notifications altogether, either remove all email addresses, or select 'Not Participating’ in the ‘Third Party Lead Notification’ drop-down menu.
Dealer Rate Markup
Setting a rate within the Dealer Rate Markup section allows you to have a specific rate applied to all Dealer Participation Certification Forms.
To set a default Dealer Markup, input the desired percent markup as an integer in the ‘Dealer Markup (Retail/Balloon)’ field.
Once you enter the rate and click the ‘Save Information’ button at the bottom of the page, this ‘Standard Dealer Participation Rate’ will be pre-populated on all Dealer Participation Certification Forms.
Any dealer user may revise the rate within the Dealer Participation Certification Form for a specific deal if necessary.
Important Note: Dealer is solely responsible for all Dealer Markup inputs and assumes the entire responsibility and liability (including, for the avoidance of doubt, compliance with applicable laws) for all of its potential losses or damages that may occur through use of the Dealer Participation Certification Form and related functionality.
Default Tax Selections (TRAC/Open-End)
This section provides the ability to set dealership-level defaults for worksheet fields.
Use the radio buttons to select the default tax selections for the dealership for each worksheet field.
Users will have the ability to manually adjust these selections when completing the worksheet.
Merge Deal Jackets from Credit Application
During the credit application process, any other deals that have a matching first name, last name, and SSN will be presented so you can determine if they represent the same deal and should be merged with the application you’re working on. Merging deal jackets helps simplify compliance tracking.
Click the checkbox to ‘Enable Merge Deal Jacket from Credit App Functionality.’

To see this change take effect, you will need to log out and log back in to RouteOne. After logging back in, Auto-Merge via the Credit application will be available in Deal Manager. More information about merging deals in RouteOne can be found in the user guide here.
IMPORTANT: To apply any changes to your Dealership Preferences, ensure you click the ‘Save Information’ button at the bottom of the page.
To learn about user information and how to set individual user permissions, see our User Information and Permissions guide here.
iPad and iPhone are registered trademarks of Apple Inc.
Android is a trademark of Google LLC.
ROUTEONE SUPPORT
Hours (EST)
Monday - Friday: 6:00am – Midnight
Saturday: 9am – 9pm
Can’t find what you need?
Try our search

