In This Guide:
Related Guides:
Integration
ERA Ignite Reynolds & Reynolds Integration
Version 29.50
The Reynolds and Reynolds Company
One Reynolds Way
Dayton, OH 45430
937.485.2000
800.767.0080 (Technical Assistance Center)
As a condition to viewing these materials, viewer expressly acknowledges and agrees that these materials contain confidential and proprietary information and trade secrets of The Reynolds and Reynolds CompanyReynolds and Reynolds Ltd., and its affiliates (“Reynolds”), and that all rights in and to the materials and information contained therein shall remain at all times the property of Reynolds. Further, viewer acknowledges that these materials and the information contained therein are copyrighted by Reynolds.
These materials are solely for use by current customers and employees of Reynolds, and any other use is strictly prohibited.
As a condition to viewing these materials, viewer agrees to keep these materials and the information contained therein strictly confidential; viewer agrees not to disclose or otherwise permit any other entity access to these materials; and viewer agrees not to copy, reproduce, or disseminate these materials to third parties. Viewer also agrees that review or disclosure of the information contained in these materials does not constitute a waiver or relinquishment of any rights or remedies related to Reynolds’ confidential, proprietary, or trade secret information.
The information contained in these materials has been carefully checked and is believed to be accurate. However, Reynolds makes no representations or warranties regarding the materials and assumes no responsibility or liability for any inaccuracies that may be contained herein. In no event will Reynolds be liable for direct, indirect, special, exemplary, incidental, or consequential damages resulting from any defect or omission in these materials, even if advised of the possibility of such damages. In the interest of continued product development, Reynolds reserves the right to make improvements in these materials and the products it describes at any time, without notice or obligation.
It is the sole responsibility of the customer to determine the applicability of federal, stateregional, and/or local laws, or other governmental requirements regarding the customer’s use, retention, or documentation of data that may be maintained as part of customer’s Reynolds In-House Computer System, and to comply with such laws and requirements.
The following products may be mentioned in this manual:
- The Reynolds and Reynolds Company or its affiliates is the owner of the following US patents: 8,531,424, 8,547,356, 8,854,330, 8,933,904, 9,081,423, and 9,235,276, and has other patents pending.
- ActiveSync®, ActiveX®, Excel®, Internet Explorer®, Microsoft®, Microsoft Access®, Microsoft Edge®, Notepad®, Outlook®, Windows Vista®, Word®, and WordPad® are products and trademarks of Microsoft Corporation.
- ADESA® is a registered trademark of ADESA, Inc.
- Adobe Acrobat and Adobe Reader are products and trademarks of Adobe Systems Incorporated.
- Apple® and iPhone® are registered trademarks of Apple, Inc.
- AutoCheck® is a registered trademark of Experian.
- Auto Plus and Service Plus are products and proprietary marks of KeyTrak, Inc.
- Avery® is a registered trademark of Avery Dennison Corporation.
- Black Book® is a registered trademark of Hearst Business Media Corporation.
- CARFAX® is a registered trademark of Carfax, Inc.
- Dealertrack® is a registered service mark of Dealertrack, Inc.
- docuPAD® is a registered trademark of COINdata, LLC., an affiliate of The Reynolds and Reynolds Company.
- Enterprise Rent-A-Car® and ARMS® are registered trademarks of the Enterprise Rent-A-Car Company.
- Equifax® is a registered trademark of Equifax, Inc.
- Experian® is a registered service mark of Experian Information Solutions, Inc.
- Firefox® is a registered trademark of the Mozilla Foundation.
- Kelley Blue Book® is a registered trademark of Kelley Blue Book Co., Inc.
- LoJack is a registered trademark of LoJack Corporation.
- Macintosh® and Macintosh Safari® are products and registered trademarks of Apple, Inc.
- Manheim Auctions® is a registered trademark of Manheim, Inc.
- Monarch®, Pathfinder®, Ultra®, 6039, 6063, 9462, and 9465 are trademarks of Avery Dennison Retail Information Services, LLC.
- Mopar is a registered trademark of Chrysler Group, LLC.
- NAAA® is a registered trademark of the National Auto Auction Association, Inc.
- NADA® is a registered service mark of the National Automobile Dealers Association.
- PermaPlate® is a registered trademark of Siskin Enterprises, Inc.
- RouteOne® is a registered trademark of RouteOne, LLC.
- Symbol® is a registered trademark of Symbol Technologies, LLC.
- TransUnion® is a registered trademark of TransUnion, LLC.
- WebEx® is a product and trademark of Cisco Technology, Inc.
Enhanced RouteOne® Integration
The enhanced RouteOne ® integration is used to transmit credit application information to the RouteOne® web site, as well as access the RouteOne® web site directly from the ERA-IGNITE System using the single sign-on feature. In addition, when a decision for a credit application is received on the RouteOne® web site, the F&I manager is alerted in the ERA-IGNITE System, and the credit application record is automatically updated in the Credit Application (CAP) application to reflect the changes.
The enhanced RouteOne ® integration also provides several tools in the ERA-IGNITE F&I application and the CAP application to allow decisions about credit applications to be reviewed and managed.
To set up the enhanced RouteOne® integration in the ERA-IGNITE System, or to license the RouteOne® interface, contact your Account Manager.
For a procedure on setting up the enhanced RouteOne ® integration on the RouteOne® web site after the integration has been set up in the ERA-IGNITE System, refer to "How to Set Up the Enhanced RouteOne® Integration" on page 31.
ERA-IGNITE F&I/Desking Toolbar
The ERA-IGNITE F&I/Desking toolbar displays at the top of the Start Deal screen and the Worksheet screens in the ERA-IGNITE F&I application. The toolbar provides shortcut buttons to quickly access various windows and functions used when submitting credit applications to the RouteOne ® web site in the ERA-IGNITE F&I application.
The Configure Toolbar window is used to customize the appearance of the toolbar in the ERA-IGNITE System. This window is used to add, remove, and reorganize the buttons on the toolbar. Employees can also determine the order in which the buttons display on the toolbar.
To access the Configure Toolbar window, click the gear (Configure) toolbar button. This window can also be accessed by selecting System Tools → Preferences → Configure Toolbar.
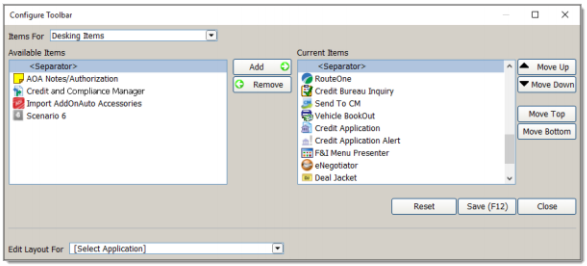
Enter Desking Items in the Items For field to add toolbar buttons for the ERA-IGNITE Desking application to the toolbar. Enter F&I Items in the Items For field to add toolbar buttons for the ERA-IGNITE F&I application to the toolbar.
To add a toolbar button to the toolbar, highlight the corresponding item in the Available Items section and click the Add button. The item is moved to the Current Items section. Press the F12 key to save the settings and display the toolbar button on the toolbar. To remove a toolbar button from the toolbar, highlight the corresponding item in the Current Items section and click the Remove button. The selected item is moved to the Available Items section. Press the F12 key to save the settings and remove the button from the toolbar.
Following are descriptions of each toolbar button.
Save (F12): Click the Save (F12) toolbar button to save the updates to the record currently displayed. Records can also be saved by pressing the F12 key.
Save & Clear (F10): Click the Save & Clear (F10) toolbar button to save the current deal and clear the entries on the Retail Worksheet screen, the Lease Worksheet screen, or the Multiple Scenarios screen. Deals can also be saved and cleared by pressing the F10 key.
RouteOne: Click the RouteOne toolbar button to display a list of options used to access a RouteOne® credit application, transmit credit applications to RouteOne®, and access the RouteOne® Deal Manager screen.
The following options are available:
R1 Credit Application
Select the R1 Credit Application option to send a credit application to the RouteOne® web site. For more information about the R1 Credit Application option, refer to "Transmitting Credit Applications to RouteOne®" on page 7.
R1 Credit Bureau
Select the R1 Credit Bureau option to transmit the necessary information for requesting credit reports to the RouteOne® web site. When the R1 Credit Bureau option is selected, the Credit & Compliance screen on the RouteOne® web site is accessed, where a credit report request can be submitted. For more information about the R1 Credit Bureau option, refer to "Sending Necessary Information to Request Credit Reports to RouteOne®" on page 9.
R1 Deal Manager
Select the R1 Deal Manager option to access the Deal Manager screen on the RouteOne® web site. For more information about the R1 Deal Manager option, refer to "Accessing the Deal Manager Screen on the RouteOne® Web Site" on page 10.
These options can also be accessed by selecting Tools → RouteOne.
Credit and Compliance Manager:
Click the Credit and Compliance Manager toolbar button to display the Credit and Compliance Manager window. This window is used to manage active RouteOne® credit applications throughout the life cycle of the credit application and to review decisions returned by lenders. For more information about the Credit and Compliance manager window, refer to "Credit and Compliance Manager Window" on page 14.
Transmitting Credit Applications to RouteOne®
The R1 Credit Application option in the ERA-IGNITE Credit Application (CAP) application and the ERA-IGNITE F&I application is used to send a credit application to the RouteOne® web site.
To access the R1 Credit Application option, select Tools → RouteOne → R1 Credit Application. This option can also be accessed by clicking the RouteOne toolbar button and selecting R1 Credit Application.
Access to view previously submitted RouteOne® credit applications or to create a new credit application to be transmitted to the RouteOne® web site must be granted in the Security Maintenance (SEC) application.
To grant an employee access to previously submitted RouteOne® credit applications or to create a new credit application to be transmitted to the RouteOne® web site in the ERA-IGNITE F&I application, access the Security Access screen in the SEC application and select the F&I/Desking → Actions → RouteOne: Credit Application check box. To grant an employee access to previously submitted RouteOne® credit applications or to create a new credit application to be transmitted to the RouteOne® web site in the CAP application, select the Credit Application → Actions → RouteOne: Credit Application check box.

When the R1 Credit Application option is selected, the RouteOne® web site is accessed, where the credit application can be reviewed and modified, as needed.
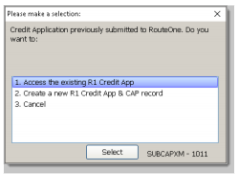
If a credit application has already been transmitted to the RouteOne web® site, the Please Make a Selection window displays, where the employee can choose to view the previously submitted credit application in RouteOne®. Alternatively, the employee can choose to create a new credit application in the CAP application to be transmitted to the RouteOne® web site.
Transmit Credit Application window
The Transmit Credit Application window in the Credit Application (CAP) application can also be used to select the lender to which the credit application is transmitted for processing.
To access the Transmit Credit Application window, press the CTRL+T hot key combination or select CAP application → CAP Functions → Transmit Credit Application. This window can also be accessed by clicking the Transmit Application toolbar button.
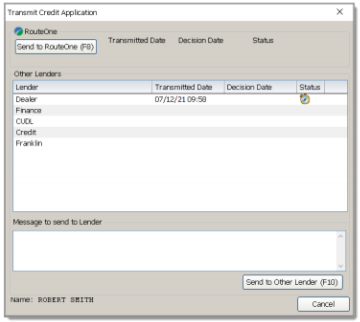
To transmit a credit application to RouteOne®, click the Send to RouteOne (F8) button. The RouteOne® web site is accessed, where the credit application can be reviewed and modified.
If a credit application has already been transmitted to the RouteOne® web site, the Please Make a Selection window displays, where the employee can choose to view the previously submitted credit application or to create a new credit application in the CAP application to be transmitted to the RouteOne® web site.
If multiple RouteOne® IDs are available, the Multi Third-Party ID window displays. Select the appropriate ID to use on this window.
Sending Necessary Information to Request Credit Reports to RouteOne®
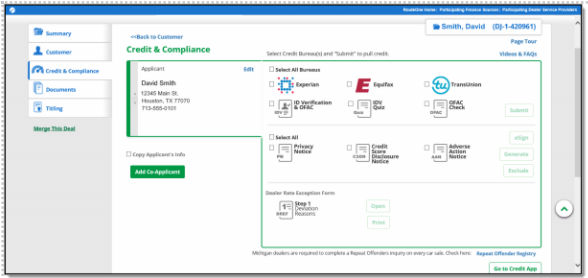
The R1 Credit Bureau option in the ERA-IGNITE Credit Application (CAP) application and the ERA-IGNITE F&I application is used to access the Credit & Compliance screen on the RouteOne® web site, where a credit report request can be submitted.
To access the R1 Credit Bureau option, select Tools → RouteOne → R1 Credit Bureau. This option can also be accessed by clicking the RouteOne toolbar button and selecting R1 Credit Bureau.
Access to the R1 Credit Bureau option in the ERA-IGNITE F&I application and the CAP application must be granted in the Security Maintenance (SEC) application. To grant an employee access to the R1 Credit Bureau option in the ERA-IGNITE F&I application, access the Security Access screen in the SEC application and select the F&I/Desking → Actions → RouteOne: Credit Bureau check box. To grant an employee access to the R1 Credit Bureau option in the CAP application, select the Credit Application → Actions → RouteOne: Credit Bureau check box.

When the R1 Credit Bureau option is selected, the Credit & Compliance screen on the RouteOne® web site is accessed. Information from the ERA-IGNITE System that is needed to request a credit report using the RouteOne® web site is automatically entered in the fields on this screen.
Accessing the Deal Manager Screen on the RouteOne® Web Site
The R1 Deal Manager option in the ERA-IGNITE Credit Application (CAP) application and the ERA-IGNITE F&I application is used to access the Deal Manager screen on the RouteOne® web site.
To access the R1 Deal Manager option, select Tools → RouteOne → R1 Deal Manager. This option can also be accessed by clicking the RouteOne toolbar button and selecting R1 Deal Manager.
Access to the R1 Deal Manager option in the ERA-IGNITE F&I application and the CAP application must be granted in the Security Maintenance (SEC) application. To grant an employee access to the R1 Deal Manager option in the ERA-IGNITE F&I application, access the Security Access screen in the SEC application and select the F&I/Desking → Actions → RouteOne: Deal Manager check box. To grant an employee access to the R1 Deal Manager option in the CAP application, select the Credit Application → Actions → RouteOne: Deal Manager check box.

When the R1 Deal Manager option is selected, the RouteOne Deal Manager screen on the RouteOne® web site is accessed, where pending credit applications and decisions from lenders can be reviewed.
Credit Decision Alerts
When a decision about a credit application is received on the RouteOne® web site, the credit application is automatically updated in the Credit Application (CAP) application, and an alert that the decision was received displays on various screens in the ERA-IGNITE F&I application.
The alert displays for credit applications started either in the ERA-IGNITE System or on the RouteOne® web site.
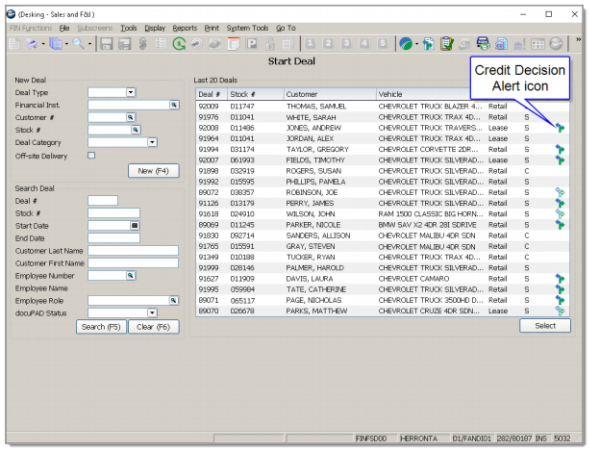
On the Start Deal screen, the Credit Decision Alert icons display to the right of the Status column so that the status of the credit applications for the last 20 deals can be easily identified without accessing the RouteOne® web site.
The Credit Decision Alert buttons also display at the top of the Retail Worksheet screen and the Lease Worksheet screen for a deal. By alerting managers to status changes for an application directly in the deal, they can negotiate deals without navigating to the RouteOne® web site periodically to verify the status.
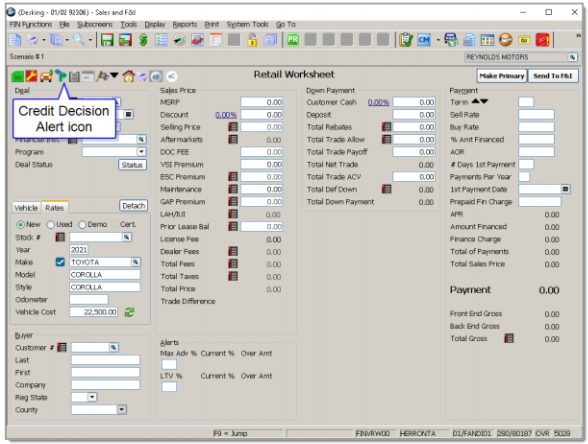
The following buttons display to indicate the status of a credit application:
RouteOne® Credit Application Attached to Deal:
The RouteOne® Credit Application Attached to Deal button is used to indicate that a RouteOne ® credit application is attached to the deal. The RouteOne® credit application attached to the deal is the credit application that was most recently transmitted to the RouteOne ® web site. Click the (RouteOne® Credit Application Attached to Deal) button to access the Credit and Compliance Manager window, where recent credit applications and the decisions returned by lenders can be reviewed. For more information about the Credit and Compliance Manager window, refer to "Credit Applications Tab" on page 16.
New Credit Decision from RouteOne®:
The New Credit Decision from RouteOne® button is used to indicate that a new credit decision has been received from RouteOne® and is attached to the deal. Click the New Credit Decision from RouteOne® button to access the Credit and Compliance Manager window, where recent credit applications and the decisions returned by lenders can be reviewed. For more information about the Credit and Compliance Manager window, refer to "Credit Applications Tab" on page 16.
If a decision about a credit application is received from a lender other than RouteOne® , the New Credit Decision button displays. When the New Credit Decision button is clicked, the alert is cleared, and the Credit Application Attached to Deal button displays.
When the New Credit Decision from RouteOne® button is clicked, the alert is cleared, and the RouteOne® Credit Application Attached to Deal button displays.
Credit Application Attached to Deal:
The Credit Application Attached to Deal button is used to indicate that a credit application is attached to the deal. The credit application attached to the deal is the credit application that was transmitted to a non-RouteOne® lender. Click the Credit Application Attached to Deal button to access the Credit and Compliance Manager window, where recent credit applications and the decisions returned by lenders can be reviewed. For more information about the Credit and Compliance Manager window, refer to "Credit Applications Tab" on page 16.
Credit and Compliance Manager Window
The Credit and Compliance Manager window in the Credit Application (CAP) application and the ERA-IGNITE F&I application is used to manage credit applications throughout their life cycle, review decisions returned by lenders, and monitor the status of risk-based pricing notices and adverse action notices. This window provides employees with a summary of credit application activity in the CAP application.
Using the Credit and Compliance Manager window, employees can easily review which credit applications were added for a specific date or range of dates, confirm the status and decision for previously submitted applications, submit credit applications to lenders from a single location, and determine when compliance notices have been provided to customers.
The Credit and Compliance Manager window in the CAP application or the ERA-IGNITE F&I application can be accessed using one of the following four methods:
- Use the following path: Tools → Credit and Compliance Manager.
- Click the (Credit and Compliance Manager) toolbar button.
- Click the Credit and Compliance Manager link on the Credit Application Alerts window.
- Click the Credit Decision Alert buttons on the Start Deal screen, the Retail Worksheet screen, or the Lease Worksheet screen.
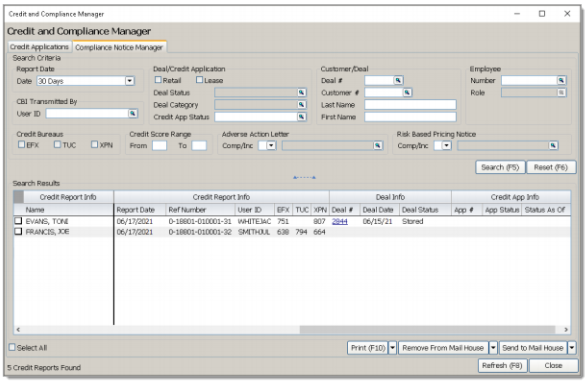
The Credit and Compliance Manager window includes the Credit Applications tab and the Compliance Notice Manager tab. On the Credit Applications tab, employees can review a list of credit applications and decisions returned by lenders. For information about the Credit Applications tab, refer to "Credit Applications Tab" on the following page.
On the Compliance Notice Manager tab, employees can search for and review credit report information and manage compliance tasks. For information about the Compliance Notice Manager tab, refer to the Credit Bureau Inquiry and Compliance Notice Manager manual (ZI231).
Credit Applications Tab
The Credit Application tab on the Credit and Compliance window is used to review a list of credit applications and decisions returned by lenders.
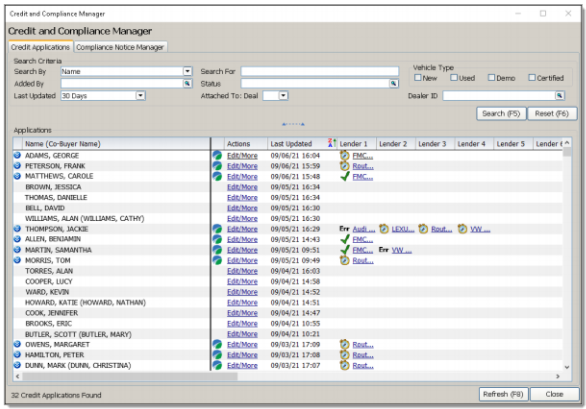
On the Credit Applications tab, credit applications and decisions returned by lenders display, with the most recently submitted credit applications and the most recent decisions returned by lenders displayed at the top of the list. The credit applications and decisions that display can be customized using various search criteria, such as a range of dates, the vehicle type, the name of the employee who transmitted the credit application, or the status of decisions returned by lenders. In addition, various filter options can be used to sort the credit applications and decisions displayed.
The entered search criteria and filter options are saved for the employee and are automatically entered when the employee next accesses the Credit and Compliance Manager window.
If a credit application has been sent to or received from the RouteOne® web site, the RouteOne button displays. Click this button to access the credit application on the RouteOne® web site. The Please Make a Selection window displays, where the employee can choose to view the previously submitted credit application or to create a new credit application in the CAP application to transmit to the RouteOne® web site.
Access to view previously submitted RouteOne® credit applications or to create a new credit application to be transmitted to the RouteOne® web site must be granted in the Security Maintenance (SEC) application.
To grant an employee access to previously submitted RouteOne® credit applications or to create a new credit application to be transmitted to the RouteOne® web site in the ERA-IGNITE F&I application, access the Security Access screen in the SEC application and select the F&I/Desking → Actions → RouteOne: Credit Application check box. To grant an employee access to view previously submitted RouteOne® credit applications or to create a new credit application to be transmitted to the RouteOne ® web site in the CAP application, select the Credit Application → Actions → RouteOne: Credit Application check box.
Click the Edit/More link to display a menu with additional options that are available for the credit application. The following options are available:
Attach to Deal: Select the Attach to Deal option to display the Deal Search window, where a search can be performed for a deal to which the credit application should be attached.
The Attach to Deal option is also available by clicking the Attach to Deal button on the Decision screen in the CAP application. For more information about the Decision screen, refer to the ERA-IGNITE Sales and F&I manual (ZI103).
Add Deal: Select the Add Deal option to add a new deal in the ERA-IGNITE F&I application using the information entered on the credit application and the decision returned by the lender. The credit application is also attached to the new deal.
The Add Deal option is also available by clicking the Add Deal button on the Decision screen in the CAP application. For more information about the Decision screen, refer to the ERA-IGNITE Sales and F&I manual (ZI103).
Transmit App to Additional: Lenders Select the Transmit App to Additional Lenders option to display the Transmit Credit Application window, where the credit application can be sent to multiple lenders.
Delete: Select the Delete option to delete a credit application for which a decision has not been returned by a lender.
Applications Flyout Details Section
If a decision has been returned by a lender, additional details about the decision can be reviewed in the Flyout Details section. To review more detailed information about the decisions returned by lenders, click the Down Arrow (Expand) button to the left of the applicant's name. Additional details, such as the lender/finance source name, tier, term, amount, buy rate, and payment, display.
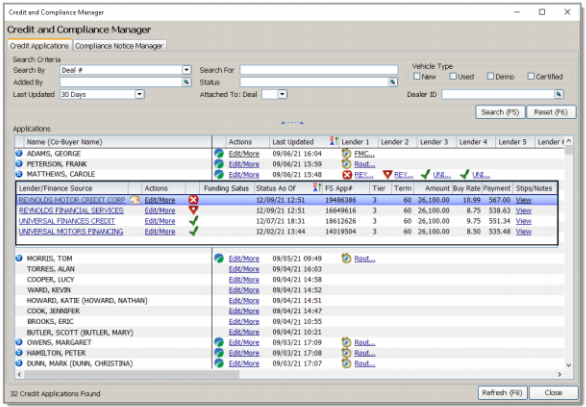
Click the Lender/Finance Source link to access the Credit Application Decision Details window, where additional information about the credit decision can be reviewed. For more information about the Credit Application Decision Details window, refer to "Credit Application Decision Details" on page 22.
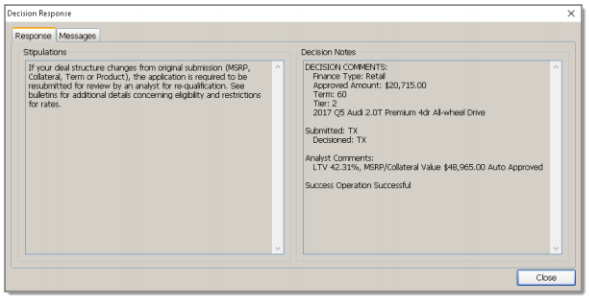
If a decision is returned by a lender with additional stipulations or notes, the View link displays in the Stips/Notes column. Click the View link to access the Response tab on the Decision Response window, where the stipulations and notes can be reviewed.
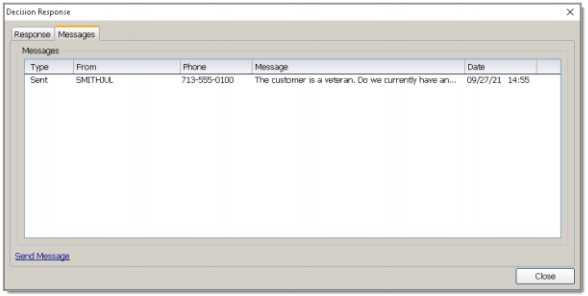
If a message is returned by a lender, the Envelope button displays in the unlabeled Message column. Click the Envelope button to access the Messages tab on the Decision Response screen, where messages from lenders can be viewed.
Click the Edit/More link to display a menu with additional options that are available for the credit application.
The following options are available:
Add Deal: Select the Add Deal option to add a new deal in the ERA-IGNITE F&I application using the information entered on the credit application and the decision returned by the lender. The credit application is also attached to the new deal.
The Add Deal option is also available by clicking the Add Deal button on the Decision screen in the CAP application. For more information about the Decision screen, refer to the ERA-IGNITE Sales and F&I manual (ZI103).
Update Deal: Select the Update Deal option to display the Credit Decision Deal Updates window, where the associated deal in the ERA-IGNITE F&I application can be updated using the information entered on the credit application and the decision returned by the lender. For more information about the Credit Decision Deal Updates window, refer to "Credit Decision Deal Updates" on page 25.
The Update Deal option is also available by clicking the Update Deal button on the Decision screen in the CAP application. For more information about the Decision screen, refer to the ERA-IGNITE Sales and F&I manual (ZI103).
New Scenario: Select the New Scenario option to create a new scenario for the associated deal in the ERA-IGNITE F&I application using the information entered on the credit application and decision.
The New Scenario option is also available by clicking the New Scenario button on the Decision screen in the CAP application. For more information about the Decision screen, refer to the ERA-IGNITE Sales and F&I manual (ZI103).
The unlabeled Status column displays the status icon associated with the status of the credit decision.
The following status icons are available:
Approved:
The Approved icon indicates that the lender approved the credit application.
Approved with Conditions:
The Approved with Conditions icon indicates that the lender can approve the credit application once lender-specified conditions are met.
Booked:
The Booked icon indicates that the credit application has been approved and booked. The definition for credit applications in Booked status varies depending on the lender.
Declined/Denied:
The Declined/Denied icon indicates that the lender declined or denied the credit application.
Decision Pending:
The Decision Pending icon indicates that a decision has not been returned by the lender.
Error:
The Error icon indicates that an error has occurred. Details about the error that occurred can be viewed on the Decision Response window by clicking the View link in the Stips/Notes column.
Credit Application Decision Details
The Credit Application Decision Details window is used to review information about the credit application, such as the customer, the credit analyst, the credit decision, and the contract funding status. Detailed information returned by lenders regarding credit decisions can also be reviewed. In addition, employees can click the Deal # link to access the deal in the ERAIGNITE F&I application, the ERA App # link to access the credit application in the CAP application associated with the decision, and the R1 App # link to access the credit application and decision on the RouteOne® web site.
In addition, employees can click the Deal # link to access the deal in the ERAIGNITE F&I application, the ERA App # link to access the credit application in the CAP application associated with the decision, and the R1 App # link to access the credit application and decision on the RouteOne® web site.
To access the Credit Application Decision Details window in the ERA-IGNITE F&I application, click the Lender link on the Credit Applications tab on the Credit and Compliance Manager window.
To display the Credit Application Decision Details window in the CAP application, access a credit application for which a decision has been returned and select Tools → Credit Application Decision Details.
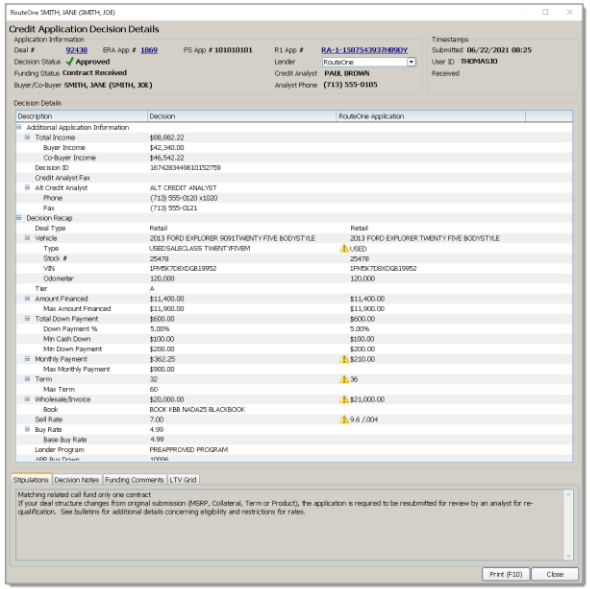
Information only displays in the RouteOne Application column if a credit application was transmitted to the RouteOne® web site or if a decision was received from a RouteOne® lender.
To print deal documentation from the Credit Application Decision Detail window, press the F10 key to display the Print Credit Application Decision Details window.
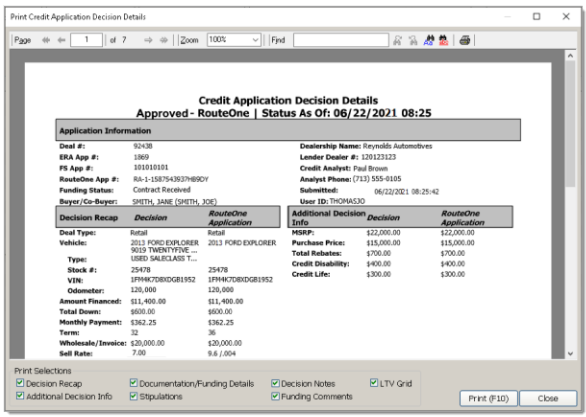
Select the sections to print in the Print Selections section and press the F10 key again to print the selected sections.
If the docuPAD® Deal Management (DDM) application or the Integrated Document Management (IDM) application is licensed, a bar code is included on documents printed for applications that are attached to a deal.
Credit Decision Deal Updates
The Credit Decision Deal Updates window in the ERA-IGNITE F&I application is used to update deal information using the information entered on the credit applications or decisions returned by lenders.
To access the Credit Decision Deal Updates window in the F&I application, select Tools → Credit Decision Deal Updates.
This window can also be accessed by clicking the Edit/More link and selecting the Update Deal option or the Attach to Deal option on the Credit and Compliance Manager window in the ERA-IGNITE F&I application or the Decision screen in the Credit Application (CAP) application.
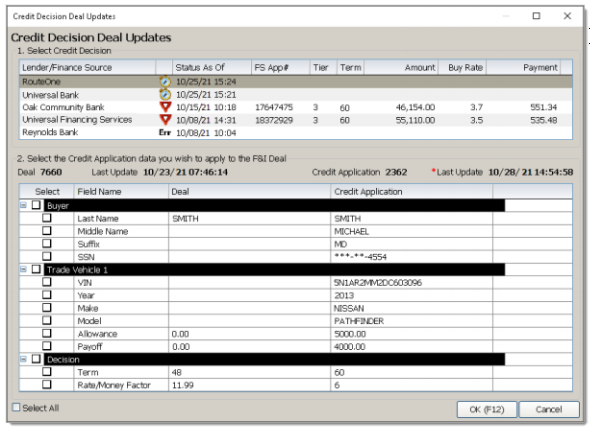
On the Credit Decision Deal Updates window, credit applications with decisions received from lenders for the deal display in the Select Credit Decision section. For each credit application decision, deal details, such as term, buy rate, and payment amount, display so that employees can quickly select the decision with the most relevant information to use when updating the deal.
In the Select the Credit Application Data You Wish to Apply to the F&I Deal section, the deal number, the date and time the deal was updated, the credit application number, and the date and time the credit application was updated, display. In addition, * (Asterisk) displays to the right of the Deal field or the Credit Application field to indicate whether the information entered in deal was updated more recently than the information entered in the decision returned by the lender, or vice versa
If the information entered in the credit application or decision does not match the information entered in the deal, the unmatching information displays in the Select the Credit Application Data You Wish to Apply to the F&I Deal section. Select the deal information that should be updated with information from the credit application and click the OK (F12) button to update the deal.
Procedures
How to Update Credit Applications with Data Received from RouteOne®
Credit application records in the ERA-IGNITE System that have been transmitted to the RouteOne® web site can be set up to automatically update the status of the credit application and the information included on the credit application when a lender decision is received on the RouteOne® web site.
- Access 1 the F&I Area Specifications screen in the Finance and Insurance (FIN) Specifications application.
The F&I Area Specifications screen is accessed using the following path: FIN Specifications → Functions → Miscellaneous F&I Specifications → F&I Area Specifications.
- Select the Spec 2 tab.
- Select the Update ERA Credit Application using RouteOne Data check box to automatically update credit applications when data is received from lenders on the RouteOne® web site.
If this check box is not selected, existing credit applications will not be updated from RouteOne ® . Decision data is still automatically imported from RouteOne® and displays in the CAP application; however, existing credit applications are not updated with the latest credit application data received from RouteOne®.
- Press 4 the F12 key to save the changes.
How to Set Up the Enhanced RouteOne® Integration
When a decision about a credit application is received on the RouteOne® web site, the credit application can be automatically updated in the ERA-IGNITE System using the enhanced RouteOne® integration. In addition, the enhanced RouteOne® integration can be used to access the RouteOne ® web site directly from the ERA-IGNITE System without entering credentials each time.
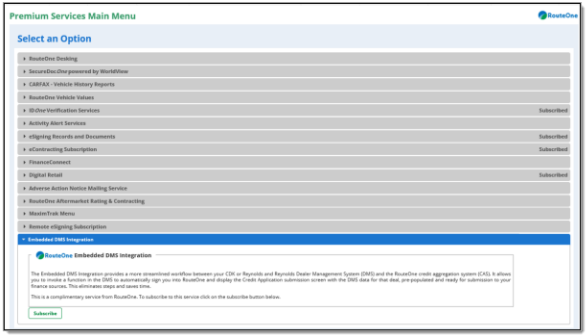
- Access the Premium Services Main Menu screen on the RouteOne® web site by selecting the Premium Services option in the Admin menu.

- Click the Subscribe button in the Enhanced DMS Integration section to subscribe to the enhanced RouteOne® integration option for the ERA-IGNITE System. The Dealer Participation Agreement Addendum (DPA Addendum) displays.
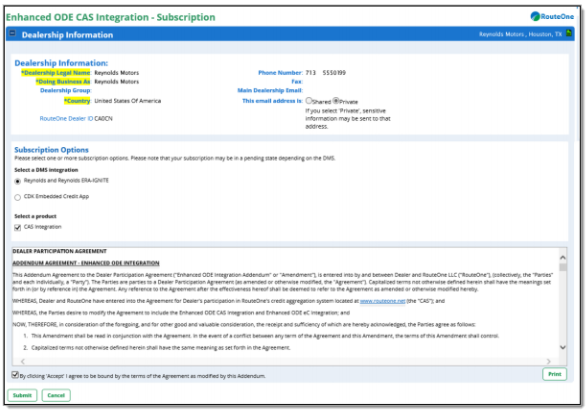
- In the Subscription Options section, select the Reynolds and Reynolds ERA-IGNITE option button.
If RouteOne® has not received set up approval from Reynolds and Reynolds, an error message displays. For more information, contact your Account Manager.
- Review the DPA Addendum and select the Accept check box.
- Click the Submit button to submit the DPA Addendum and activate the enhanced RouteOne® integration option for the ERA-IGNITE System.
- Select the Users option from the Admin menu to access the Users screen.

- In the Actions column, click the Edit button for a user profile being set up to utilize the single sign-on feature of the enhanced RouteOne® integration option.
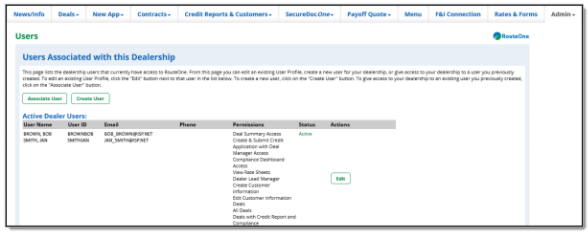
The Edit User screen displays.
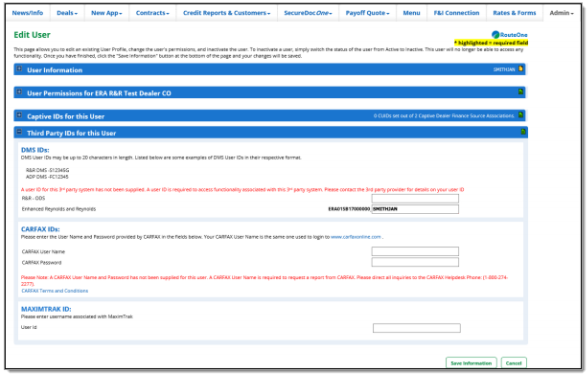
- In the Third Party IDs for This User section, enter the employee's User ID for the ERA-IGNITE System in the Enhanced Reynolds and Reynolds field.
- Click the Save Information button to save the changes.
- Repeat steps 7-9 to set up the RouteOne® single sign-on feature for additional employees.
How to Activate the LeadSync Integration Option for RouteOne®
Using the LeadSync integration option, credit applications that are submitted to the RouteOne® web site from a dealer web site or third-party provider can be automatically exported to the ERA-IGNITE System before a decision is received.
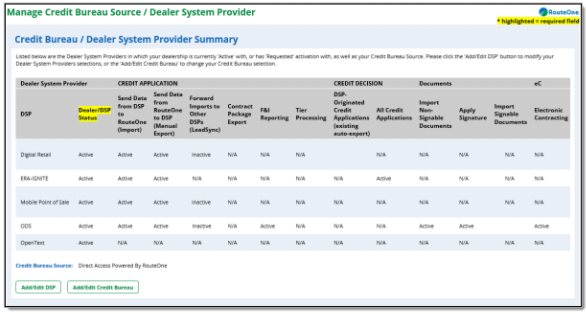
- Access the Credit Bureau/Dealer System Provider Summary screen on the RouteOne® web site by selecting the Credit Bureau/DSP option in the Admin menu.

- Click the Add/Edit DSP button.
The Add/Edit DSP table displays.
- Enter Activate in the Forward Imports to Other DSPs (LeadSync) field for the dealer system provider (DSP) for which to activate the LeadSync integration option.
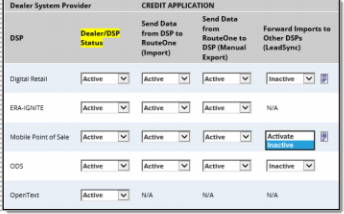
The ERA-IGNITE check box displays.
- Select the ERA-IGNITE check box.
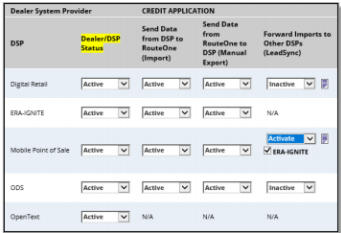
- Click the Submit button to the right of the DSP to save the changes.
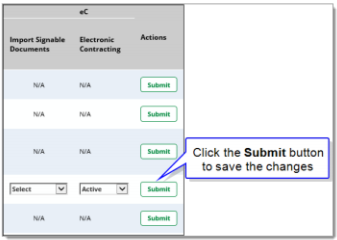
A message window displays to confirm that credit applications should be automatically exported to the ERA-IGNITE System before a decision is received.
- Click the OK button.
The Dealer Participation Agreement Addendum (DPA Addendum) displays.
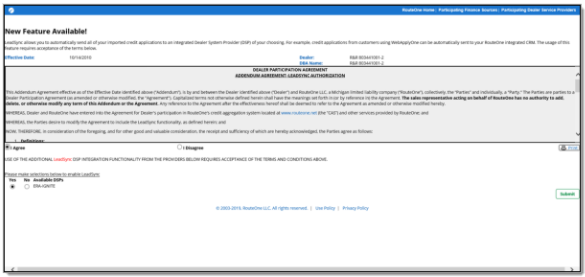
- Review the DPA Addendum and select the I Agree option button.
- To activate the LeadSync integration option, select the Yes option button for the DSP.
- Click the Submit button to submit the DPA Addendum and activate the LeadSync integration option.
ROUTEONE SUPPORT
Hours (EST)
Monday - Friday: 6:00am – Midnight
Saturday: 9am – 9pm
Can’t find what you need?
Try our search