In This Guide:
Menu
Using FLITE
What is FLITE?
FLITE is a user interface for RouteOne Menu, optimized for touch-screen devices. It can be downloaded from the App Store® online store on iPad® mobile digital devices, and from https://menu.routeone.net for Android™ and Windows™ devices. FLITE streamlines the process of aftermarket sales, while using portable and familiar touch-screen devices.
Using FLITE
When you first log in to the FLITE application, you will need to set up a username, password, and four-digit PIN, all associated with a current email address.
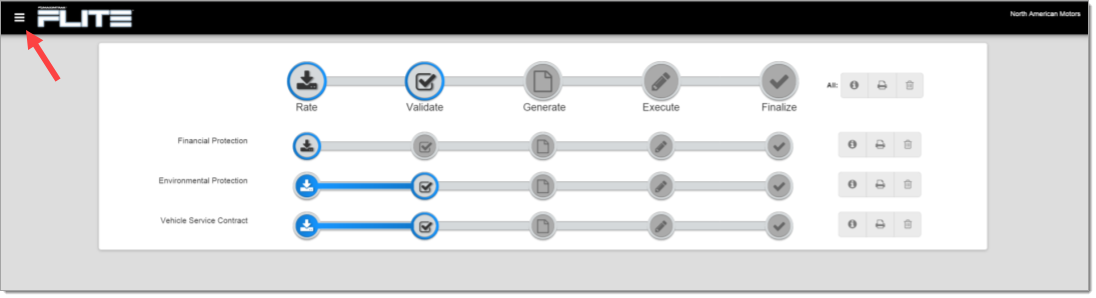
To navigate within the pages of the FLITE system, select the icon in the upper left-hand corner of the screen to open the menu. In the menu, you can navigate to different sections of FLITE.

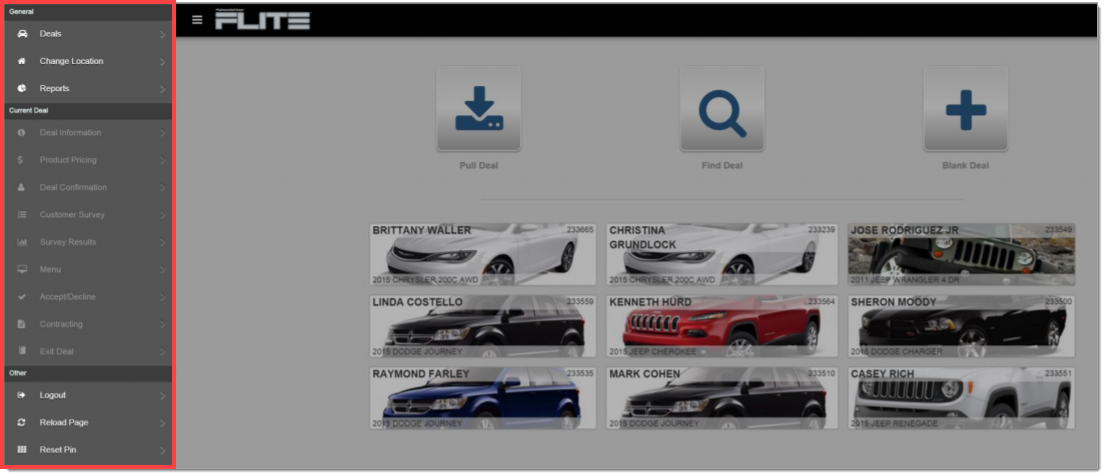
Creating a Deal in FLITE
Users can elect to pull a deal directly from the DMS using certified DMS integration (‘Pull Deal’), find an existing deal already created in the FLITE application or global Menu system (‘Find Deal’), create a blank deal (‘Blank Deal’), or create a walk-in deal (‘Walk-In’).

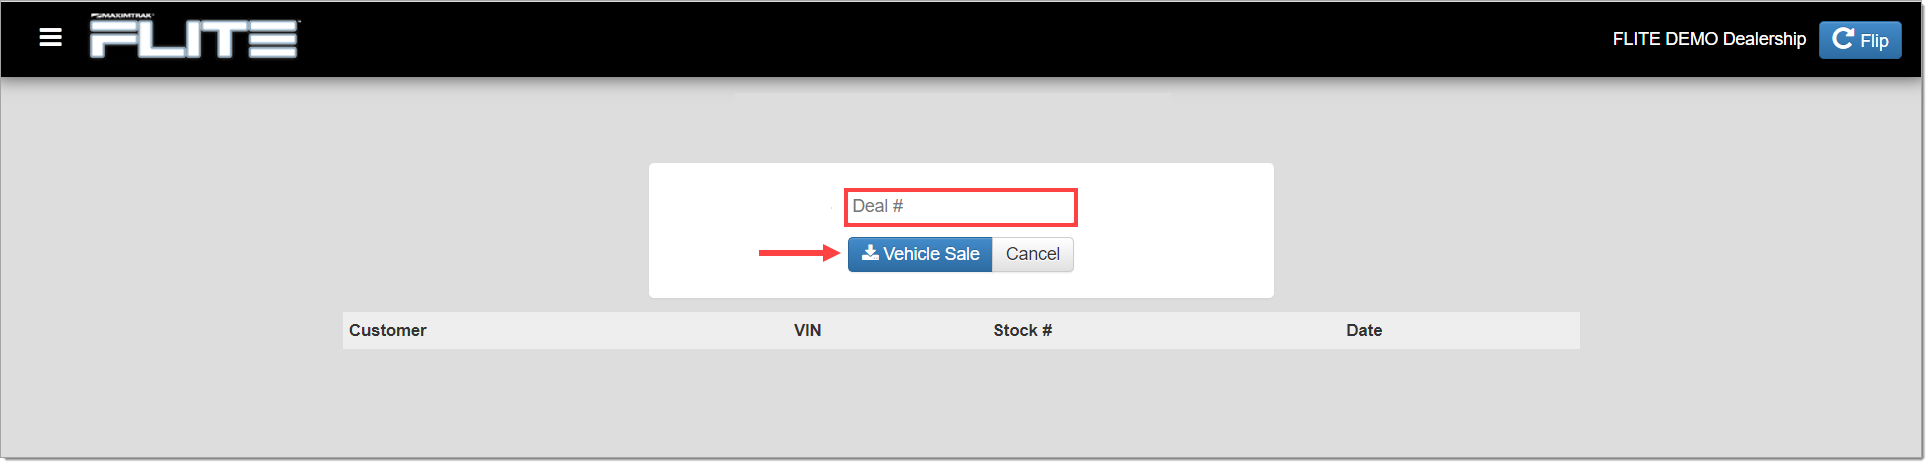
Pulling a Deal
Users can pull a deal into FLITE from a DMS integration by selecting ‘Pull Deal’ from the home page. The screen will refresh.
Input the DMS deal number in the corresponding text box.
Click ‘Vehicle Sale.’
The deal will then appear in FLITE.
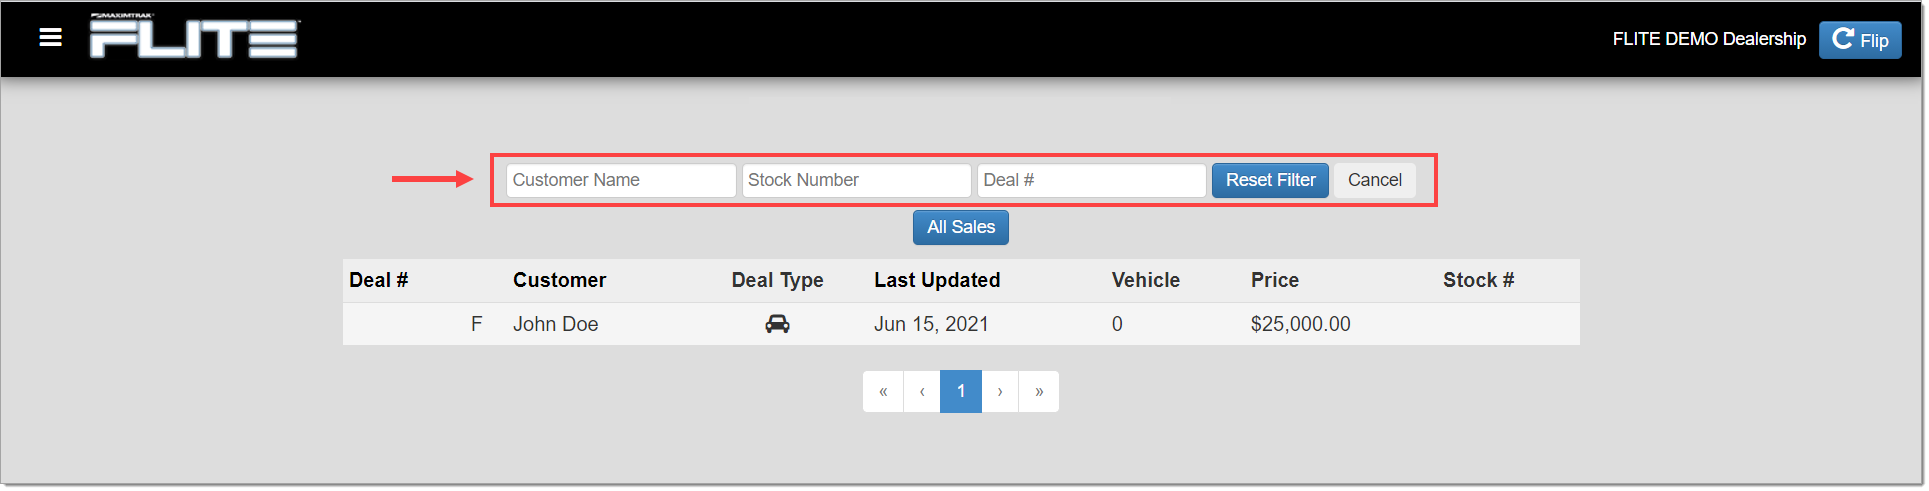
Finding a Deal
Users can search for deals that already exist in the system by selecting ‘Find Deal’ from the home page.
Use the fields at the top of the page to filter the deals.
The deals list will automatically update based on the user’s input.
Creating a Blank Deal
Users can create a new deal by selecting ‘Blank Deal’ from the home page. The screen will refresh.
Use the tabs to navigate through and complete each section of the deal.
Important Note: Tabs highlighted in red contain required fields, and the required fields within these tabs are highlighted in red as well.
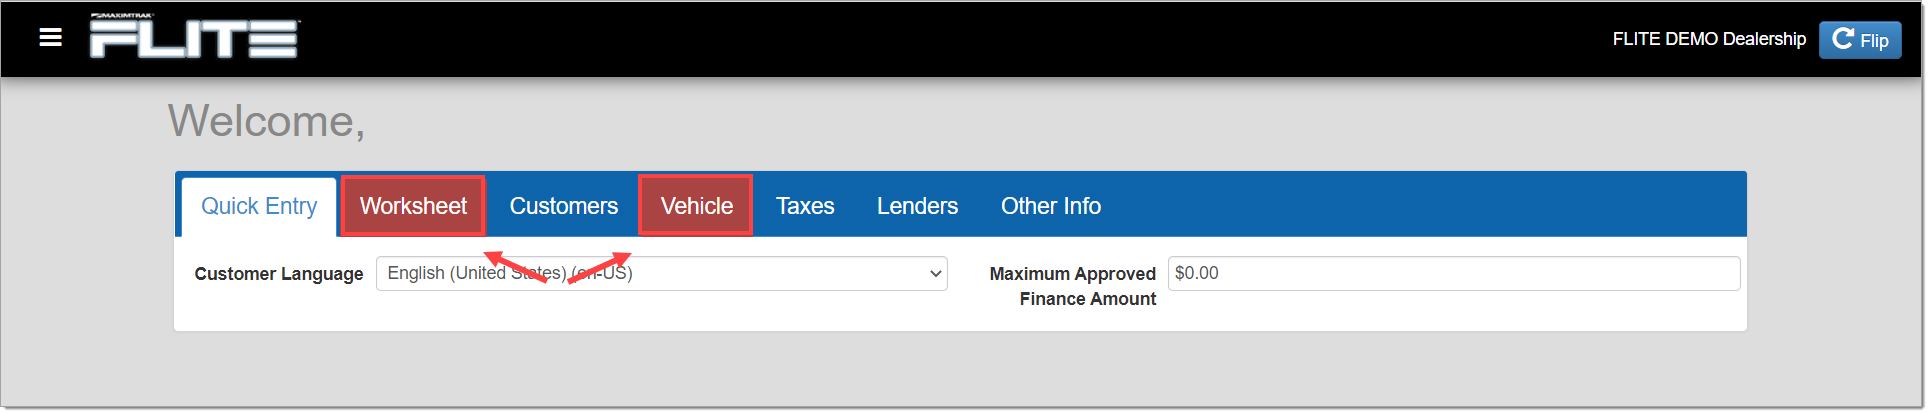
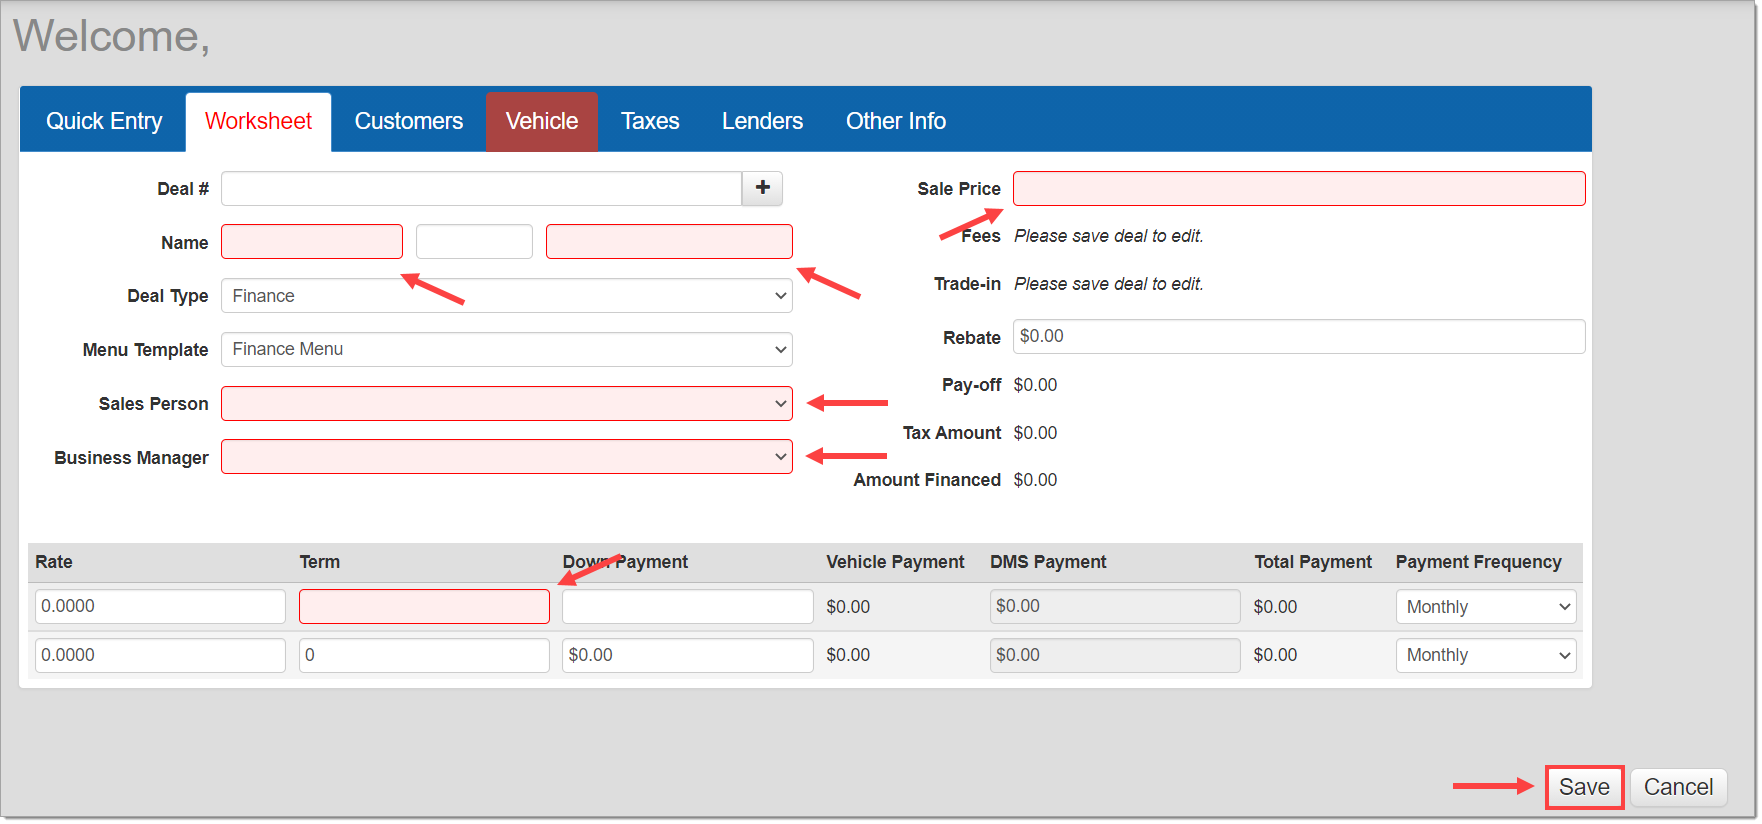
Once all required fields are filled, click ‘Save.’
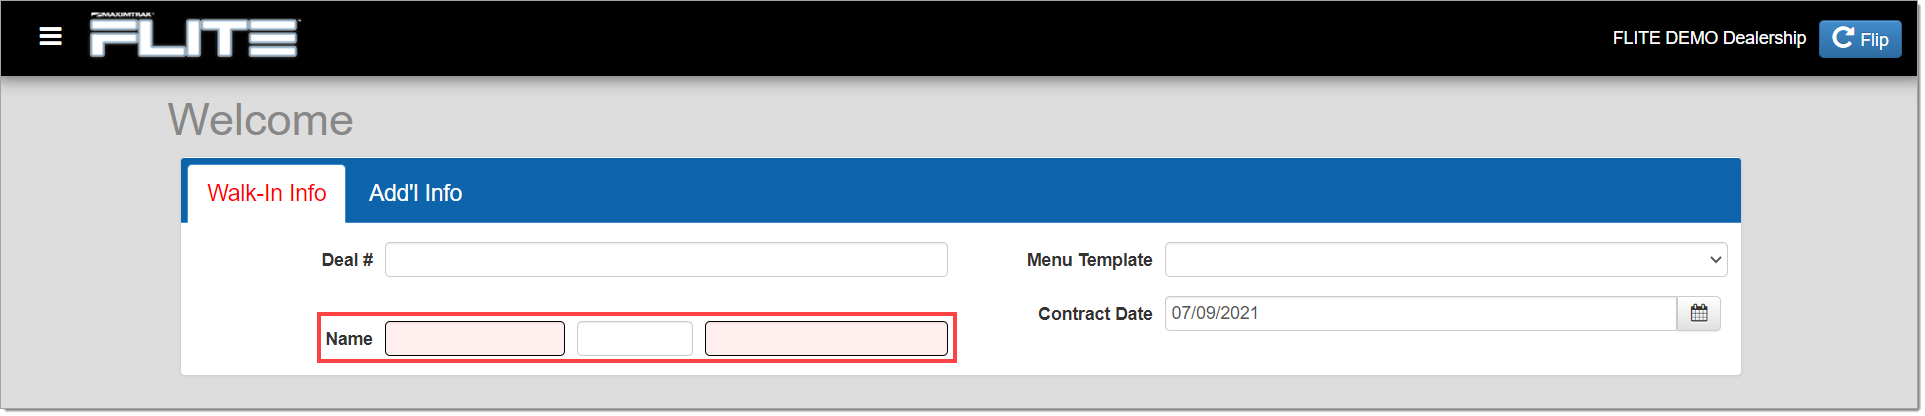
Creating a Walk-In Deal
Users can create a Walk-In Deal for product sales that are not connected to a vehicle deal, or to quickly generate a quote for the customer.
To begin, select ‘Walk-In’ from the home page.
Fill in the customer’s name (required), and any other fields needed for the deal.
Click ‘Save’ in the bottom right-hand corner of the screen.
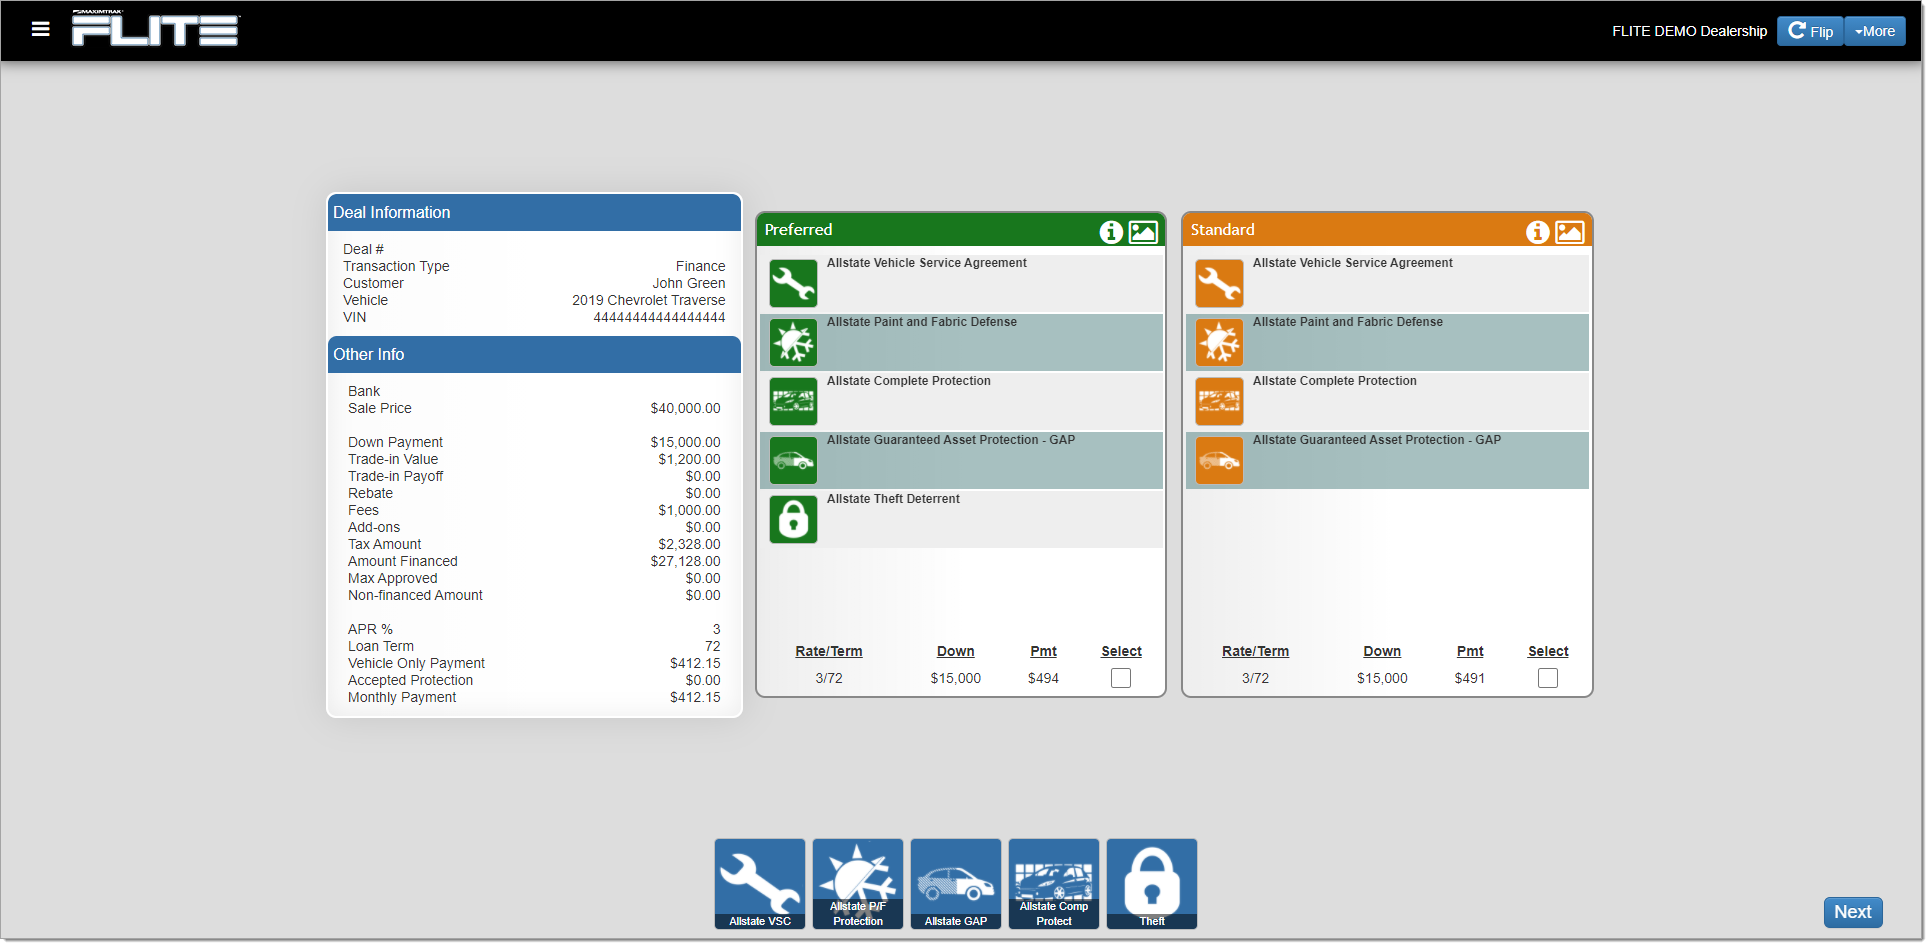
The Deal Worksheet
The Deal Worksheet is the next step for any deal created or opened using the steps above. It provides all of the information associated with the deal, allowing the user to review and make any necessary adjustments to the worksheet by navigating through use of the top tabs.
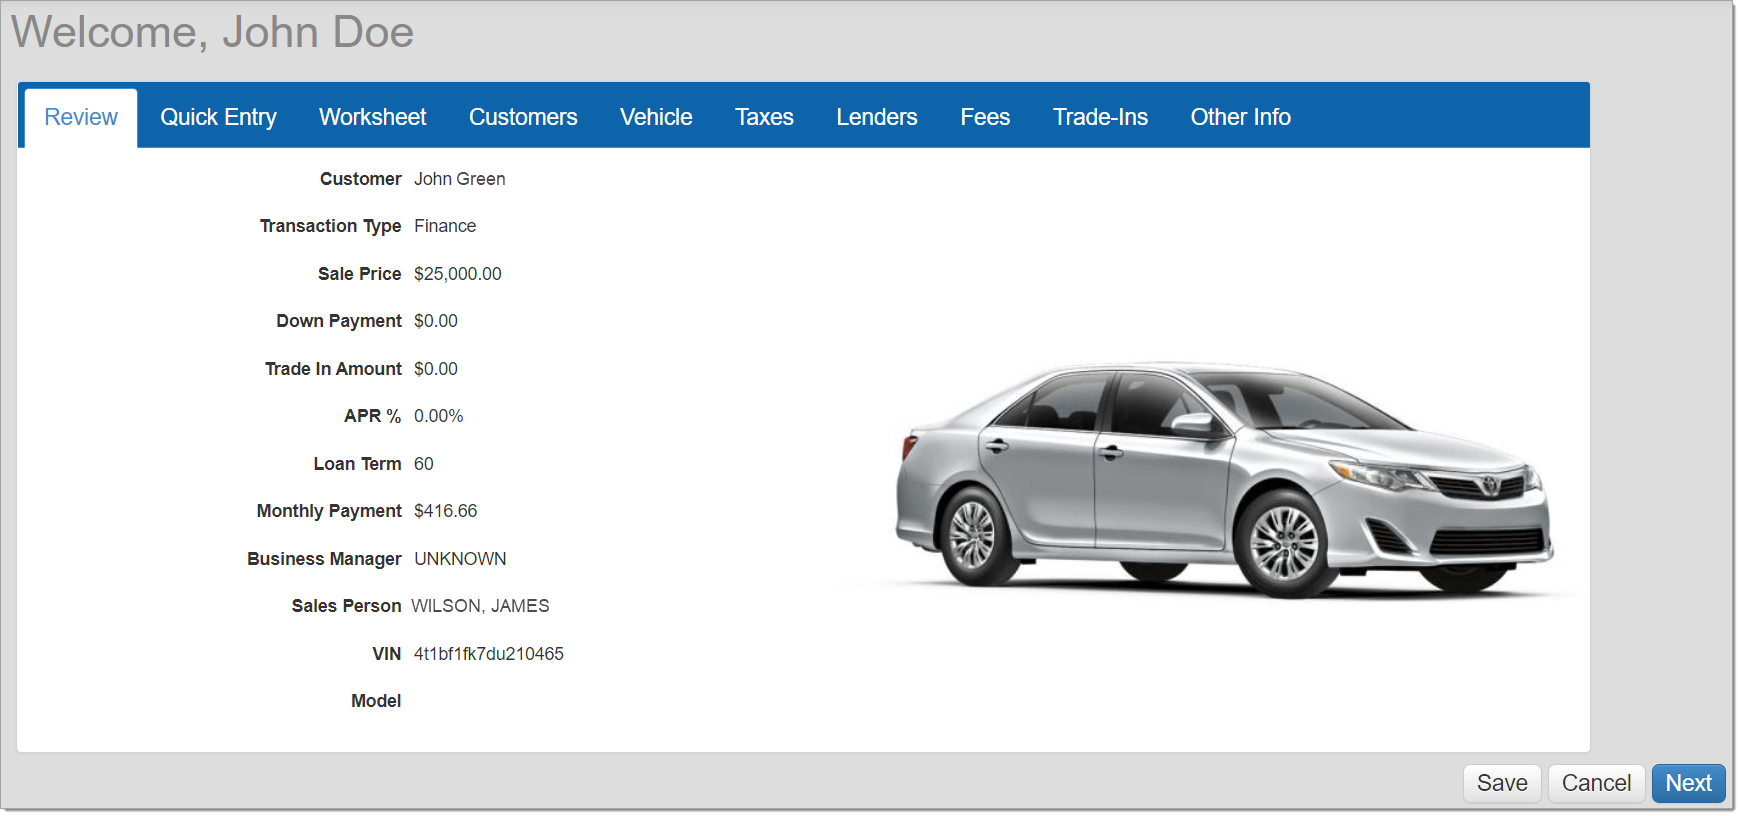
After reviewing the deal worksheet, click ‘Next’ in the bottom right-hand corner.
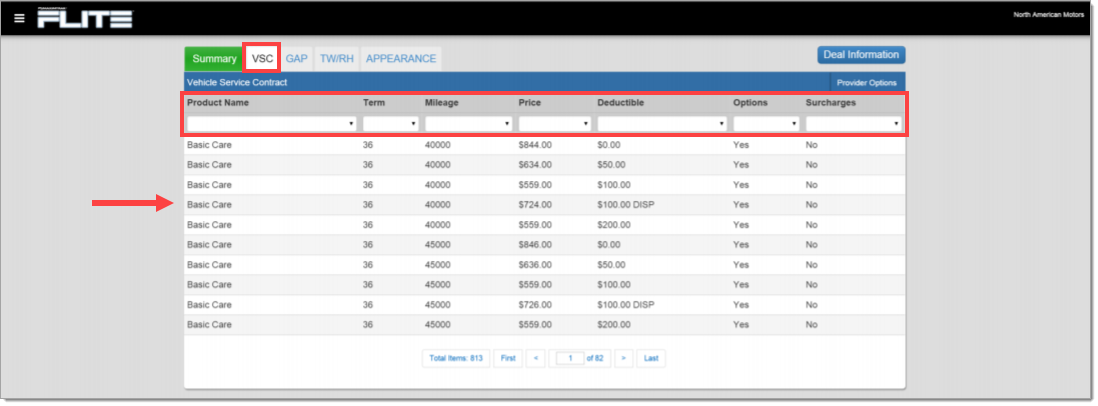
Select the products you would like to present for the deal. Click through each tab (VSC, GAP, TW/RH, APPEARANCE) to review and select different product types.
Dealerships with an established electronic rating connection will be able to rate their products prior to meeting with the customer. Electronic rating connections allow a store to view a provider’s options within RouteOne Menu, instead of going to the provider’s website.
The product options that display within each tab are based on the VIN.
Use the fields at the top to further filter the products.
Select products by clicking on the name of the product.
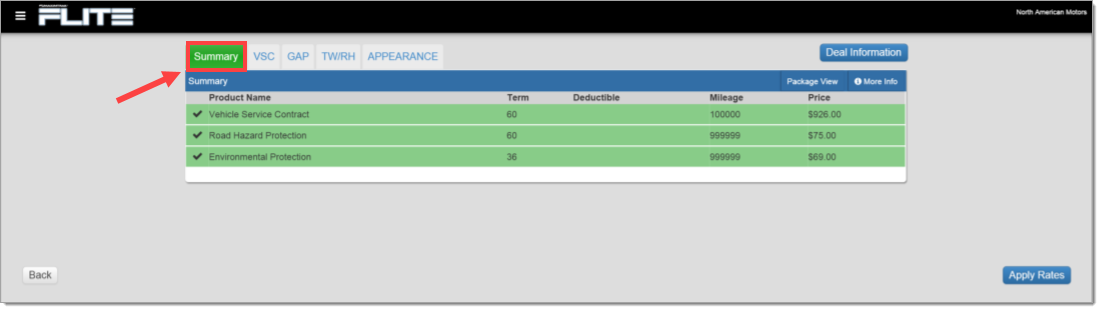
Once the products have been selected, click on the ‘Summary’ tab to show all of the selected products and rates before applying them to the customer’s deal.
Click ‘Apply Rates’ in the bottom right-hand corner to apply your selections to the deal.
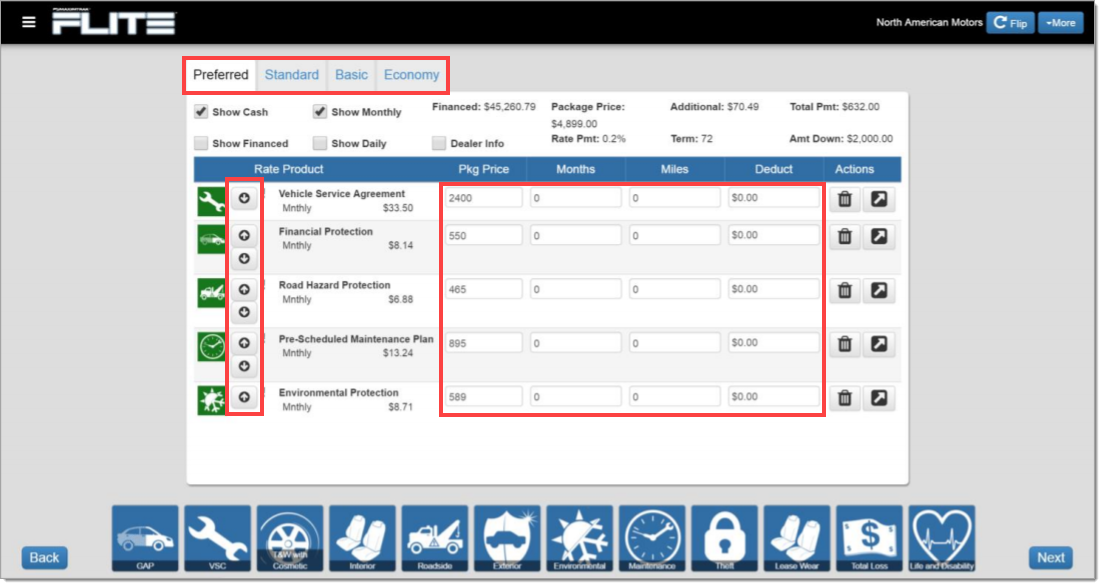
You can make pricing and setup adjustments to the menu options by rearranging the products in the different packages. Navigate through the packages by clicking the top tabs.
Package price, length of the payment plan, miles valid for, and deductions can also be added or changed on this screen.
If needed, you can also edit the individual products and their prices from this section.
Click ‘Next’ in the bottom right-hand corner to move on to the Customer Section.
The Customer Section
The Customer section of FLITE is designed as an interactive presentation with the customer, aimed at building the customer’s driving profile.
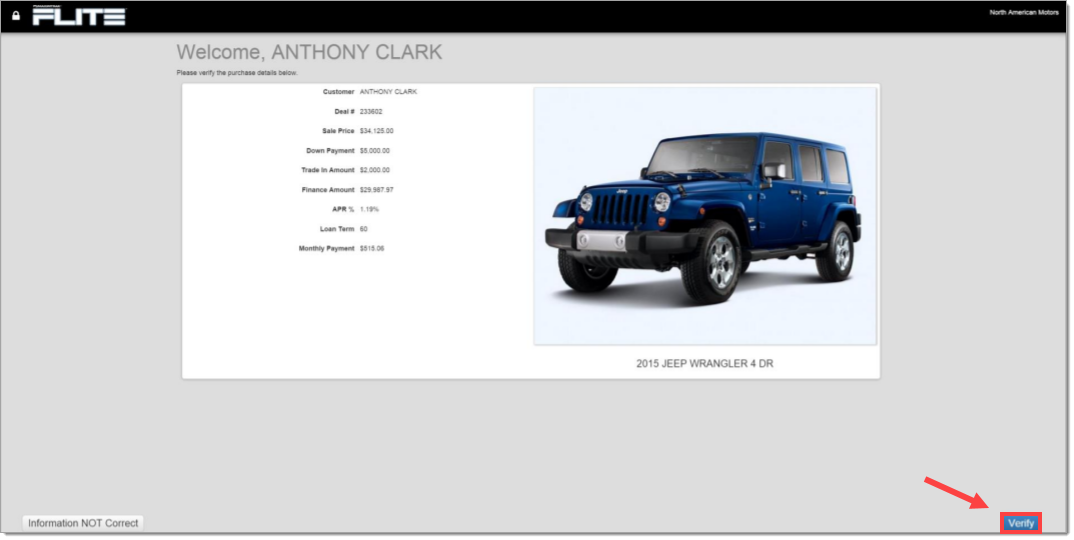
In the Customer section, the customer will be asked to verify the details of their purchase.
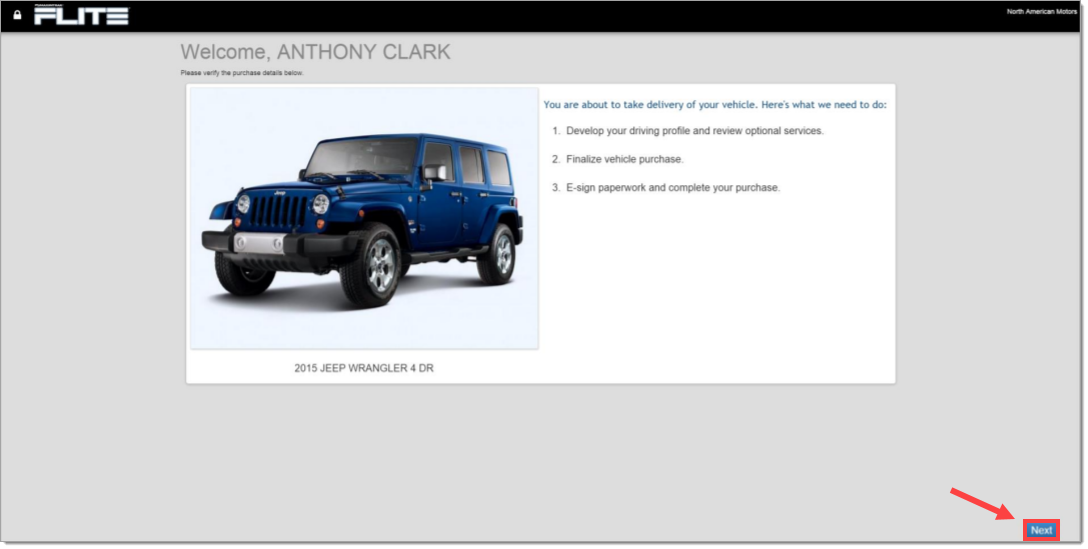
The customer will get an overview of next steps before moving on to the survey portion.
After reviewing next steps, the customer will then be guided into a dealership survey. This survey helps engage the customer and collect valuable information to aid in the Finance & Insurance (F&I) presentation.
The survey can be customized to fit the needs of the dealership, Questions can be designed to address a range of topics from Customer Satisfaction Index (CSI) scores to driving habits.
The dealership can specify which products can be associated with each possible answer, assigning a weight to each product that will be realized on the Survey Results page.
FLITE employs an algorithm working behind the scenes to correlate the custom responses with the available products. Using the dealership proscribed weighting, FLITE can help ensure that the appropriate products are recommended for the customer on every deal.
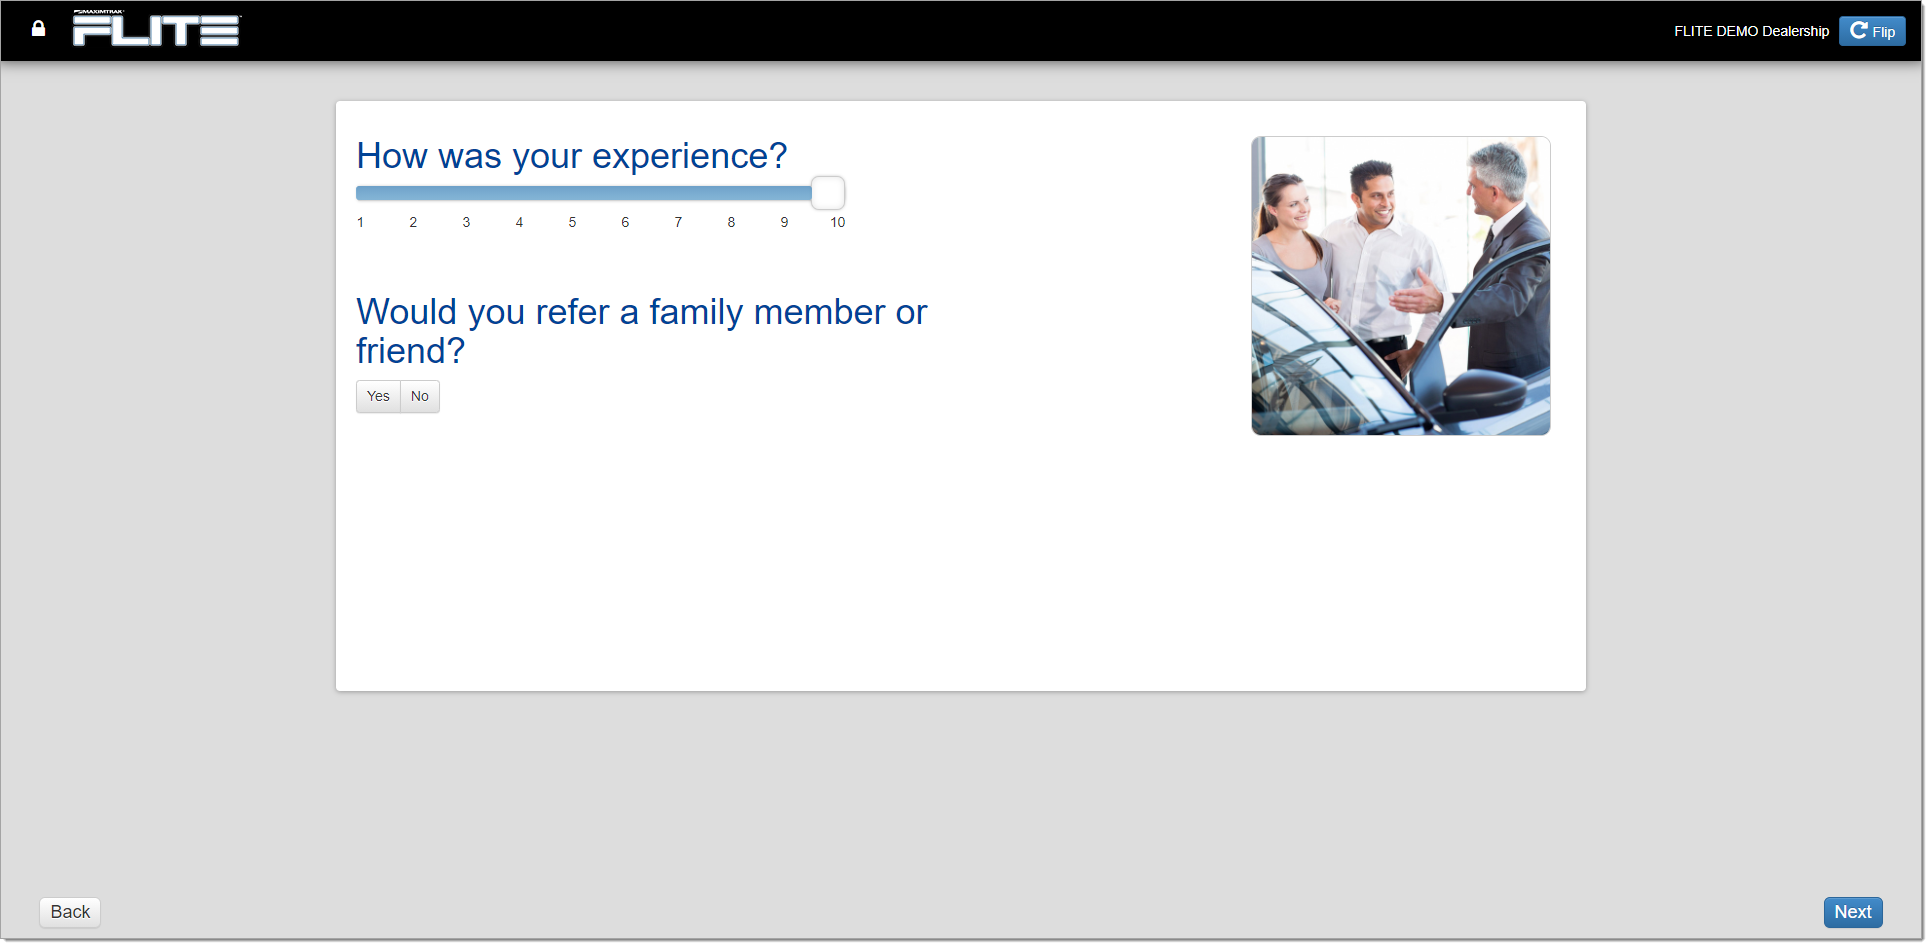
As the customer moves through the survey, they can progress to each new question by clicking the ‘Next’ button in the lower right-hand corner of the application.
At the end of the survey, the customer will receive a ‘Completed’ message, and the Finance Manager can rejoin them.
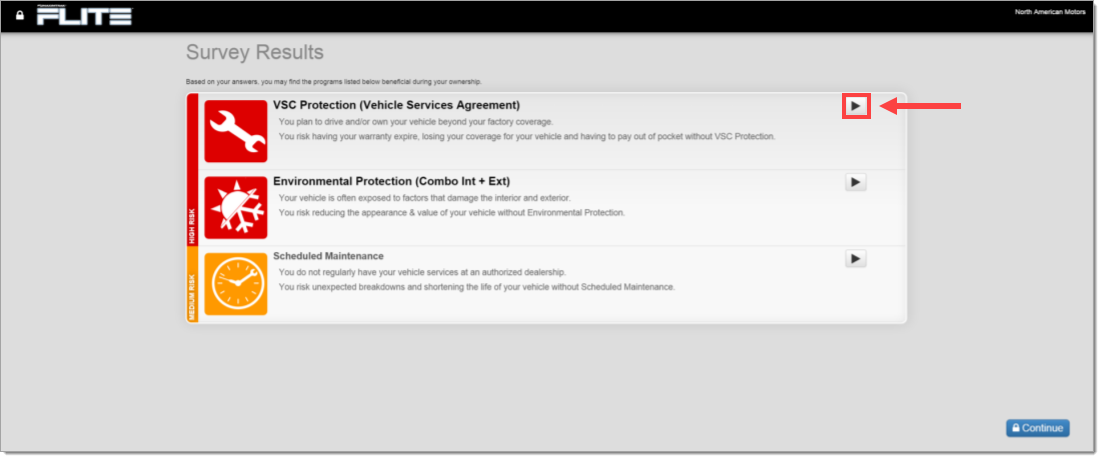
Survey Results
Based on the customer’s answers to the survey questions and the weight assigned to the available products, FLITE will customize product recommendations based on the scenarios that create levels of ‘high’ and ‘medium’ risk for the customer.
Clicking the Play buttons will launch videos about the benefits of the recommended products.
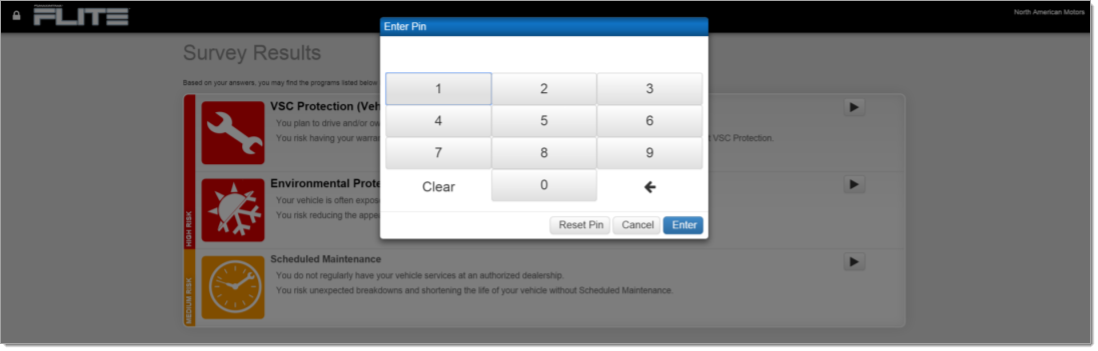
To prevent a customer from navigating to sensitive screens during the presentation, FLITE engages a locking mechanism. To override the locking mechanism, the Finance Manager must input their PIN.
After the customer reviews the products on their own or with the Finance Manager, the Finance Manager can complete the F&I presentation.
If it was enabled during FLITE setup, the Factory Warranty Review process will occur.

Using the driving habits provided by the customer during the survey, the Factory Warranty Review demonstrates the value of vehicle service contracts.

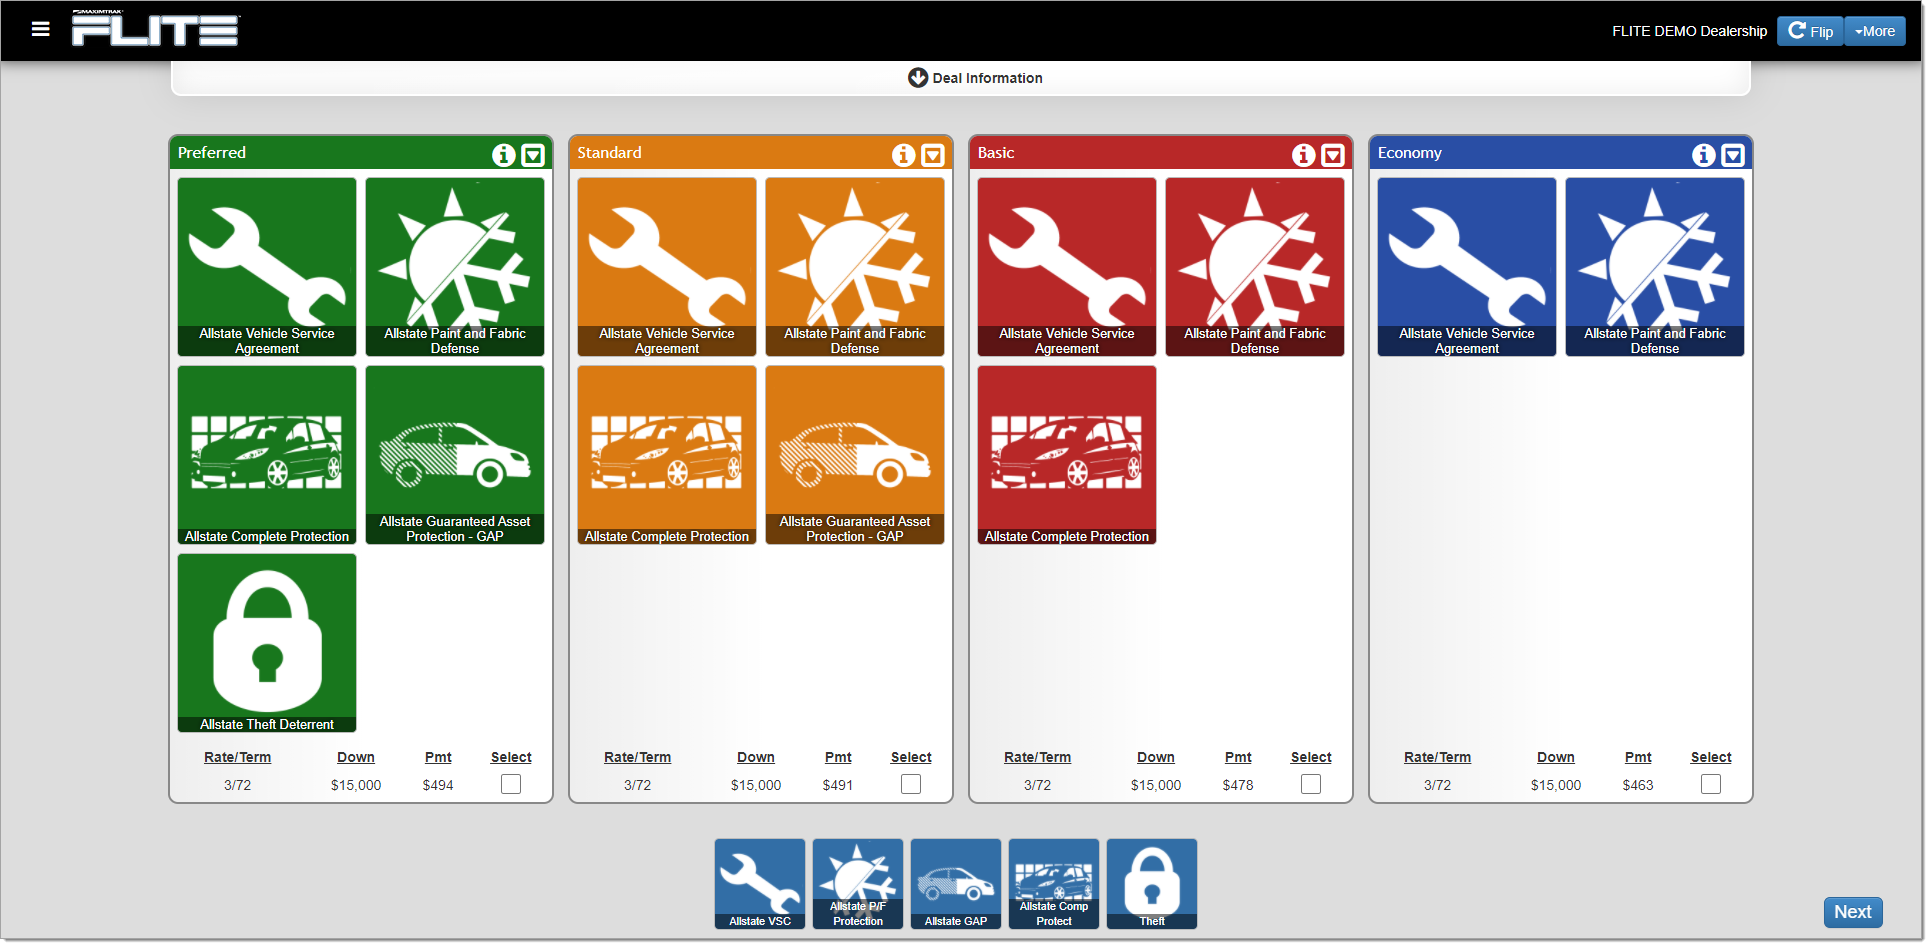
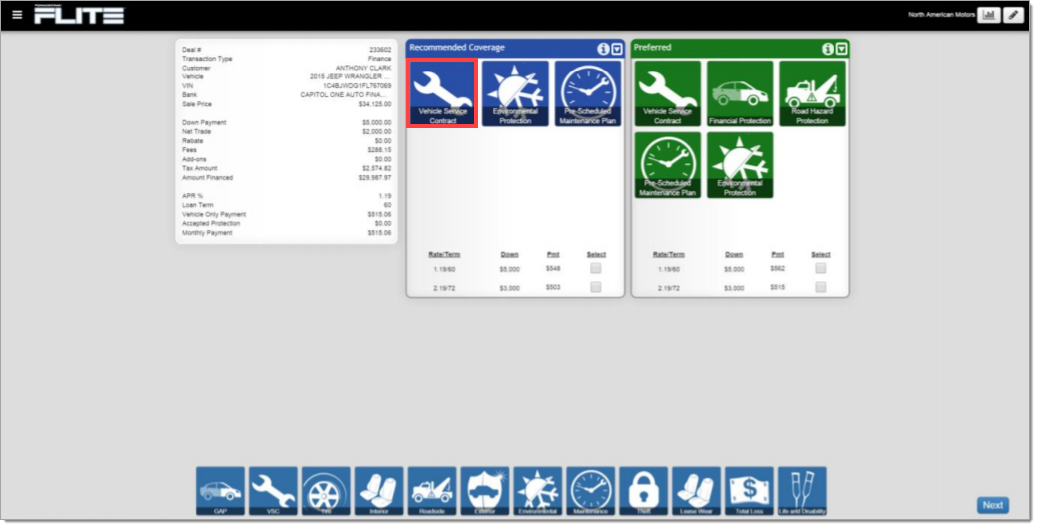
Interactive Menu
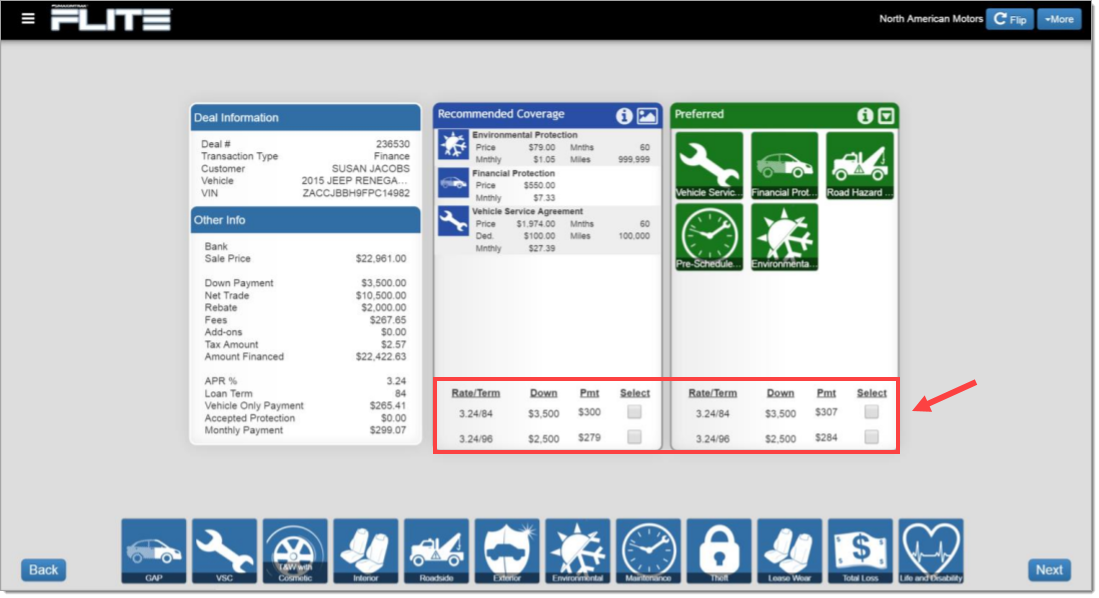
Once the customer survey portion of the presentation is completed, click ‘Next’ on the bottom right-hand corner of the screen, and the results are transferred to the interactive menu with the recommended coverage, which you can further customize and then present to the customer.
On this screen, you can move the products between packages by dragging and dropping a product icon between packages. You can also drag and drop product icons to and from the bottom shelf.
Dragging and dropping a product will duplicate it from the original location (a package or the shelf) and add it to the new location.

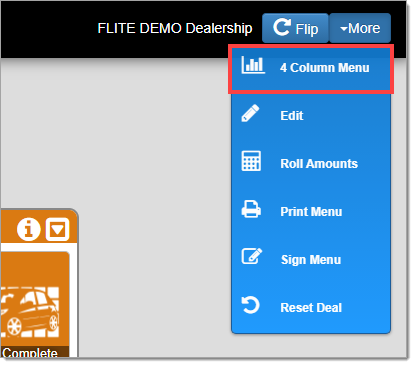
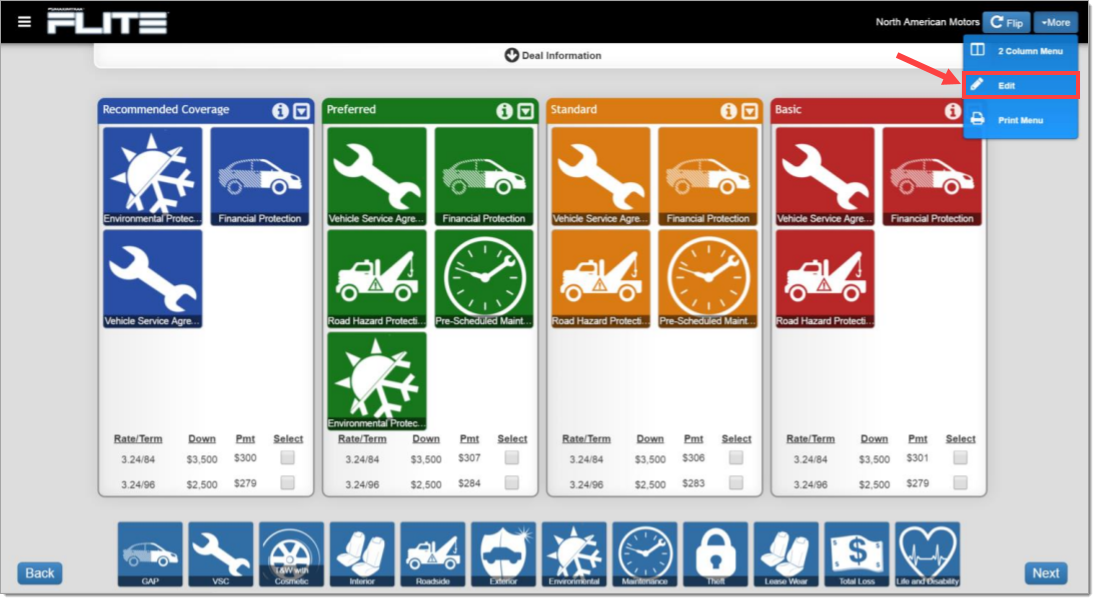
To switch between the recommended packages format to the four-column menu, click ‘More’ in the top right-hand corner of the screen and select the desired format.
In the four-column menu format, users can drag and drop products from packages, and access sales tools and additional product information in the same manner as the ‘Recommended Coverage’ presentation.
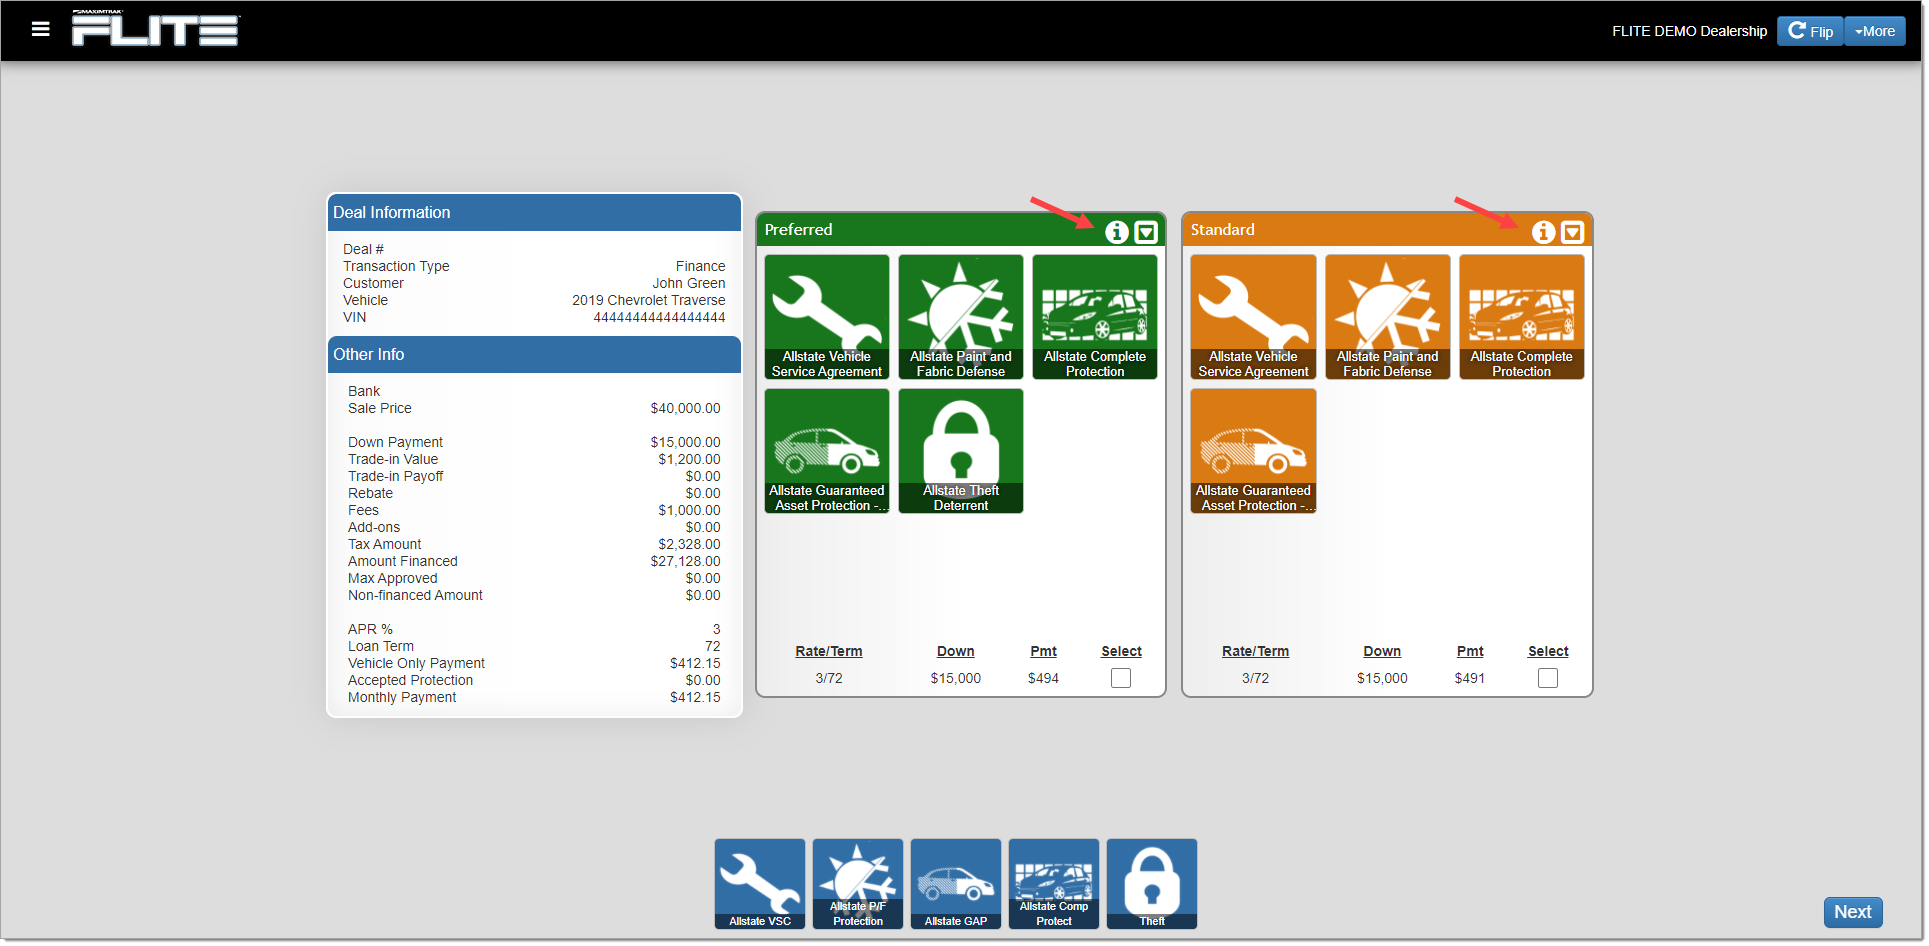
Click the ‘down arrow’ symbol in the top right-hand corner of the package to display pricing and terms as landscape instead of the portrait icons.

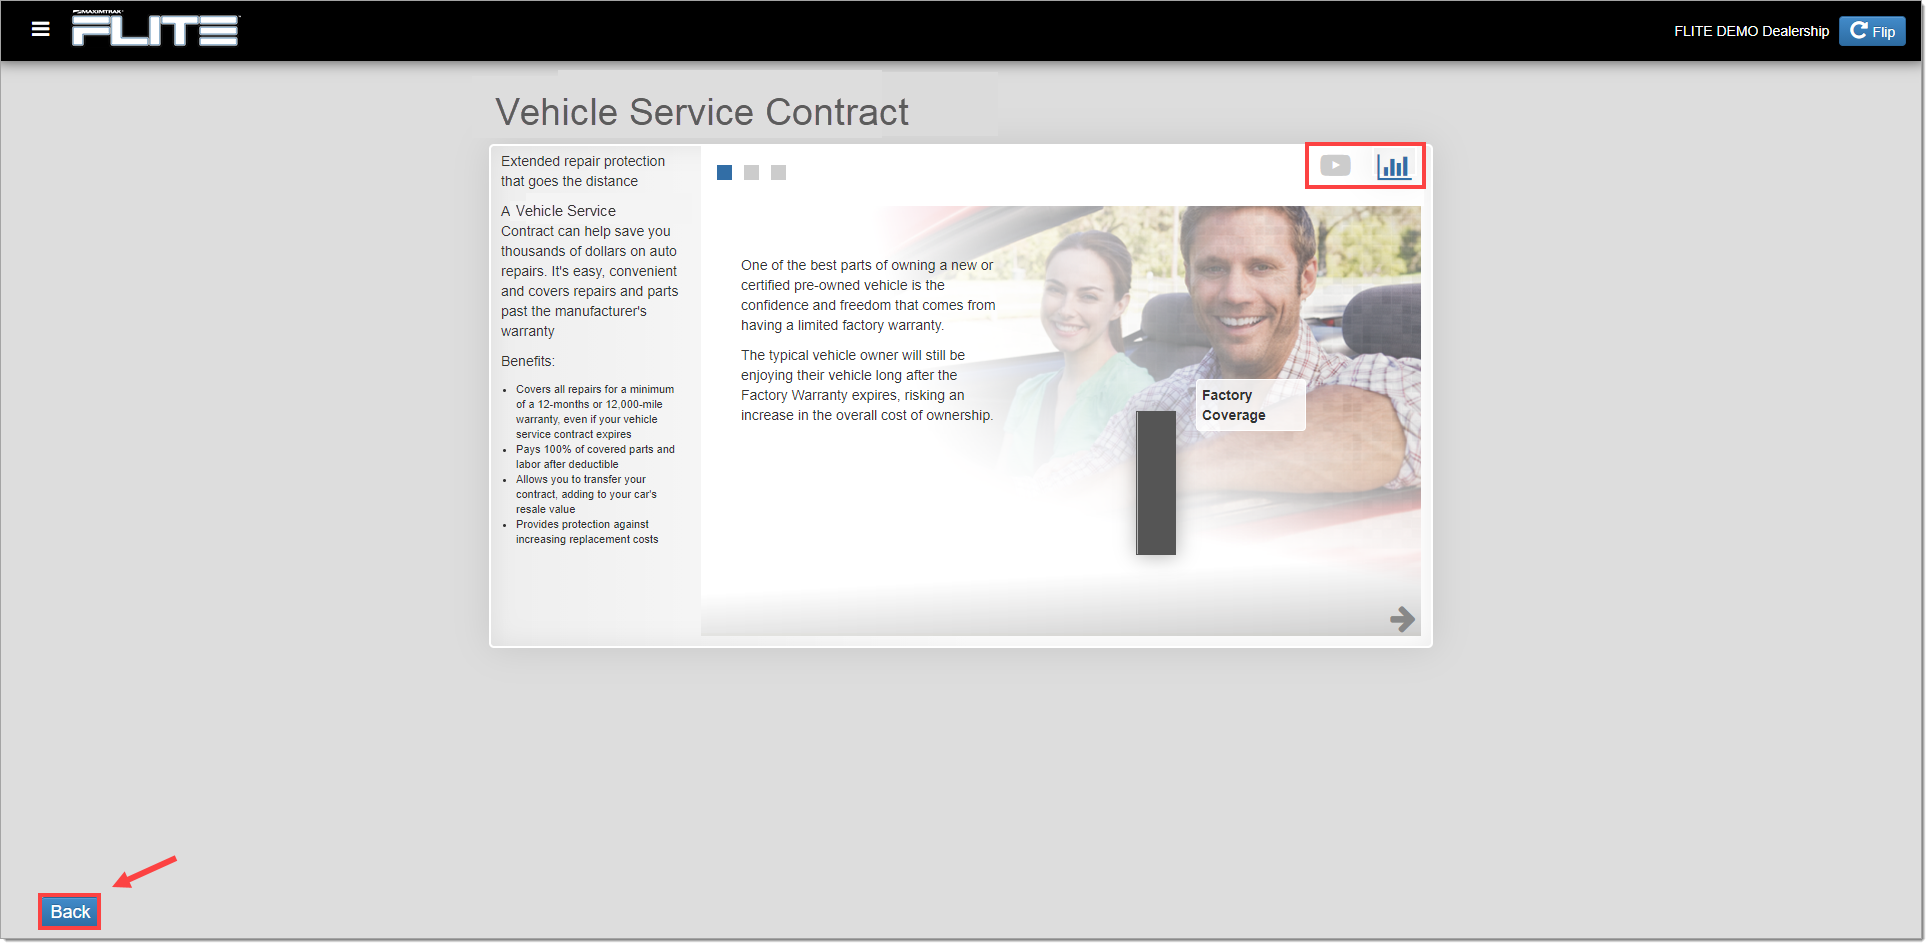
In any view, click on any product icon to view the accompanying sales tool, either as a video or slideshow presentation.
Use the icons in the upper right-hand corner of the sales tool page to switch between the video and slideshow formats.
To return to the interactive menu screen, click ‘Back’ in the bottom left-hand corner.
Descriptions of each product and package can be displayed by selecting the ‘i’ icon in the top right-hand corner of the package.

To edit the packages, click ‘More’, then select ‘Edit.’
Customers can select their package using the check boxes at the bottom of the package.
Once the customer has made their selection, click ‘Next’ to move on to the Accept/Decline confirmation.
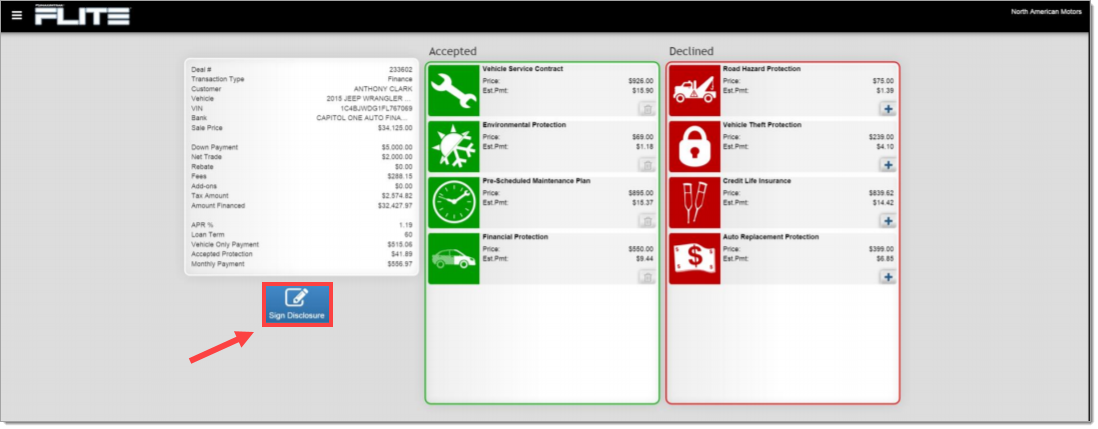
Selection Confirmation
Use the ‘+’ or trash can icons to move products between the ‘Accepted’ and ‘Declined’ sections.
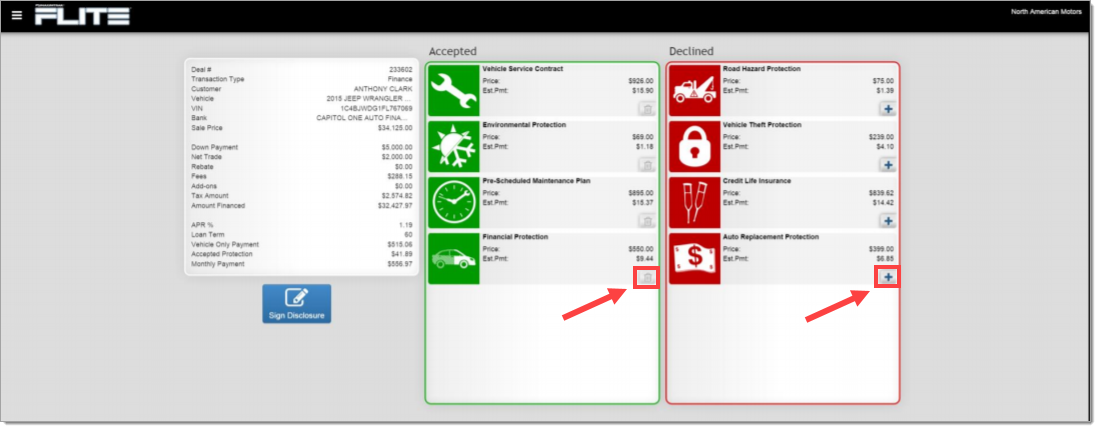
Once the customer has made their final selection, click ‘Sign Disclosure’ to move on to the signature portion.
The signature screen will allow customers to review their choices and electronically sign directly on the screen using either a stylus or their fingertip.
Once the customer signature is completed, click ‘Done,’ then click ‘Next’ to move on to the next step in the eContracting process.
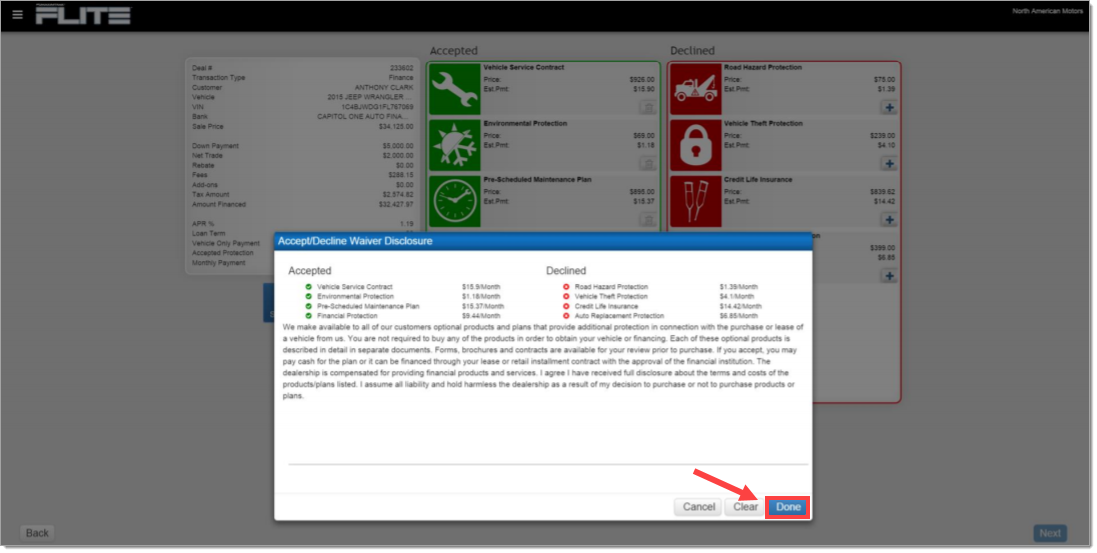
If using eContracting, the user will be guided to the next step in the eContracting process.
If not using eContracting, the user can navigate back to the ‘Deals’ screen using the menu icon in the upper left-hand corner.
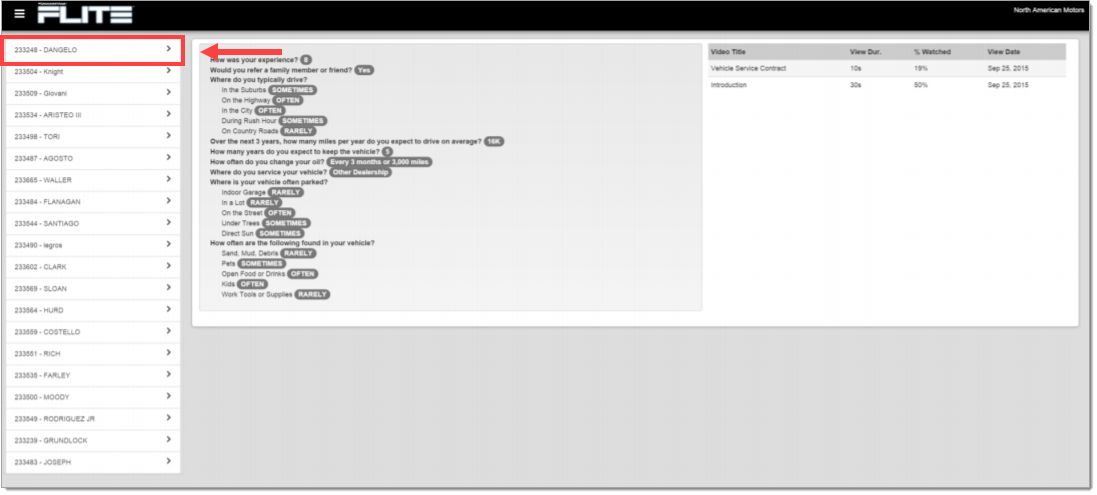
Customer Responses and FLITE Reporting
You can view the customer’s survey responses to prepare for the presentation with the customer.
Click the menu icon in the upper left-hand corner, then select ‘Reports.’
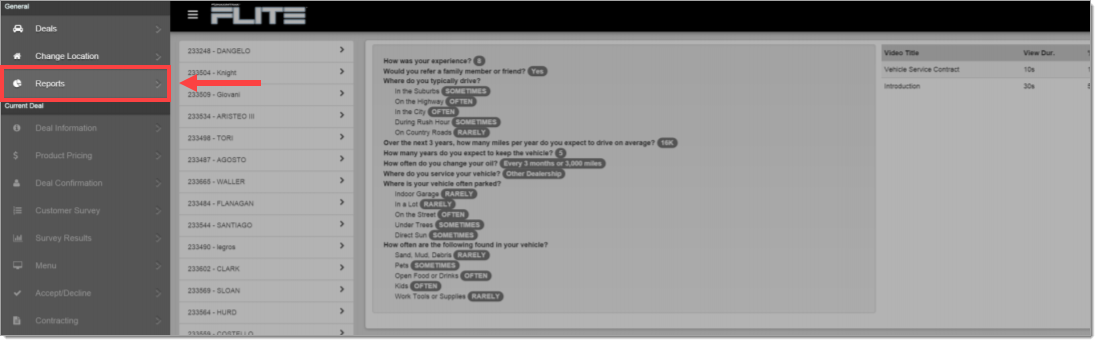
Select the applicable deal to see the customer’s responses.
iPad and App Store are registered trademarks of Apple Inc., registered in the U.S. and other countries and regions.
Android is a trademark of Google LLC.
Windows is a trademark of the Microsoft group of companies.
ROUTEONE SUPPORT
Hours (EST)
Monday - Friday: 6:00am – Midnight
Saturday: 9am – 9pm
Can’t find what you need?
Try our search
