In This Guide:
Related Guides:
Menu
Integrating RouteOne and Menu
For best results in integrating Menu and RouteOne, complete the following steps in Google Chrome.
Enabling Single Sign-On
Single Sign-On (SSO) must be enabled and verified for every individual that will use the RouteOne – Menu integration.
Requirements for Single Sign-On (SSO):
- The Dealer is subscribed to Menu, and the subscription is approved by the store’s RouteOne Dealer System Administrator.
- The Dealer user’s Menu ID (their email) appears in both spots in their RouteOne user profile, and the Dealer user’s RouteOne User ID appears in the ‘External User ID’ in their Menu user profile. To add the RouteOne User ID to a Menu user’s profile, follow the instructions in the Managing Users guide.
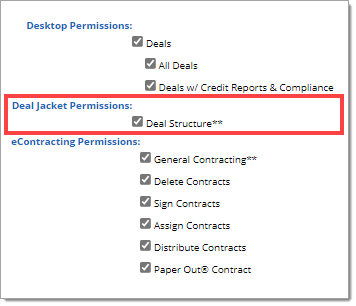
- The Deal Structure permission is enabled for the Dealer user in the RouteOne system. For more information on enabling the Deal Structure permission in the RouteOne system, see the section titled 'Granting Permissions.'
- Single Sign-On is set up for the dealership as a whole in the Menu system, using the dealership’s RouteOne ID.
Enabling ‘Sign in RouteOne’ Functionality
Menu ‘Sign in RouteOne’ functionality must be enabled before a deal can be pushed to the RouteOne system.
To enable ‘Sign in RouteOne’ functionality, click the name of the dealership in the upper right-hand corner.
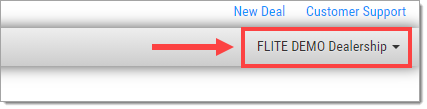
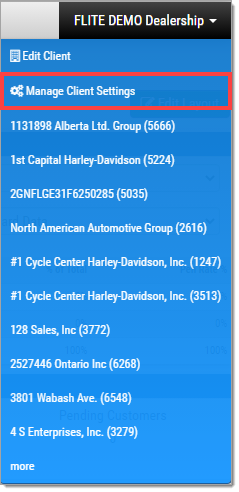
In the drop-down menu, click ‘Manage Client Settings.’
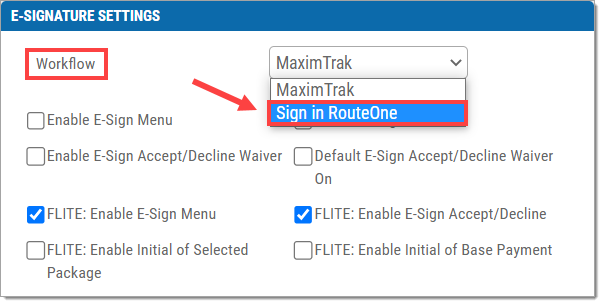
Go to ‘Deal Wizard.’

Find ‘E-Signature Settings.’
Under the ‘Workflow’ drop-down menu, make sure ‘Sign in RouteOne’ is selected.
Setting Up Fees
The fees must be set up in a specific way in order to properly integrate with Menu.
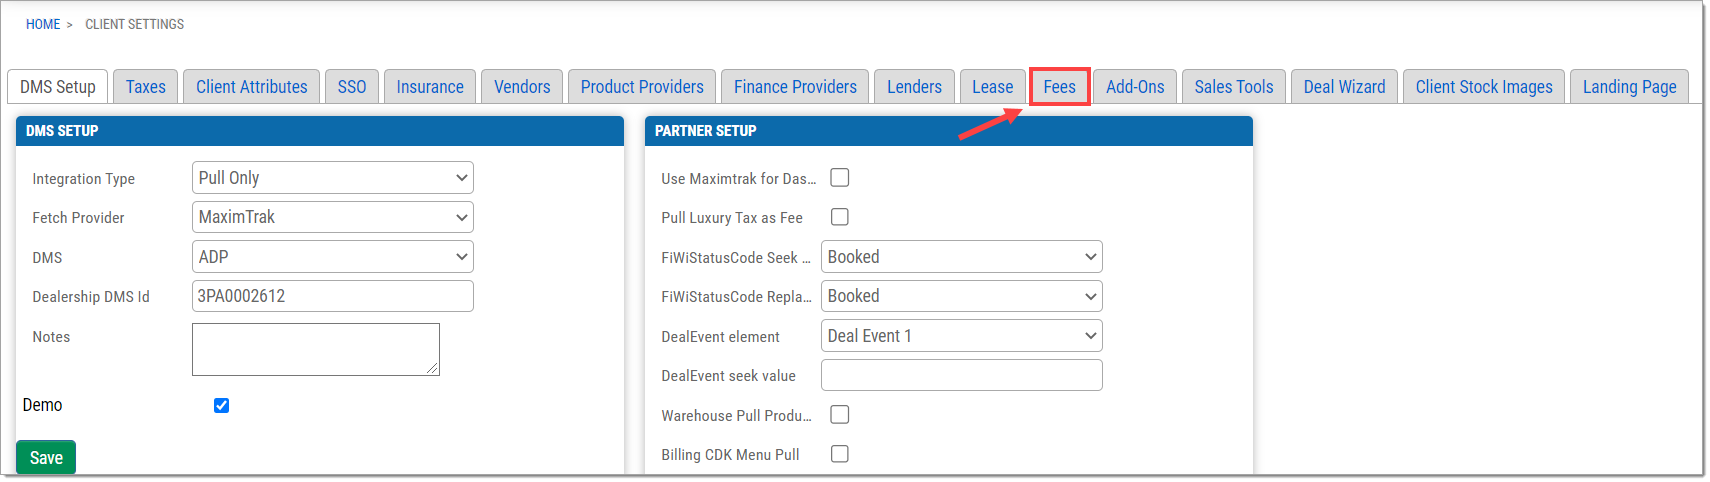
To start this process, click the name of the store in the upper right-hand corner.

In the drop-down menu, click ‘Manage Client Settings.’

Go to ‘Fees.’
You will need to map all fees to ‘registrationFee.’ To do this, begin by clicking the Edit (pencil) icon.
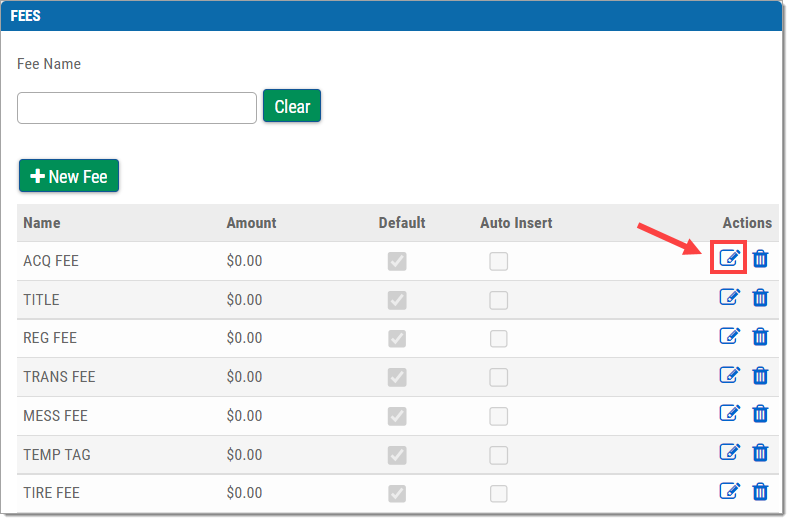
The ‘Edit Fee’ window will launch. Under ‘DMS Code’ enter ‘registrationFee.’
Click ‘Add,’ then click ‘Save.’
Repeat these steps for each fee.

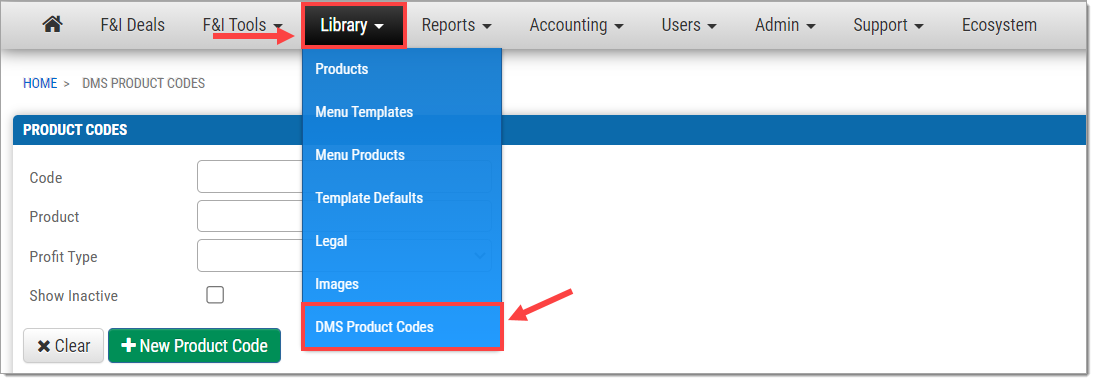
Adding RouteOne DMS Product Codes
RouteOne DMS Product codes must be added to the Menu system to be used for all products that will be pushed via the RouteOne-Menu Integration, and associated to that product in the Library.
At this time, do not set up the 'accessories' code.
From the top navigation, click ‘Library’ and select ‘DMS Product Codes’ from the dropdown.
Click ‘+ New Product Code’.
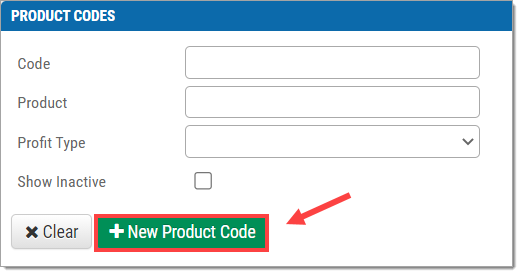
For each product, input the Product Code information as follows:
- Partner: ‘RouteOne, LLC’
- Product: Input the product name from the table below.
- Profit Type: ‘Back’
- Code: Input the RouteOne code from the table below.
- Active: Is selected
Note that all products will use the Partner ‘RouteOne, LLC’ and the Profit Type ‘Back.’
Click ‘Save.’ Repeat for each product.

| Product | RouteOne DMS Code |
| Vehicle Service Contract | VSA |
| Tire & Wheel | tireWheel |
| Maintenance | prepaidMaintenance |
| GAP | Gap |
| Disability | CreditDisa |
| Credit Life | CreditLife |
| Surface | surfaceProtection |
| Theft | theftDeterrent |
| Excess Wear | wearAndTear |
| Taxes | salesTax |
| Other | otherProductTypeDescription |
Granting Permissions
Once setup is complete, you’ll need to ensure that every user who will use RouteOne-Menu Integration has the Deal Structure permission in the RouteOne system. This can be completed by emailing [email protected] with a list of those users.
ROUTEONE SUPPORT
Hours (EST)
Monday - Friday: 6:00am – Midnight
Saturday: 9am – 9pm
Can’t find what you need?
Try our search
