In This Guide:
Related Guides:
Credit
RouteOne Fusion - Customer Experience
RouteOne Fusion is an all-inclusive suite of products that allows your customers to begin their vehicle purchase or lease process directly from your dealership’s website.
Fusion allows customers to get finance, lease, and cash payment estimates and further refine them by prequalifying and/or filling out a full credit application. Fusion also allows customers to value their trade-in, add aftermarket products to their deal, schedule an appointment to see the car in person at the dealership, and upload relevant documents to expedite the process when they do go in-person at the dealership.
By enabling customers to do more online, they can be better prepared to complete the purchase when they visit the dealership.
The Fusion experience is embedded within your dealership’s website.
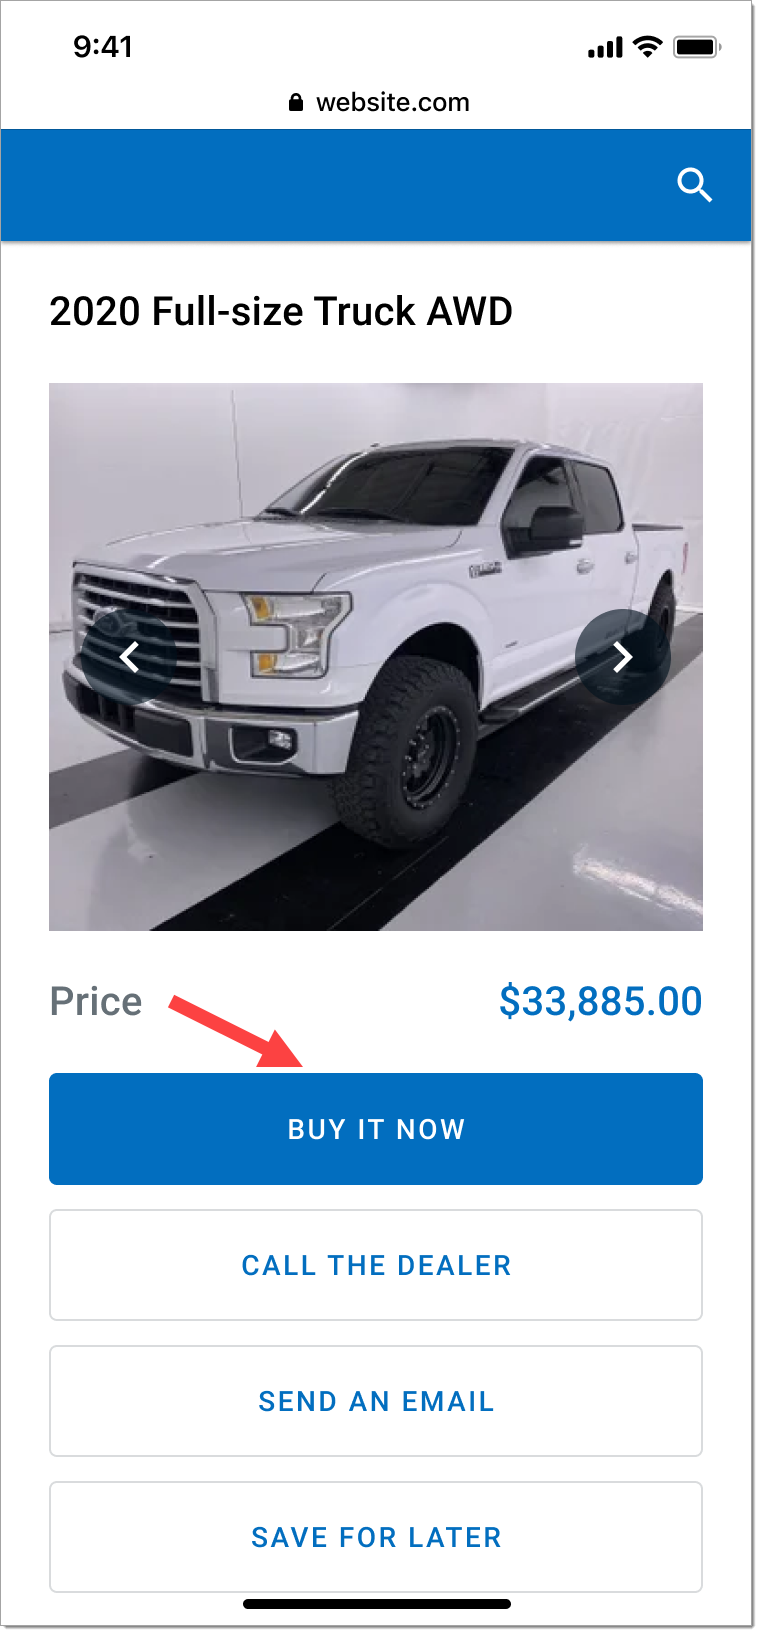
The customer begins by clicking the customized call-to-action button (e.g., Buy It Now) on the vehicle results page on your website. This button can also be installed on the vehicle detail page for each individual car for sale.
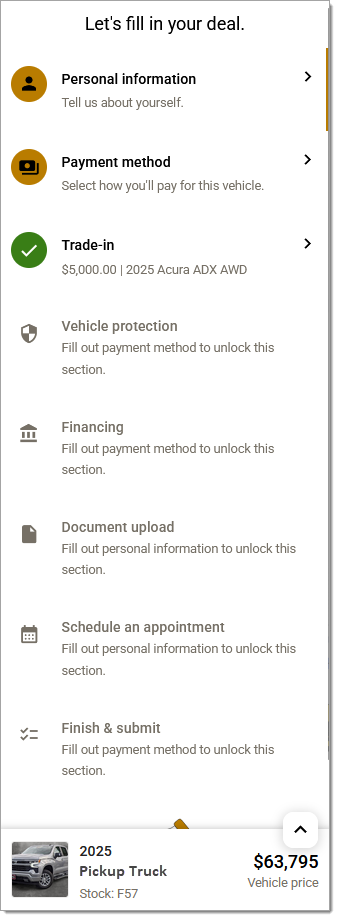
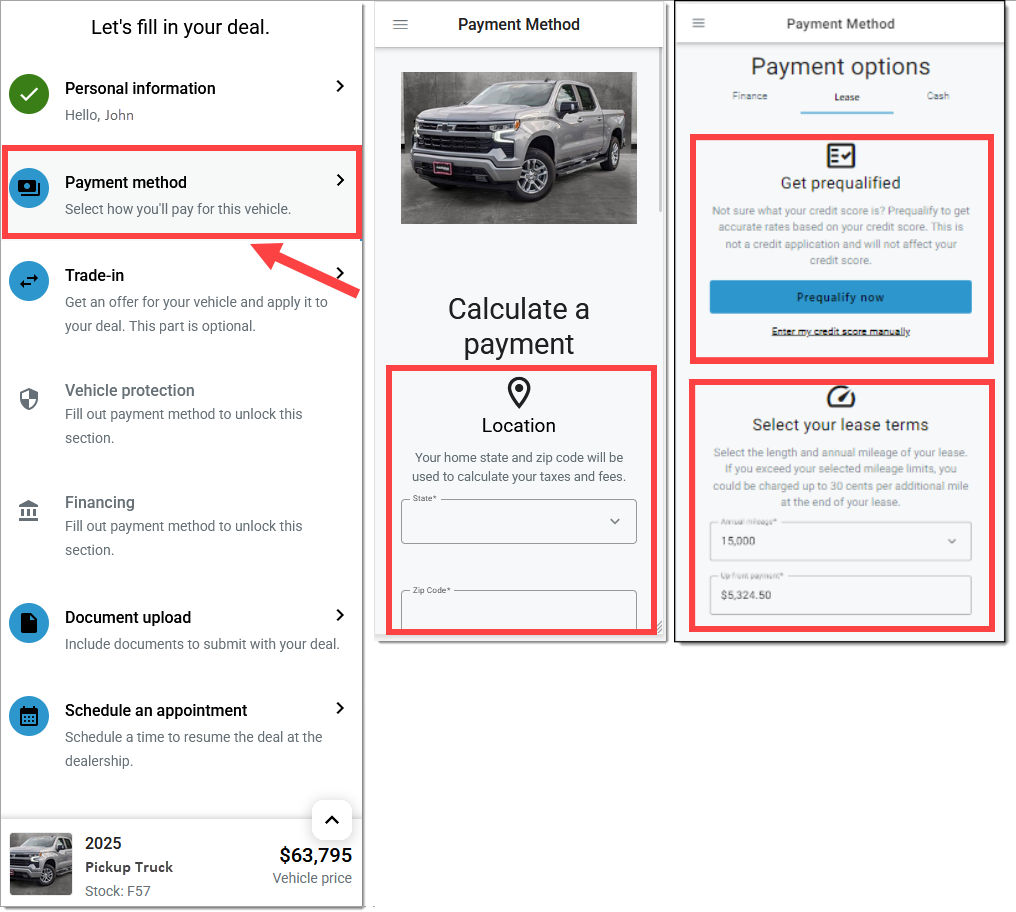
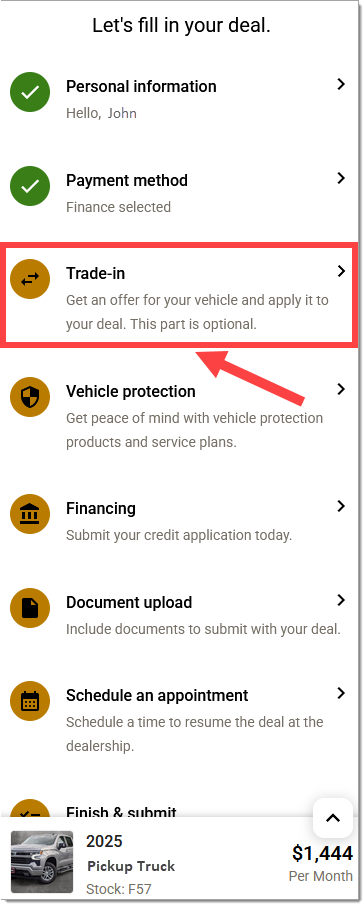
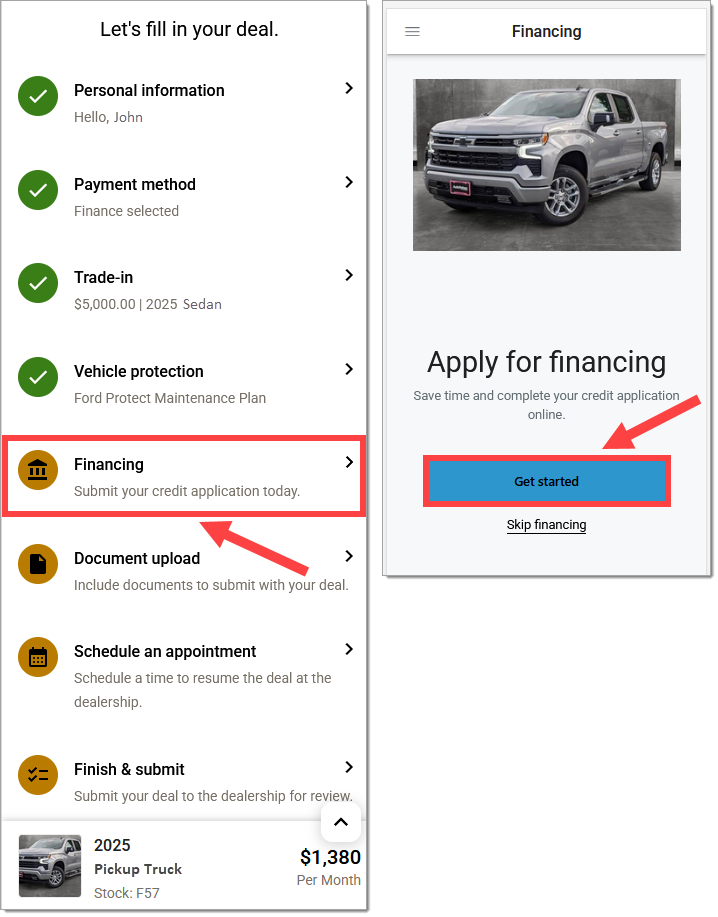
The customer is navigated to the ‘Let’s fill in your deal’ screen to begin the process. This serves as the customer dashboard and remains visible throughout the online purchasing process.
This screen shows all available actions a customer can take, as well as their progress. Clicking any of the areas will load that section for the customer to complete.
As the customer completes different sections, their estimated total and monthly payment will update automatically as they provide more information.
Green checkmarks indicate that a section has been completed.
After entering information in the different sections, the customer can return to those sections and edit information as needed.
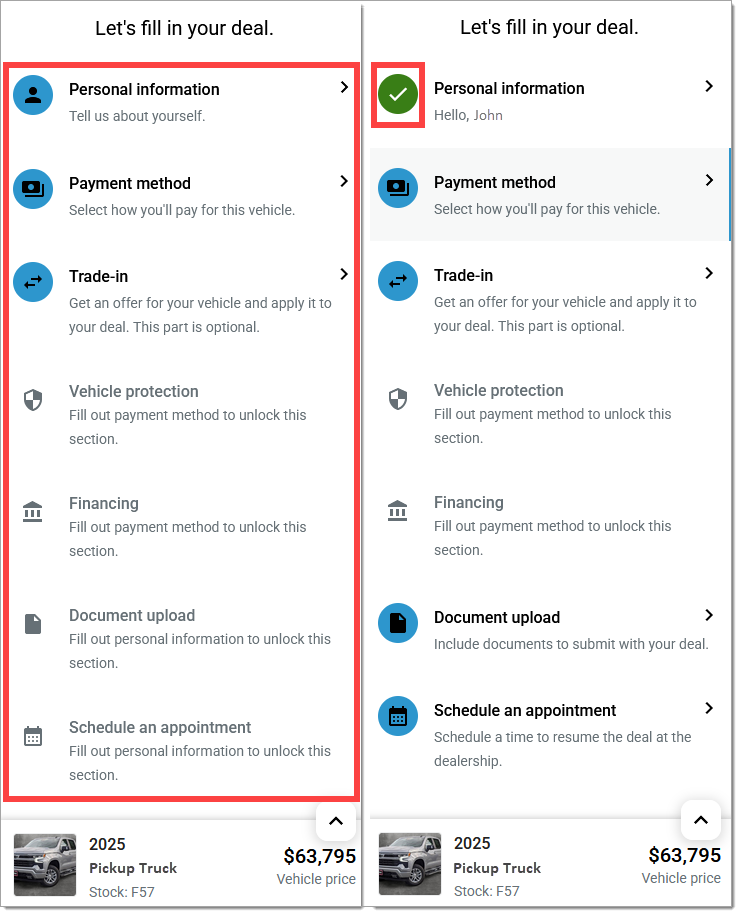
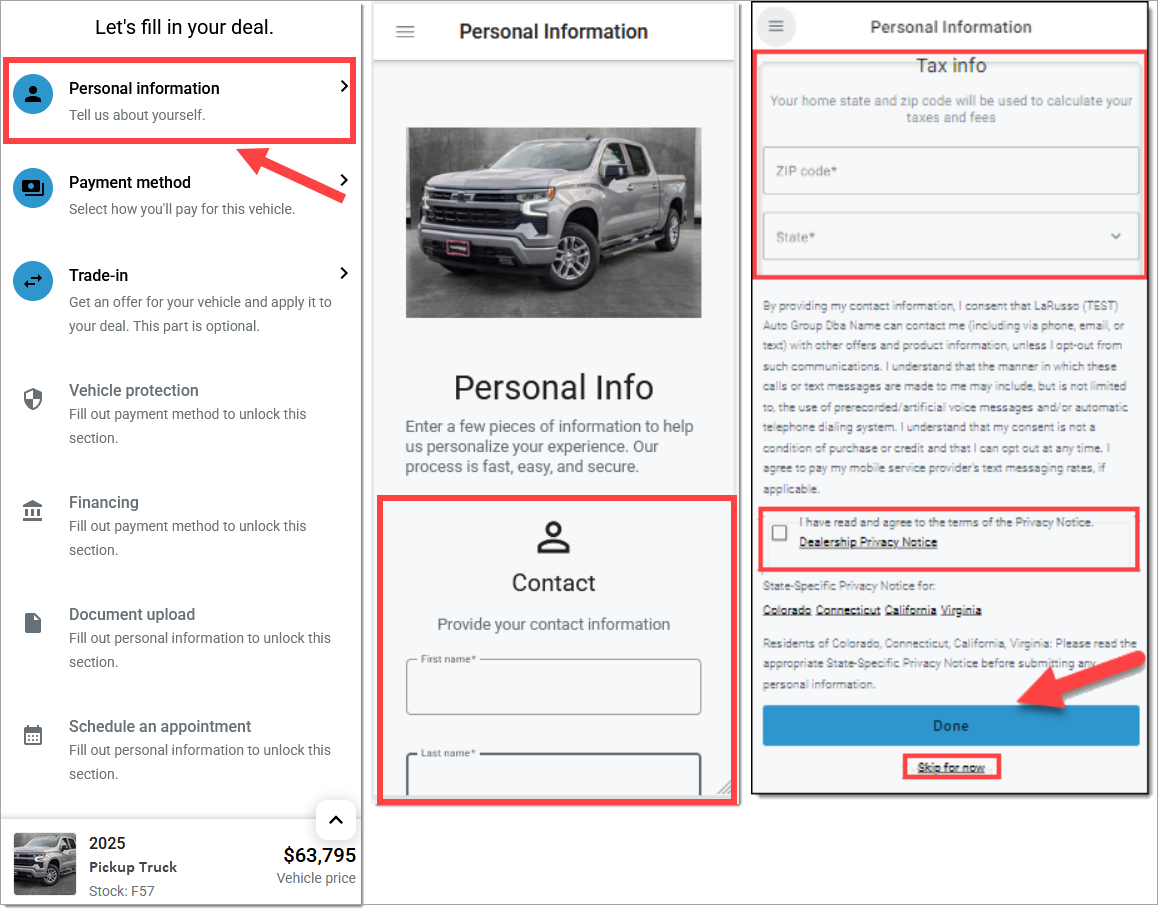
Personal Information
It is recommended that the customer first fill out their ‘Personal Information’ and ‘Location.’ Entering their basic personal details and legal residence will ensure the most accurate taxes and fees.
The ‘Personal Information’ section automatically loads when the customer begins the process. They can return to the dashboard at any point by clicking the three stacked bars in the top left of the screen.
To complete this step, the customer will need to select the checkbox indicating they have read the Dealership Privacy Notice and agree to the terms. Clicking ‘Done’ will advance them to the next section.
Location information will be required to calculate an accurate payment in the ‘Payment Method’ section.
If the customer does not wish to enter their personal information at this time, they can click ‘Skip for now.’ They will still be required to input their ‘ZIP code’ and ‘State.’
Payment Method: Finance
The ‘Finance’ method allows the customer to estimate their monthly payment based on several pieces of information.
‘State Tax Info’
In order to calculate the applicable taxes and fees, the customer will be asked to enter their home zip code and state. If they already entered this on the ‘Personal Information’ section, that information will automatically be populated here.
Tax data is pulled from vendor applications based on the zip code entered by the customer. The dealer will configure this as well as any additional fees that may be needed.
‘Enter Down Payment’
The customer can enter how much they would like to use as a down payment.
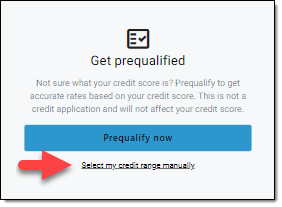
‘Get Prequalified’
The customer can click ‘Prequalify Now’ and input more information to determine if they prequalify for financing. For more information, see the ‘Payment Options With Prequalification’ section of this guide.
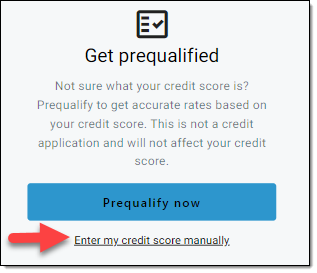
If the customer does not want to go through prequalification, they can click ‘Select my credit range manually.’ See the ‘Payment Options Without Prequalification’ section of this guide.
Important: It is encouraged that customers complete prequalification so that they are shown the most accurate terms, rates, and monthly payment options available from the dealership.

Payment Method: Lease
The ‘Lease’ method allows the customer to estimate their monthly payment based on several pieces of information.
‘State Tax Info’
In order to calculate the applicable taxes and fees, the customer will be asked to enter their home zip code and state. If they already entered this on the ‘Personal Information’ section, that information will automatically be populated here.
Tax data is pulled from vendor applications based on the zip code entered by the customer. The dealer will configure this as well as any additional fees that may be needed.
‘Get Prequalified’
The customer can click ‘Prequalify Now’ and input more information to verify their credit score. For more information, see the ‘Payment Options With Prequalification’ section of this guide.
If the customer does not want to go through prequalification, they can click ‘Enter my credit score manually.’ See the ‘Payment Options Without Prequalification’ section of this guide.
Important: It is encouraged that customers complete prequalification so that they are shown the most accurate terms, rates, and monthly payment options available from the dealership.
‘Select your lease terms’
The customer can select annual mileage and enter their desired up-front payment amount.
Payment Options With Prequalification
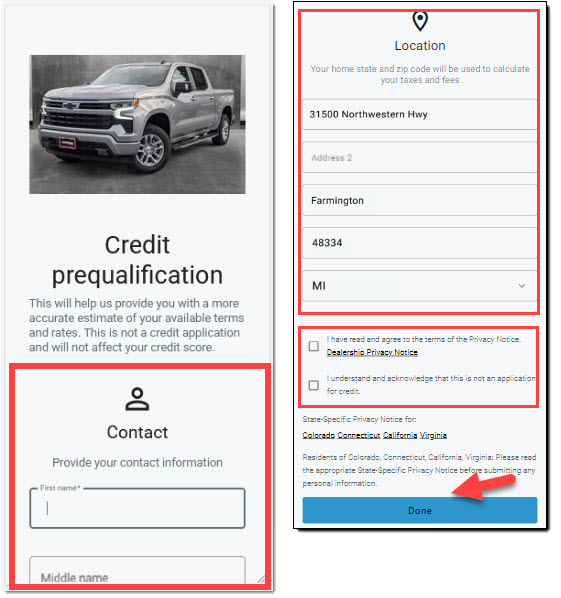
Clicking ‘Prequalify now’ will load the ‘Credit Prequalification’ screen and the fields that need to be completed.
If the customer completed the ‘Personal Information’ section and their ‘Location’ details earlier in the process, that information will be pre-populated into the corresponding fields.
RouteOne leverages an external vendor to complete the customer prequalification at this point in the process. If the customer later goes through the credit application process, the credit score obtained from the prequalification will be used to present rates to the customer based on dealership-configured credit ranges.
The dealer will have access to the prequalification credit score, but the customer will not. The dealer can subscribe to prequalification in ’Premium Services’ within RouteOne. Once the subscription is completed they will then be able to offer prequalification functionality within Fusion.
If the customer did not previously complete the ‘Personal Information’ section and their ‘Location’ details, they can complete that here. They will also need to read the privacy notice and acknowledgment at the bottom of the page, and select the checkboxes acknowledging and agreeing to the terms.
The customer will click ‘Done’ to submit their prequalification request.
If the customer is prequalified, they will receive a confirmation message. If additional information is needed to complete the prequalification, a new section will appear requesting their Social Security Number (SSN). They will need to input their SSN, select the checkbox to accept the disclosure notice, and click ‘Try Again.’
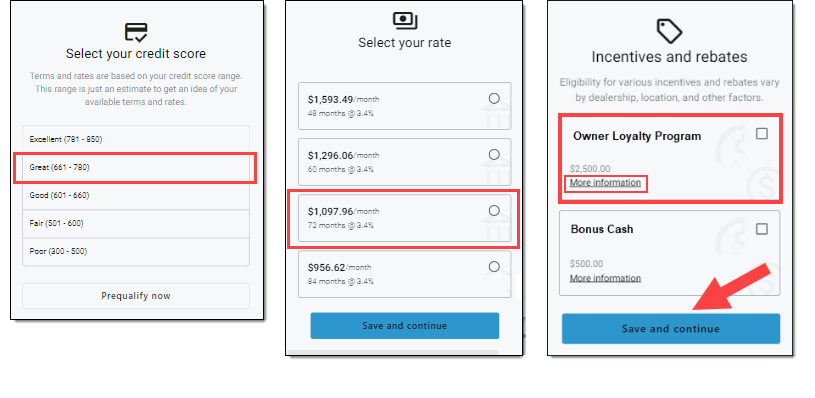
If they click ‘Skip Prequalification’ instead to skip the prequalification process, they will be asked to manually input their estimated credit score range or credit score range.
Once prequalified, the customer will scroll down to the ‘Select your rate’ section. Available payment terms and rates will be displayed here, along with the estimated monthly payment.
The payment terms and rates are configured by the dealership.
The customer will select the desired payment term and then click ‘Done.’
If the selected payment term has any additional incentives or rebates, they will then be shown to the customer. The customer can click the ‘More information’ link for each incentive to view program details and eligibility requirements. The customer may then select all incentives that they believe they qualify for and click ‘Save and Continue.’
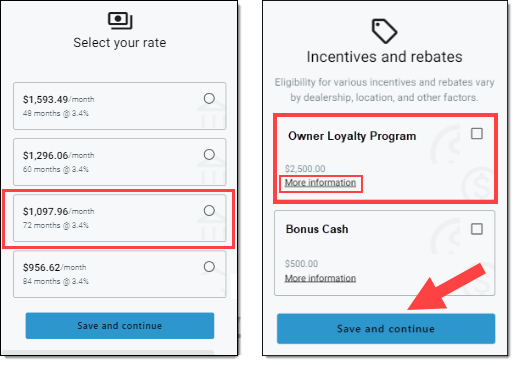
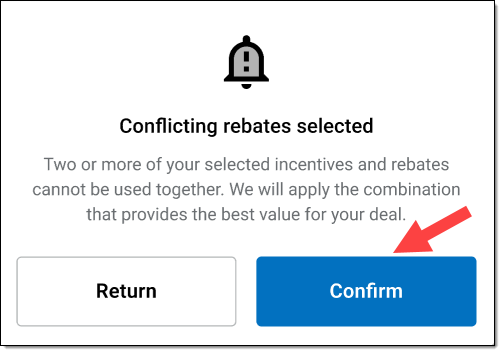
A validation will be performed to determine if the selected rebates or incentives are compatible with each other. If any selected incentives conflict with each other, an alert message will be displayed to the customer. The maximum possible dollar amount will be applied to the deal.

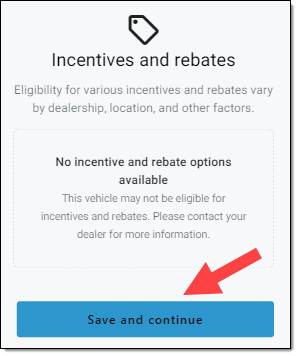
If the selected payment term does not have any available incentives or rebates, a message will be displayed to the consumer that ‘no incentive and rebate options are available,’ and the customer will click ‘Save and Continue’ to proceed.

Payment Options Without Prequalification
Important: It is encouraged that customers complete prequalification so that they are shown the most accurate terms, rates, and monthly payment options.
Finance
If a customer wishes to proceed without completing the prequalification process, clicking ‘Select my credit range manually’ will direct them to manually select their self-identified credit score range or credit score range.
The customer will select their estimated credit score or credit score range, which will then cause their available terms, rates, and monthly payment options to display.
The customer will select the desired payment term.
If the selected payment term has any additional incentives or rebates, they will then be shown to the customer. The customer can click the ‘More information’ link for each incentive to view program details and eligibility requirements. The customer will then select all rebates or incentives that they qualify for and click ‘Save and Continue.’
A validation will be performed to determine if the selected rebates or incentives are compatible with each other. If any selected rebates or incentives conflict with each other, an alert message will be displayed to the customer. The maximum possible dollar amount will be applied to the deal.

If the selected payment term does not have any available incentives or rebates, a message will be displayed to the consumer that ‘no incentive and rebate options are available,’ and the customer will click ‘Save and Continue’ to proceed.

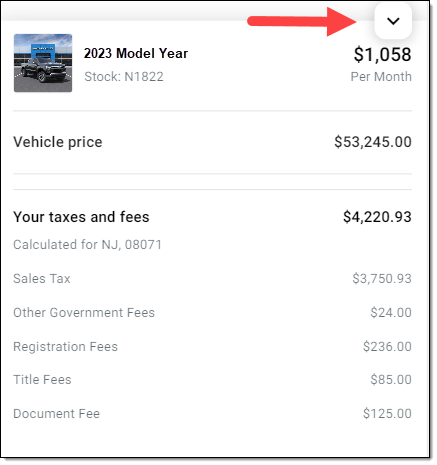
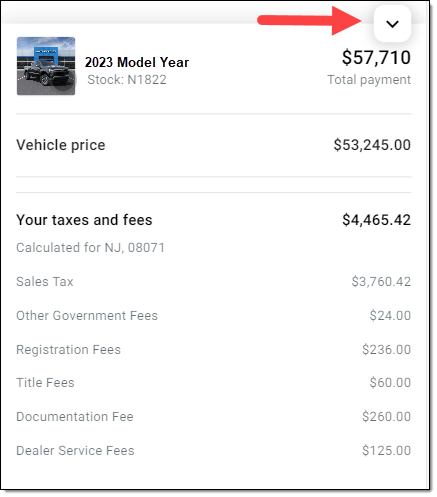
The customer will see their overall estimated monthly payment. They can expand or collapse the detailed list of their estimated costs by clicking on the collapsible arrow.
Recall that taxes and fees are calculated based on the home zip code and state that the customer entered earlier.

Lease
If a customer wishes to proceed without completing the prequalification process, clicking ‘Enter my credit score manually’ will direct them to manually enter their self-identified credit score or credit score range.
The customer will enter their credit score or credit score range, which will then cause their available terms and monthly payment options to display.
The customer will select the desired payment term.
If the selected payment term has any additional incentives or rebates, they will then be shown to the customer. The customer can click the ‘More information’ link for each rebate or incentive to view program details and eligibility requirements. The customer may then select all incentives that they believe they qualify for and click ‘Save and Continue.’

A validation will be performed to determine if the selected rebates or incentives are compatible with each other. If any selected rebates or incentives conflict with each other, an alert message will be displayed to the customer. The maximum possible dollar amount will be applied to the deal.
If the selected payment term does not have any available incentives or rebates, a message will be displayed to the consumer that ‘no incentive and rebate options are available,’ and the customer will click ‘Save and Continue’ to proceed.
The customer will see their overall estimated monthly payment. They can expand or collapse the detailed list of their estimated costs by clicking on the collapsible arrow.
Recall that taxes and fees are calculated based on the home zip code and state that the customer entered earlier.
Payment Method: Cash/Other Finance Source
The ‘Cash’ method is used if the customer wants to pay in cash or use financing from another source outside of the dealership.

The customer will see their estimated total cash price. They can expand or collapse the detailed list of their estimated costs by clicking on the collapsible arrow.
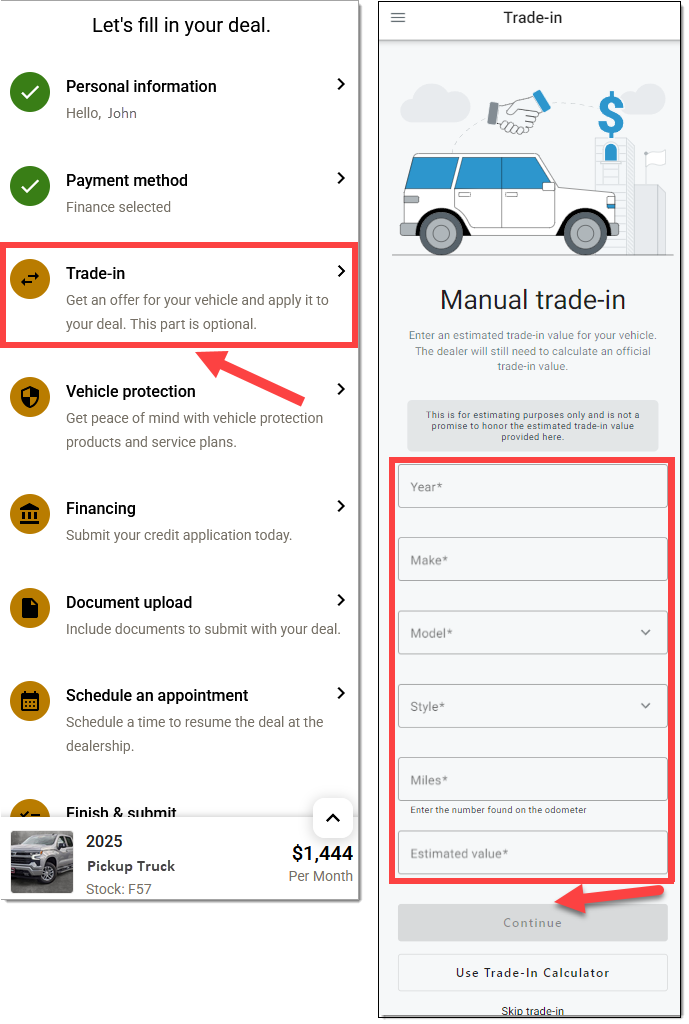
Trade-in: Manual Entry Option
Trade-in is an optional section for the customer to complete. Manual entry allows the customer to input information about their trade-in vehicle.
If the customer did not previously enter their ‘Personal Information’ and ‘Location’ details in the ‘Personal Information’ section, they will be prompted to enter that information when they navigate to the ‘Trade-In’ section.
Here they will enter information about their trade-in vehicle (e.g., Year, Make, Model, Style, Total distance driven, Estimated value).
Clicking ‘Continue’ will navigate them to the ‘Trade-in Payoff’ screen. See the ‘Trade-in Payoff’ section of this guide for the next steps in the process.
Trade-In: Vendor Integration Option
Trade-in is an optional section for the customer to complete.
RouteOne has integrations with multiple vendors to more accurately estimate the trade-in value.
Depending on the vendor you are using for trade-in, your dealership may be required to have a separate agreement in place with the vendor.
Trade-in Example
The customer will be navigated to the ‘Trade-in estimate’ screen and will begin entering their trade-in vehicle information.
They will have 3 options to choose from to provide trade-in information.
Search: Allows customer to enter mileage and Year, Make, Model, and Trim
VIN: Allows customer to enter mileage and VIN
Plate: Allows customer to enter mileage, license plate number, and state
Once the customer has entered their trade-in information, they will click ‘Continue’ to proceed to the next screen.

On the next screen, the customer will be prompted to answer questions related to their trade-in vehicle, such as color, condition of interior and exterior, and other items to accurately estimate trade-in value. Once the customer has completed all questions, they will click ‘Continue’ to proceed to the next screen.
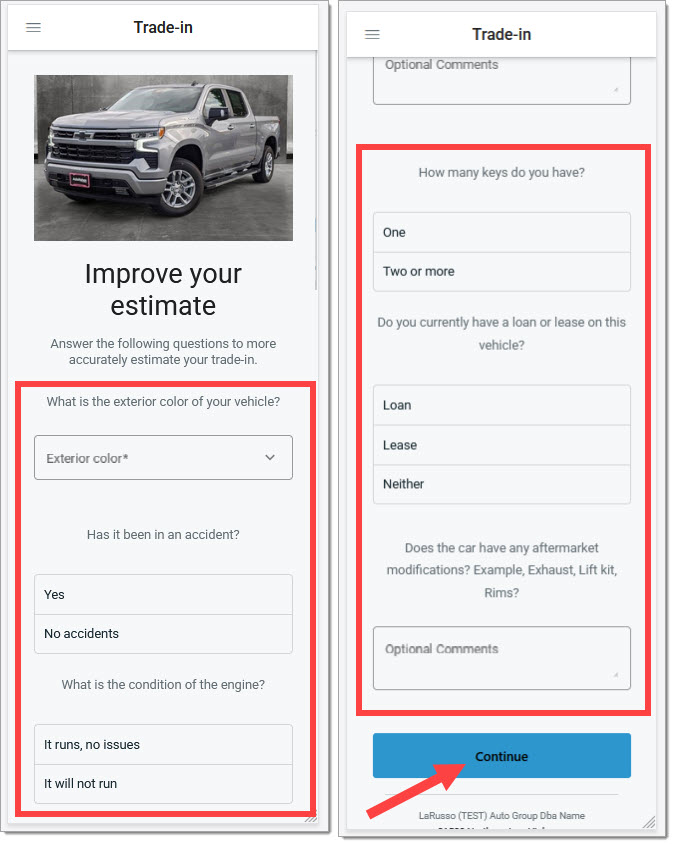
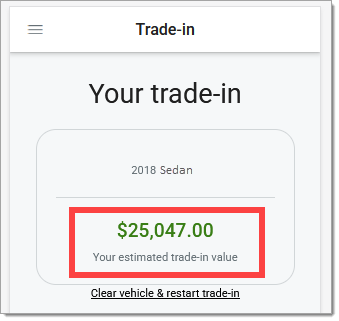
On the next screen, the customer will be provided with an estimated trade-in value amount.
Trade-in Payoff
Payoff: Manual Entry
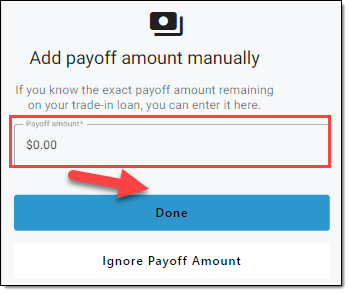
The customer can manually enter their trade-in payoff information, if known, by typing in the payoff amount, then clicking ‘Done.’
This will manually apply the value of the remaining payoff loan amount to their estimated trade-in total.
Payoff: Prequalification
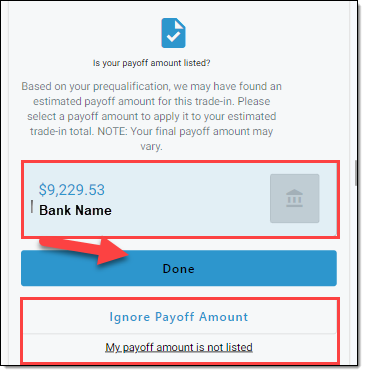
If the customer went through the prequalification process, after adding their estimated trade-in amount, they will be routed to a screen displaying their trade-in value and potentially matching loan details (if any).
They can select the correct existing loan(s), if any, and click ‘Done’ to apply the appropriate loan(s) to their estimated trade-in total.
- If the correct loan is not listed, the customer can select ‘My payoff amount is not listed’ and manually enter the loan payoff information.
- The customer can also choose to ‘Ignore payoff amount’ if they do not wish to add the trade-in to their deal. If they do so, the trade-in will be calculated with a payoff amount of $0.
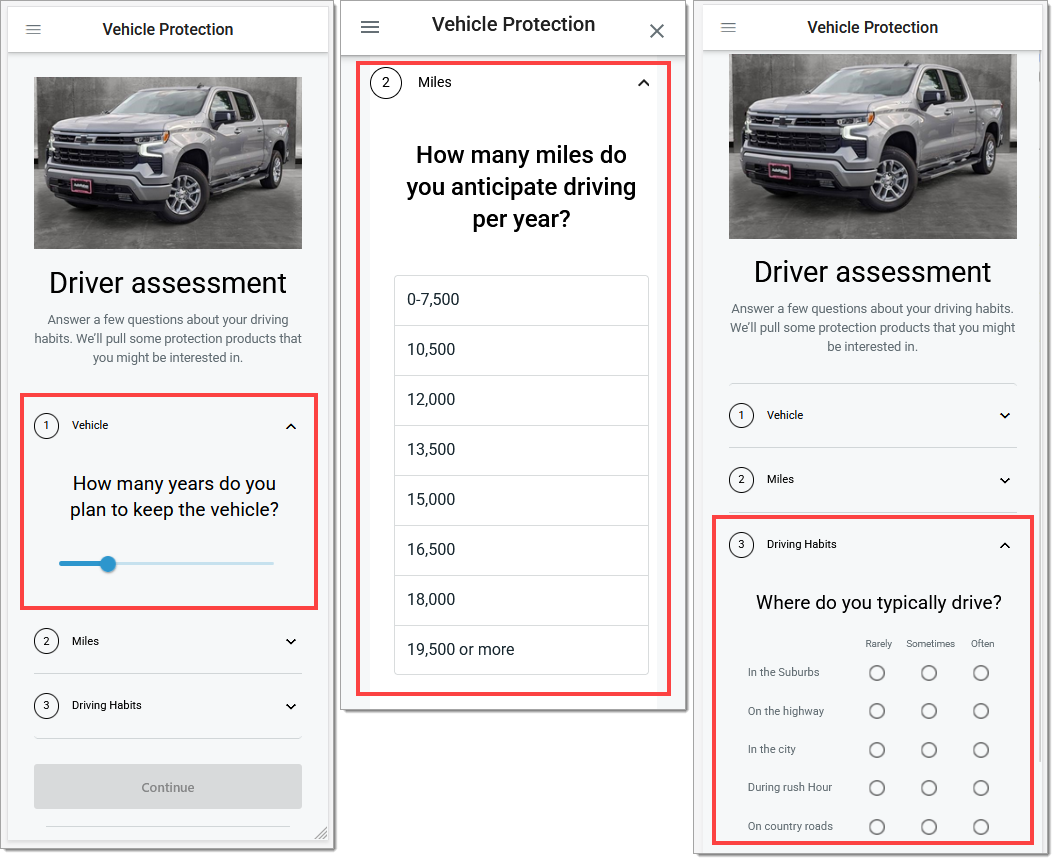
Vehicle Protection
Vehicle Protection is an optional section for the customer to complete. RouteOne has integrated Fusion with RouteOne Menu to provide an easy way to explore vehicle protection options and understand how they may impact a customer’s monthly payment.
In the ‘Vehicle Protection’ section, the customer will be prompted to complete a brief questionnaire to receive personalized vehicle protection recommendations.
They will click ‘Get Started’ to proceed.

Based on the preferences and configurations set by your dealership, the questionnaire may include sections related to the customer’s driving habits, vehicle mileage, vehicle maintenance, vehicle storage, and vehicle usage.
In order to display available protection products, the customer is minimally required to answer the questions about the number of years they expect to keep the vehicle and average mileage per year.
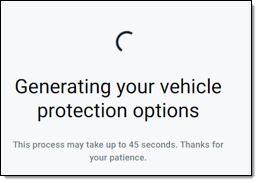
After completing the questions and clicking ‘Continue,’ the customer will see a loading screen while the system generates their vehicle protection coverage recommendations.
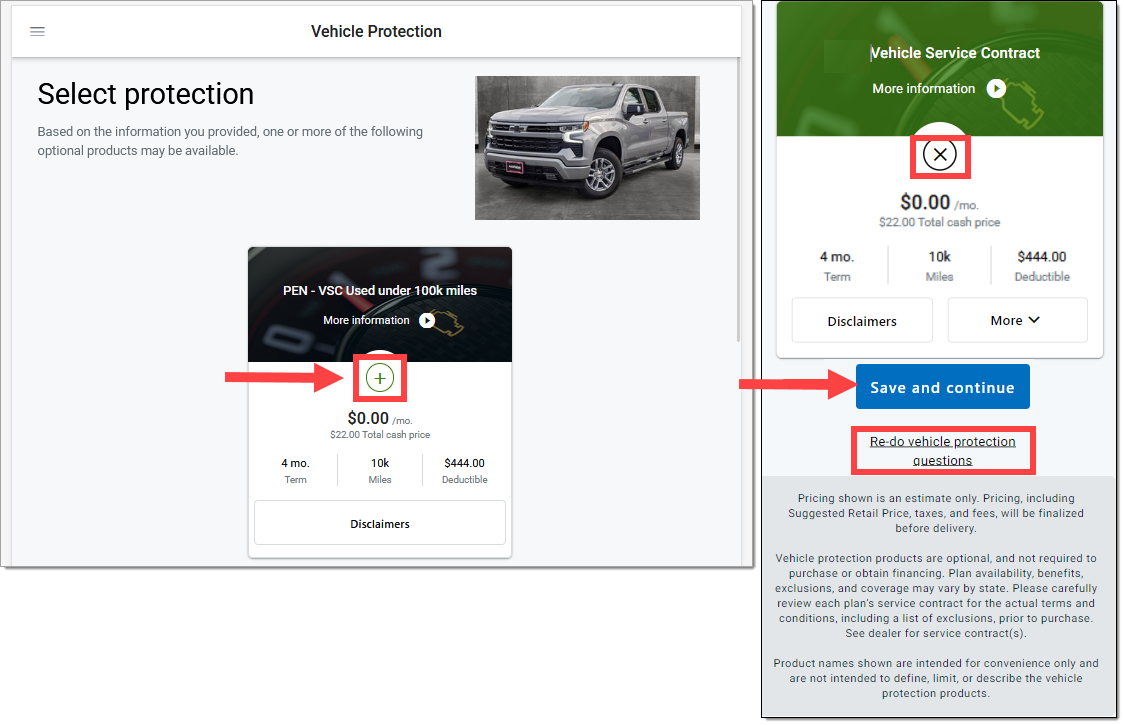
The customer is presented with a list of available vehicle protection products, which includes the product name (e.g., extended warranty), cost per month, total cost, additional details, and a product video with more information to help them reach an informed decision.
The protection products are configurable by your dealership. Product pricing can be configured to include dealership markups.
Products are added to the deal by selecting the ‘+’ button on each specific product.
The customer can click the ‘Play’ button next to ‘More Information’ to play a product video and learn more about the vehicle protection option selected.
The collapsible arrow on ‘More’ will expand to provide highlights about the product. To collapse the details, the customer can click ‘Less.’ They can also click to see any related ‘Disclaimers’ for each product.
A product can always be removed by clicking the ‘X’ button.
To add the selected products to the deal, the customer will click ‘Save and continue.’
To skip this section, they can click ‘Save and continue’ without selecting any protection products.
They also have the option of retaking the questionnaire by clicking ‘Re-do vehicle protection questions.’
Apply for Financing
RouteOne has integrated Fusion with the RouteOne Online Credit Application to allow customers to submit a credit application before submitting their deal to the dealership.
Within ‘Apply for financing,’ the customer can click ‘Get Started’ to begin the online credit application process.
The customer will input their information into the RouteOne Online Credit Application.
Once complete, they will be able to review their information, read and consent to the necessary disclosures and authorizations, and accept the dealership's privacy notice.

Once the credit application has been submitted, the customer will land on a confirmation screen.
When the ‘Fetching rates’ message is shown under ‘Select your rate,’ the application is being processed.
A list of potential financial institutions to whom the credit application may be submitted is also displayed under ‘Which financial institutions?’
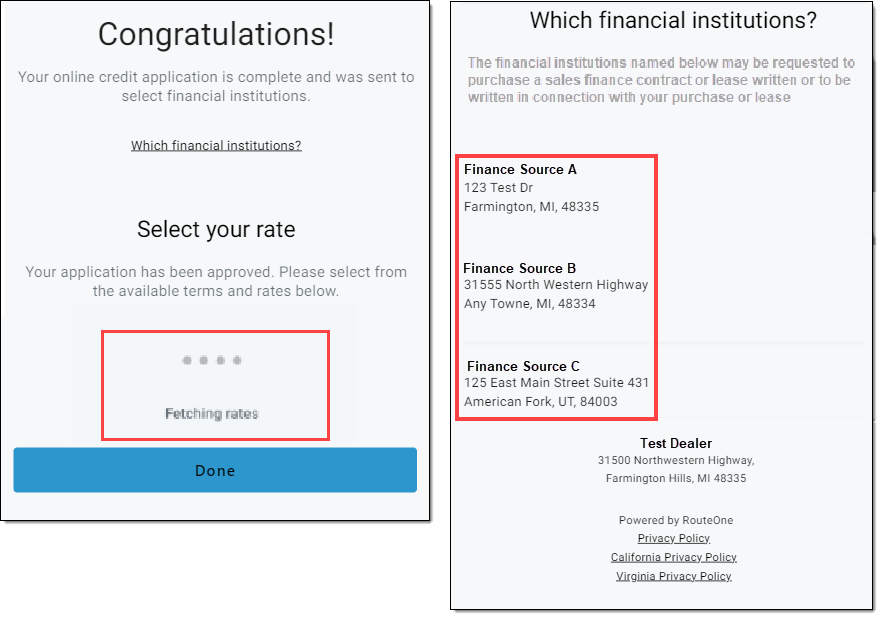
When decisions are available, they will be presented to the customer.
The customer will be able to view the different terms, rates, and monthly payment options. They can select their desired option and click ‘Done.’
If the customer is not approved for any terms and rates, messaging will display indicating that the dealership will follow up with them.
Document Upload
The Document Upload section is optional for the customer. This section allows the customer to upload relevant documents that are often required by the dealership to complete the transaction. Uploading these documents allows the customer to save time online rather than submitting the documents in-person at the dealership.
This section becomes available to complete as soon as the customer fills in their Personal Information. The customer does not need to fill out a payment method or any other sections to advance to this section.
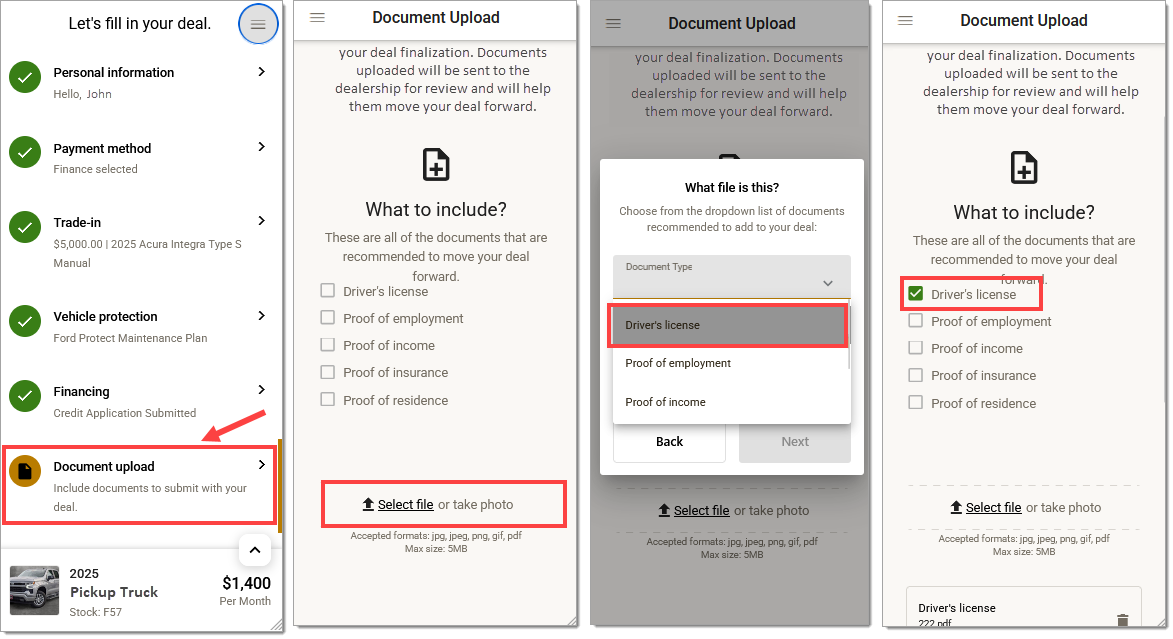
When ready, the customer can click 'Select file.' This will prompt a file uploader module to appear. The customer will then use the ‘Document Type’ dropdown menu to indicate what type of document was uploaded (e.g., driver’s license, proof of employment, etc.). A green check mark will appear next to the document once it is uploaded.
The dealership can then view these documents in their RouteOne portal in the corresponding Deal Jacket. For more information, click here to view the Fusion - Dealership Experience user guide.
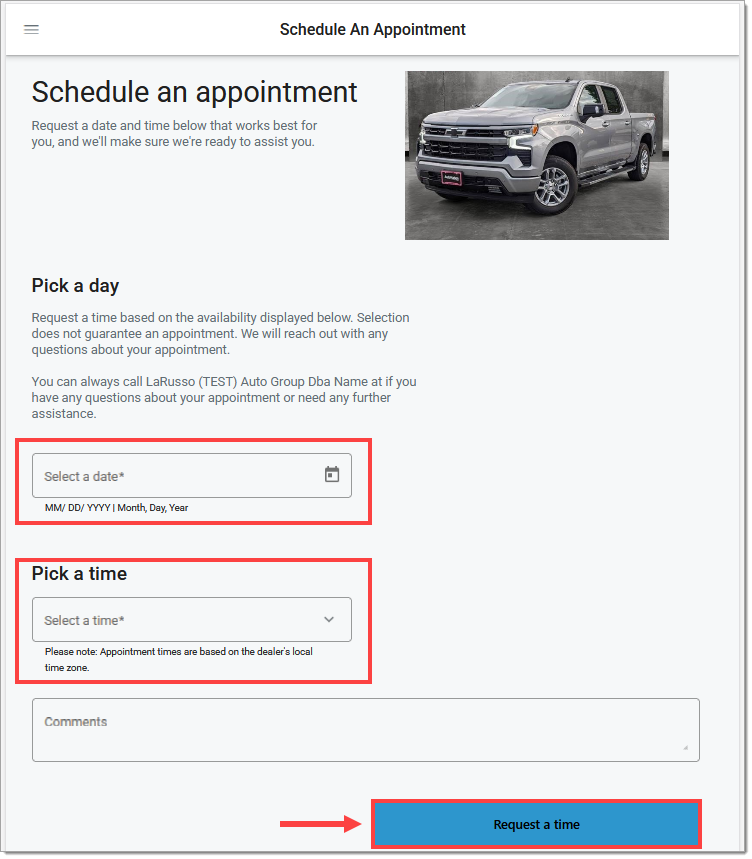
Schedule an Appointment
This section allows the customer to request an appointment with the dealership to view the vehicle in-person. In the Fusion workflow, the customer can request an appointment, receive an appointment confirmation email, and cancel and/or modify their appointment after it is booked.
The customer and the dealer will receive email notifications when the appointment is booked and/or cancelled. The dealer will also receive a calendar invitation ensuring they will not miss the appointment request.
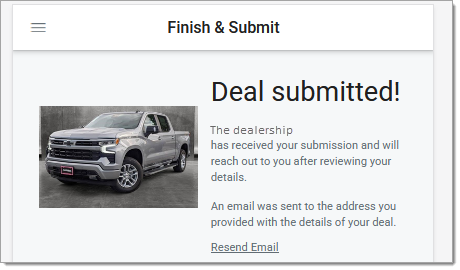
Finish and Submit
Clicking ‘Finish & Submit’ will show a summary of the deal for the customer to review.
If the customer skipped providing their personal information, they will be prompted to complete that section at this time.
When ready, they can click ‘Submit Deal.’
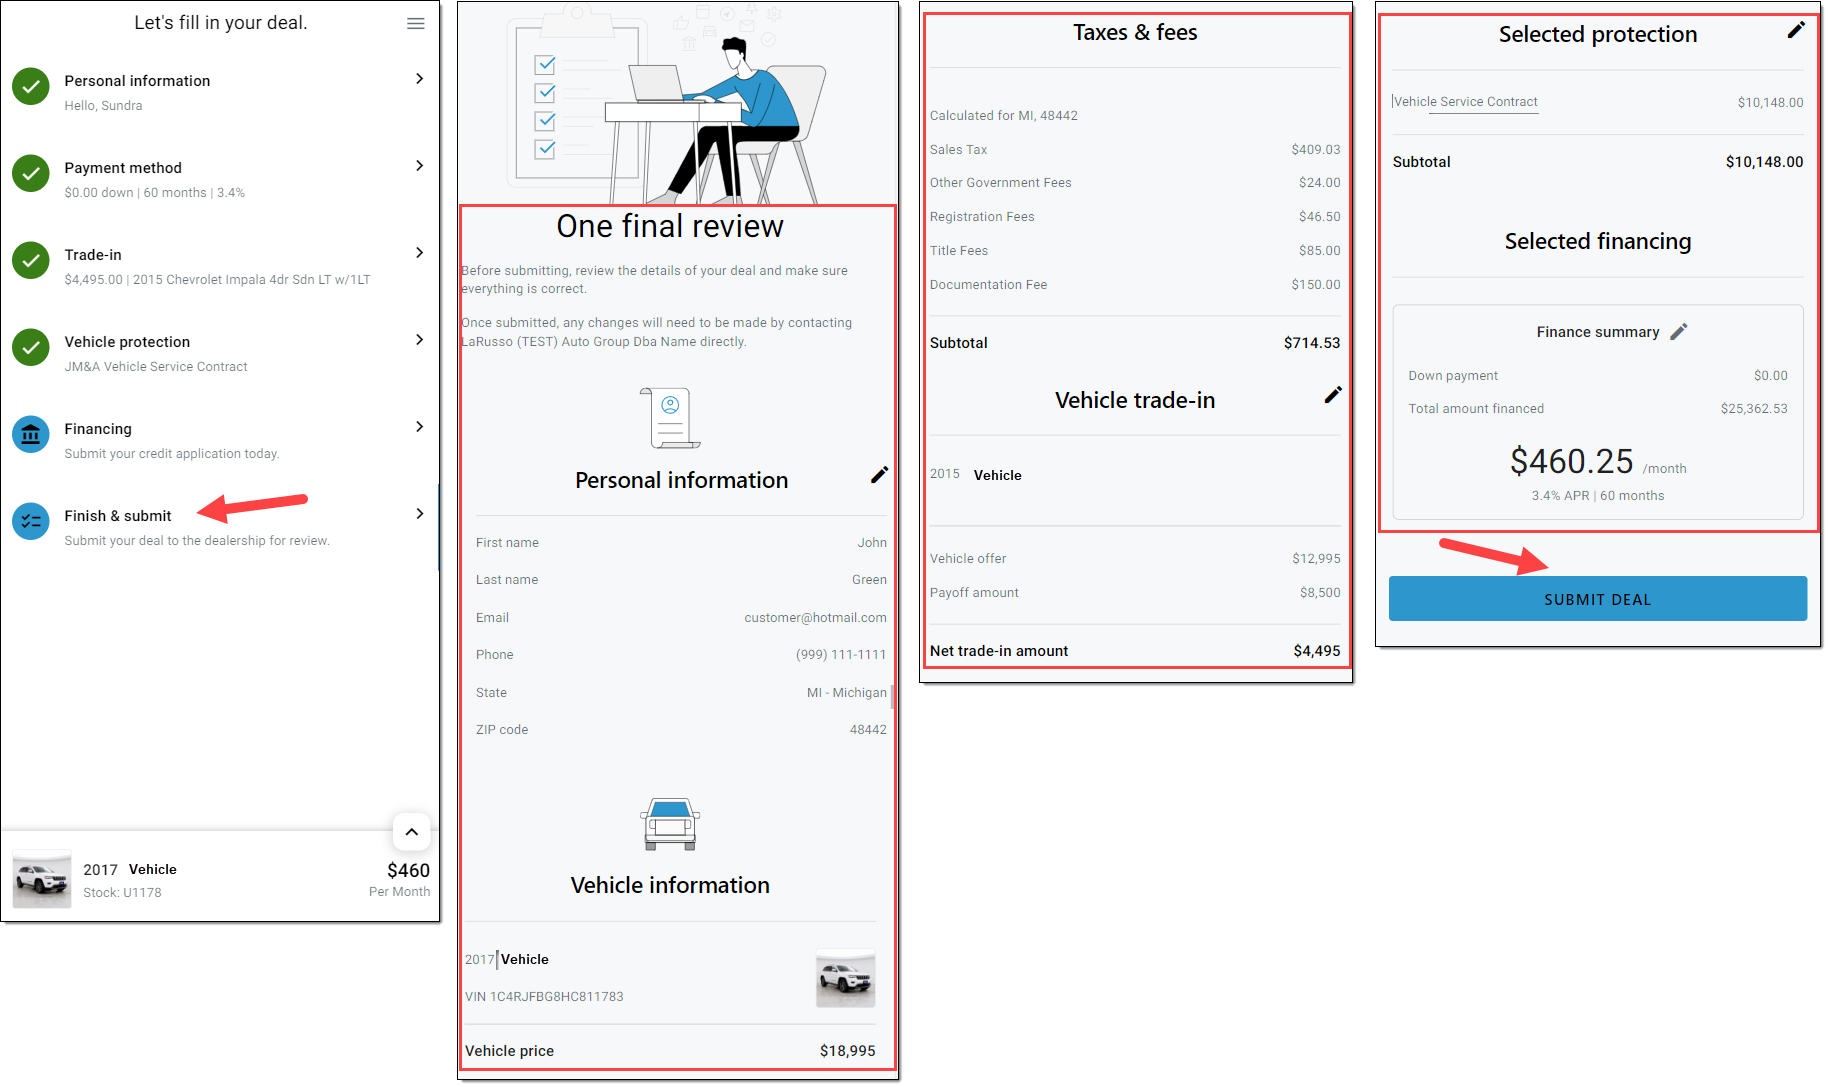
The ‘Deal Submitted’ screen will load. The customer will receive a confirmation email summarizing the details of their deal and letting them know that someone from the dealership will reach out to them to finalize their purchase or lease.
The dealership will also receive a confirmation email. See the ‘RouteOne Fusion – Dealership Experience’ guide for more information about viewing and following up with the generated Lead.
ROUTEONE SUPPORT
Hours (EST)
Monday - Friday: 6:00am – Midnight
Saturday: 9am – 9pm
Can’t find what you need?
Try our search
